
cPanel is a powerful web hosting control panel that is used by millions of websites around the world. It is a user-friendly platform that provides users with a wide range of tools and features to manage their web hosting services. With cPanel, users can easily set up and manage their websites, email accounts, and databases.
Creating an email account in cPanel is essential for businesses and individuals who want to establish a professional online presence. An email address associated with a domain name (i.e., john@mywebsite.com) looks more professional than a generic one (i.e., john@gmail.com). Additionally, having an email account in cPanel allows users to access their email accounts through a webmail interface or an email client such as Microsoft Outlook or Apple Mail.
How to create and manage webmail in cPanel server?
Mail service is one of the most useful services that users can use upon purchase of a web hosting service. After activating web hosting services, users can create and manage mail accounts in the hosting management system. In this tutorial, we use cPanel as a hosting management panel to create and manage webmail services.
To create an email account in cPanel follow these instructions:
1. log in to cPanel and in the “Email” section click on “Email Accounts”.
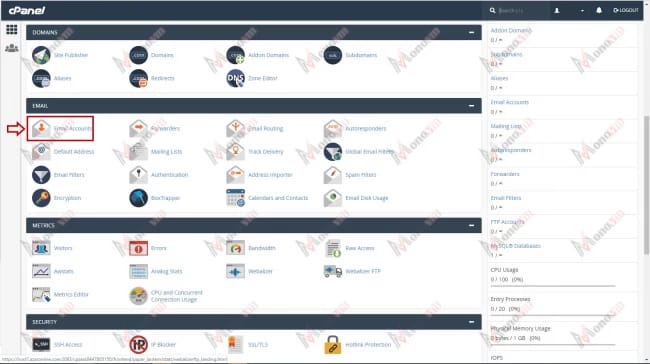
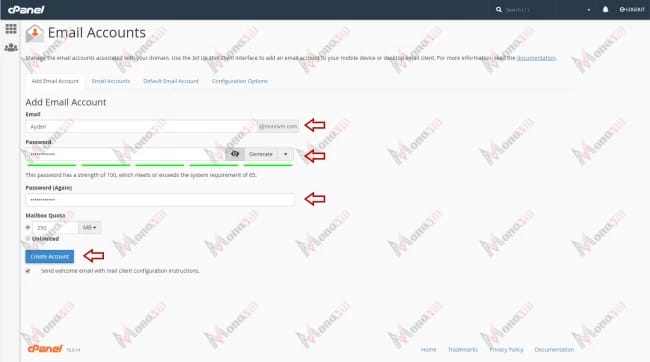
2. Enter your account details to create the email account. The information required to create one:
- Email account name
- Password for email
- Storage capacity for the email account (Quota)
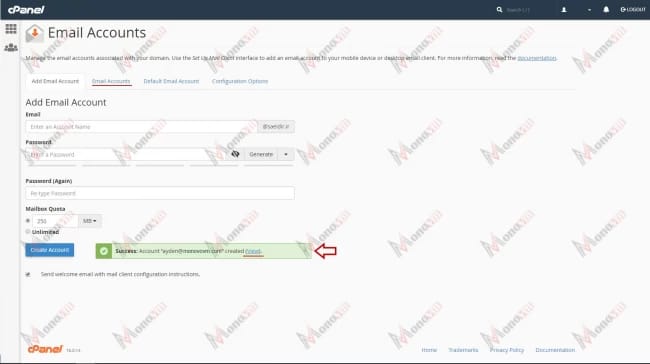
3. After clicking on the “Create Account” button, a related mail account will be created and you will see a “Success” message. Click on the “View” link in this message to manage the created account. You can also access the email accounts' management page, by clicking on the “Email Accounts” tab.
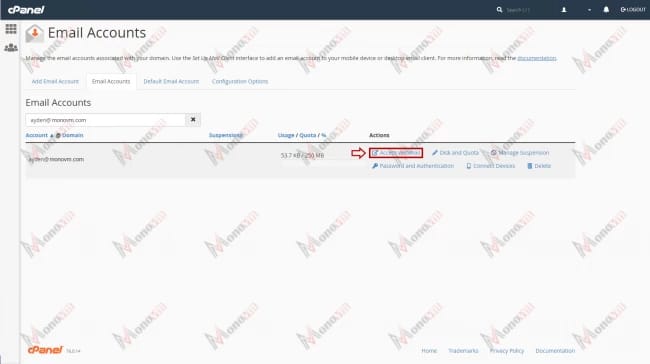
4. Click on “Access Webmail” under "Actions" to access the created mail account.
5. In the appeared page you can select from three different platforms to access your emails.
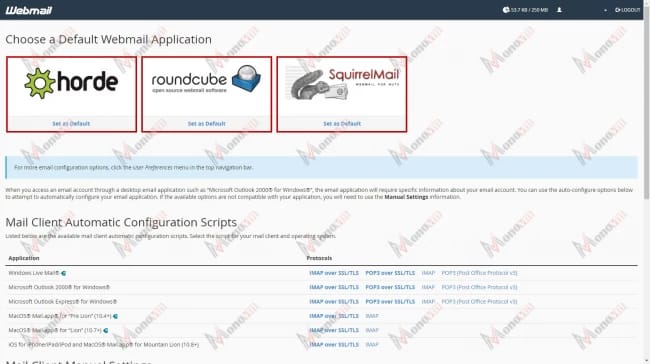
6. For this tutorial we will use “Squirrel Mail”.
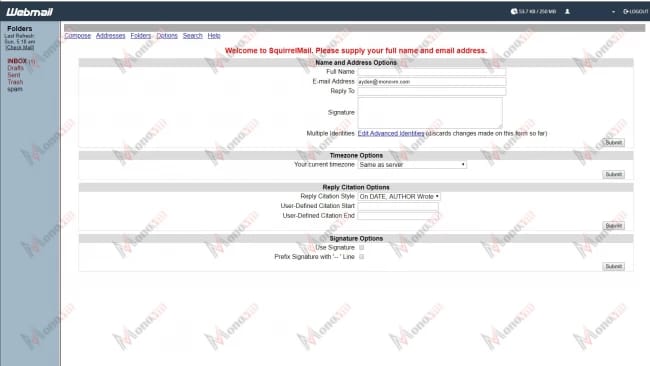
Please note that, upon the first login into the email account, some account information will be requested.
Upon completion of the aforementioned steps, you must see the following page. If that's the case, then the email account is now active.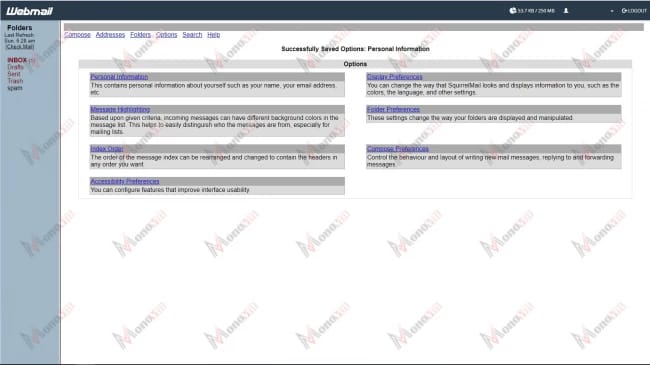
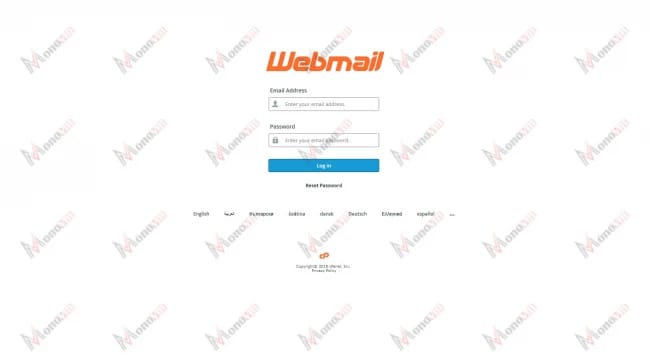
Please note that you can also access your webmail accounts via the following methods.
Open a browser and type your domain name in the URL bar with one of these formats.
- Webmail.yourdomainname (for example: “webmail.monovm.com”)
- Yourdomainname:2095 (for example: “monovm.com:2095”)
With both of these methods, the following page should appear and allow you to log in by entering your email account details.
Managing Email Accounts in cPanel
Managing email accounts in cPanel can be done through the account management page. Follow these steps to access and manage your email accounts:
- Log in to cPanel using your username and password.
- Navigate to the "Email Accounts" section, which is located under the "Email" category on the cPanel dashboard.
- Click the "Email Accounts" icon to access the account management page.
- On the email account management page, you will see a list of all the email accounts that you have created. To manage an email account, click the "Manage" button next to the email account you want to modify.
Once on the email account management page, you can perform various tasks, such as changing passwords and modifying email account settings. Here's how to do it:
- Changing Passwords: To change the password for an email account, click on the "Password & Security" tab on the email account management page. Enter the new password you want for the email account and confirm it by entering it again. Then, click on the "Update Email Settings" button to save the new password.
- Modifying Email Account Settings: To modify the settings for an email account, click on the "Email Account Settings" tab on the email account management page. Here, you can modify the following settings:
- Display Name: The name that will appear as the sender of emails sent from this account.
- Mailbox Quota: The maximum amount of storage space the email account can use.
- Mail Routing Settings: Choose how incoming email messages are handled.
- Auto Responders: Configure automated responses to incoming emails.
After you have made the desired changes to the email account settings, click on the "Update Email Settings" button to save the changes.
need ssd vps to improve your performance? click here.
It is important to note that some web hosting providers may have different email account management interfaces, and the steps for managing email accounts in cPanel may vary slightly. However, most cPanel interfaces have similar features and settings for managing email accounts. With these steps, you can manage your email accounts effectively using cPanel.
Troubleshooting
While creating an email account in cPanel is generally a straightforward process, users may encounter some common issues. Here are some troubleshooting tips to help you address these issues:
- Login Issues: If you are having trouble logging in to cPanel, double-check that you are using the correct username and password. Also, ensure that your web hosting account is active and your subscription has not expired. If you continue to experience login issues, contact your web hosting provider for assistance.
- Email Delivery Issues: If you are having trouble sending or receiving emails, check that you have entered the correct email address and password in your email client settings. Additionally, ensure that your web hosting provider has not blocked your email account due to spam or other security concerns. If you are still experiencing email delivery issues, contact your web hosting provider for further assistance.
- Quota Exceeded Errors: If you receive a "quota exceeded" error when attempting to send or receive emails, it may indicate that you have exceeded the storage limit for your email account. To resolve this issue, you can delete unnecessary emails or increase the mailbox quota limit in cPanel.
- Email Authentication Errors: If you receive an email authentication error, it may indicate that your email account is not properly configured for email authentication. To resolve this issue, ensure your email client settings are correctly configured to use the correct authentication method, such as SMTP authentication or SSL/TLS encryption.
- DNS Configuration Errors: If you experience email delivery or authentication issues, it may be due to incorrect DNS configuration. To resolve this issue, ensure your DNS records are correctly configured to point to your web hosting provider's mail servers. Contact your web hosting provider for assistance with DNS configuration.
In general, many issues with creating and managing email accounts in cPanel can be resolved by double-checking your settings, verifying your web hosting account status, and contacting your web hosting provider for necessary assistance. With these troubleshooting tips, you can resolve many common issues and enjoy a smooth experience with your email accounts in cPanel.
Summing Up
cPanel is an essential tool for web hosting and email management, and creating email accounts within cPanel is a straightforward process that can greatly benefit businesses and individuals. Following this article's step-by-step guide, you can easily create and manage email accounts in cPanel. Additionally, understanding how to troubleshoot common issues with email accounts in cPanel can help you ensure the smooth operation of your email communication. Overall, mastering creating and managing email accounts in cPanel can greatly improve your online presence and streamline your email management.
- Creating an email account in cPanel is straightforward to follow, making it accessible to even those with limited technical skills.
- With cPanel, users have the ability to customize their email accounts by selecting their usernames and passwords and setting up personalized signatures and filters.
- cPanel offers robust security features that help protect user accounts from spam and other malicious activity.
- Users can access their cPanel email accounts from their mobile devices, allowing greater flexibility and convenience.
- cPanel integrates seamlessly with other popular email services such as Outlook and Gmail, making it easy to manage your email accounts from a single platform.