You can change your MAC address on almost any device — Windows 11, Windows 10, Linux, macOS, and Android — usually in a few minutes. On Windows it's done through Device Manager or the registry. On Linux you've got ip link or macchanger. macOS uses Terminal. Android needs root for a true custom MAC, though it randomizes by default. One catch worth flagging up front: most changes are temporary and reset after reboot, and a handful of adapters simply won't let you spoof at all because the driver blocks it.
Whether you're aiming to enhance privacy, bypass network restrictions, or test software, understanding how to change MAC address correctly across platforms like Windows, Linux, macOS, and Android is essential. In this comprehensive guide, you'll learn why you might want to spoof your MAC address, detailed step-by-step instructions for each platform, plus troubleshooting tips, tools, and important legal considerations.
What Is a MAC Address?
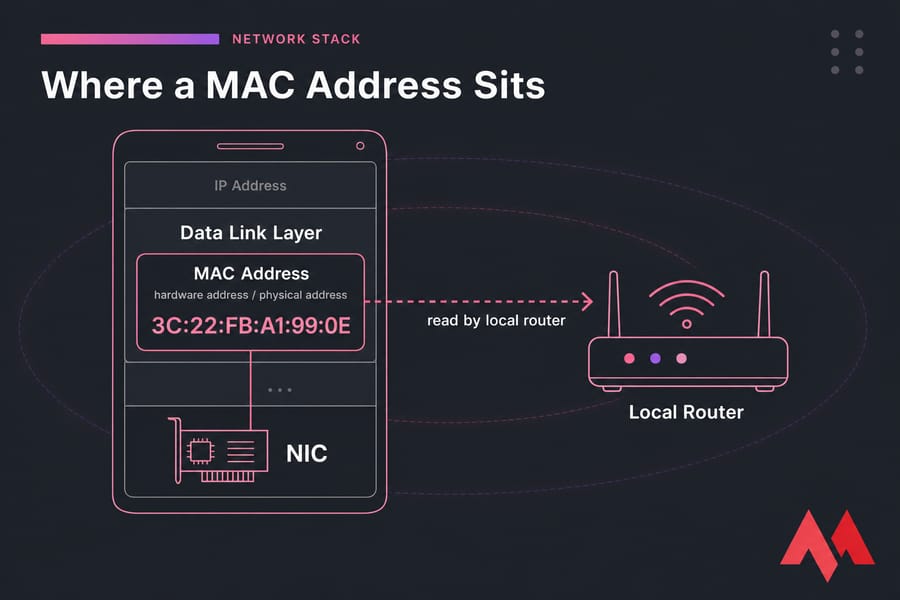
A MAC (Media Access Control) address is the hardware identifier baked into your network interface card (NIC). You'll also see it called the physical address or hardware address — same thing. It's a 12-digit hex value like 00:1A:2B:3C:4D:5E that identifies your adapter on the local network. Unlike an IP address, which can shift around, the MAC is meant to stay fixed. "Meant to" being the key phrase. When you change it, you're really setting what's called a locally administered address — a software override that sits on top of the burned-in one. If you're new to MAC addresses or want a refresher, check out what is MAC address and how do I find it.
Why You Might Want to Change Your MAC Address
Changing your MAC address is sometimes called MAC address spoofing. Here are some common reasons:
Privacy & Tracking
Your MAC address can be used to track your device on networks, especially public Wi-Fi. Spoofing your MAC address helps protect your privacy by making your device appear as a different one, reducing tracking risks.
Bypassing MAC Filters
Some networks use MAC filtering to restrict access to authorized devices only. Changing your MAC address to one that's allowed on the network can help you bypass such restrictions — useful in testing or legitimate troubleshooting.
Software Testing & Development
Developers and network admins often spoof MAC addresses to test network configurations, simulate different devices, or troubleshoot connectivity issues without needing additional hardware.
MAC Address Spoofing: Legal & Ethical Notes
Before proceeding, it's critical to understand the legal and ethical considerations:
- In most countries, changing your MAC address for privacy or testing is legal.
- However, spoofing MAC addresses to gain unauthorized access or conduct malicious activities is illegal and unethical.
- Always use MAC spoofing responsibly and with permission on networks.
- You can break a DHCP reservation tied to your old MAC, losing your fixed local IP.
- Captive portals (hotels, airports) may force you to re-authenticate.
- Enterprise networks running 802.1X or NAC will often kick an unrecognized MAC straight off.
So before you touch anything, write down your original address.
How to Find Your Current MAC Address
This is the step most people skip — and then they can't undo their change. Save the original first.
Windows
Open Command Prompt and run getmac /v /fo list for a clean per-adapter view, or ipconfig /all and look for the "Physical Address" line under your Wi-Fi or Ethernet adapter. For a more detailed walkthrough, see our guide on how to find MAC address on Windows.
Linux
Run ip link show. The MAC sits after link/ether. The older ifconfig still works on many systems too, but ip link is the modern way.
macOS
Use ifconfig en0 | grep ether, or list every port with networksetup -listallhardwareports.
Android
Go to Settings → About phone → Status, or tap your connected Wi-Fi network and check the details. Note that Android shows a randomized MAC per network by default.

Temporary vs Permanent MAC Address Changes
Most methods are temporary. Reboot, and the original comes back. Here's how it shakes out across platforms.
| OS | Typical Method | Survives Reboot? |
| Windows 11/10 | Device Manager / Registry | Yes (registry-backed) |
| Linux | ip link / macchanger |
No (unless NetworkManager config) |
| macOS | Terminal ifconfig |
No |
| Android | Root / built-in randomization | Depends |
To restore the original, you either reboot (for temporary methods) or clear the override field you set. On Windows that means blanking the Network Address property.
How to Change MAC Address on Windows 11
Windows 11 is where most searches land, so let's be precise.
Method 1: Device Manager
- Press
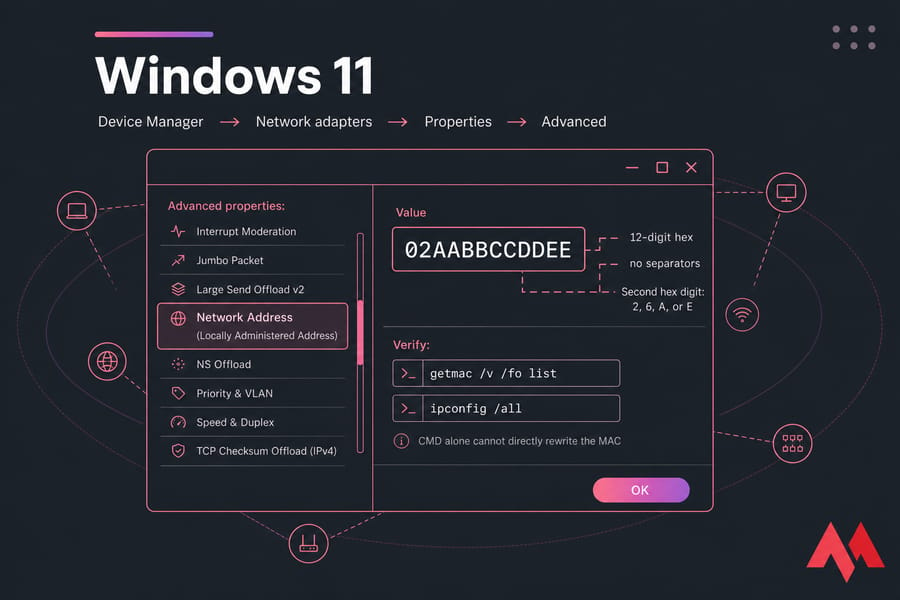
Win + Xand open Device Manager. - Expand Network adapters, right-click your Wi-Fi or Ethernet adapter, choose Properties.
- Go to the Advanced tab and find Network Address (sometimes "Locally Administered Address").
- Select Value, type a 12-digit hex MAC with no separators (e.g.
02AABBCCDDEE), click OK. - Restart the network adapter or reboot your PC for changes to take effect.
A tip from experience: keep the second hex digit as 2, 6, A, or E. That marks it as a locally administered address and avoids weird rejections.
Method 2: Registry-based method
If the Network Address field is missing, the registry route works. You edit the adapter's class key under HKEY_LOCAL_MACHINE\SYSTEM\CurrentControlSet\Control\Class\{4d36e972-...} and add a NetworkAddress string value. It's fiddly and one wrong key breaks networking, so follow our dedicated walkthrough on how to change MAC address through the registry before diving in.
Method 3: PowerShell and command-line limitations
Here's the honest truth about change mac address windows 11 cmd searches: Windows has no native command that directly rewrites the MAC. PowerShell can disable and re-enable an adapter (Restart-NetAdapter), but the actual MAC value still relies on the registry or Device Manager property. So CMD alone won't do it.
Verify on Windows 11
Disable then re-enable the adapter, then run getmac /v /fo list or ipconfig /all and confirm the new Physical Address shows up. If you're testing network configurations on a Windows VPS, these same steps apply — just connect via RDP first.
How to Change MAC Address on Windows 10
Windows 10 is nearly identical. Open Device Manager, find your adapter under Network adapters, go to Properties → Advanced → Network Address, and enter your 12-digit hex value. The registry method matches Windows 11 too. The only real difference is that older drivers sometimes hide the Network Address field — in which case the registry is your fallback. Verify the same way with ipconfig /all.
How to Change MAC Address on Linux (Ubuntu/macchanger)
Linux provides flexible ways to change your MAC address, from temporary changes via command line to permanent changes using network manager configurations.
Find the interface name
Modern systems use names like enp3s0 (Ethernet) or wlp2s0 (Wi-Fi), though you'll still see classic eth0 and wlan0 on some boxes. Run ip link show to list them.
Temporary change with ifconfig / ip link
Bring down your network interface:
sudo ifconfig eth0 downChange the MAC address:
sudo ifconfig eth0 hw ether 00:11:22:33:44:55Or using ip command:
sudo ip link set dev eth0 address 00:11:22:33:44:55Bring the interface up:
sudo ifconfig eth0 upThis change lasts until reboot — it's a temporary MAC address change.
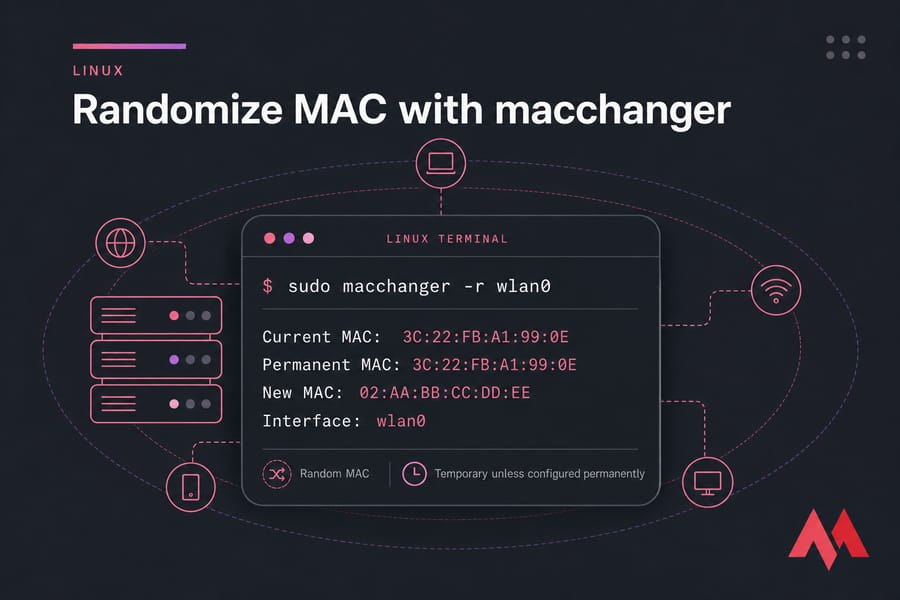
Change MAC with macchanger (Recommended Tool)
macchanger is a popular utility to simplify MAC spoofing on Linux.
Install macchanger:
sudo apt install macchangerCheck current MAC:
macchanger -s eth0Change MAC to a random value:
sudo macchanger -r eth0Set a specific MAC address:
sudo macchanger -m 00:11:22:33:44:55 eth0Making MAC Address Changes Permanent on Linux
For persistence, set the MAC in your NetworkManager connection profile (or a systemd-networkd link file). Temporary ip link changes vanish on reboot. For NetworkManager, add the following in your connection config:
[connection]
clone-mac-address=00:11:22:33:44:55
Want a sandbox to test this safely? Spin up a Linux VPS as a safe Linux test environment before touching your daily machine.
How to Change MAC Address on macOS
Changing your MAC address on macOS can be done via Terminal commands, but keep in mind the System Integrity Protection (SIP) feature, which may restrict modifications to network interfaces on newer macOS versions.
Terminal Command to Change MAC Address on macOS
Open the Terminal app from Applications → Utilities. Find your port with networksetup -listallhardwareports. Look for the interface name (usually en0 for Wi-Fi). Temporarily change your MAC address with:
sudo ifconfig en0 ether 02:AA:BB:CC:DD:EEThis change is temporary and will revert after a reboot. Confirm with ifconfig en0 | grep ether. Two notes: macOS changes are almost always temporary, and on recent versions you may need to turn Wi-Fi off first for the change to stick. System Integrity Protection generally doesn't block this, but stricter MDM-managed Macs might.
SIP Considerations
If you want to make permanent MAC address changes, SIP must be disabled, which is generally not recommended due to security risks. Permanent spoofing on macOS is tricky and typically requires advanced configuration or third-party tools.
How to Change MAC Address on Android
Changing MAC address on Android depends on whether your device is rooted or not.
Randomization explained
Android 10 and up randomizes your MAC per Wi-Fi network automatically. In the network's settings you'll see a "Privacy" or "MAC address type" option to switch between randomized and your device MAC.
Rooted Devices
With root access, you can spoof your MAC address using terminal commands or apps that require root. Use terminal emulator apps and execute:
ip link set wlan0 address xx:xx:xx:xx:xx:xxApps like MAC Address Ghost or BusyBox offer GUI to spoof your MAC address. Note: The interface may be different (wlan0 or eth0) depending on your device.
Non-root Alternatives
Without root, your options are limited due to Android's security model. Some apps claim to spoof MAC but generally only work on certain devices or Android versions. Android 10+ introduced randomized MAC by default on Wi-Fi connections for privacy, but this doesn't let you manually set a custom MAC. For more persistent spoofing, rooting is almost always required.
MAC Randomization vs Manual MAC Spoofing
These get conflated constantly. Randomization (Android private MAC, iOS private Wi-Fi address, Windows random hardware addresses) hands you a system-generated address per network — great for privacy, but you don't pick the value. Manual MAC spoofing or MAC cloning means you choose the exact address, usually to match another device or satisfy a filter. Different goals, different mechanisms.
Tools to Automate MAC Spoofing
Several tools exist to simplify the MAC address spoofing process across platforms, especially when you want GUI options or advanced functionality.
| Tool Name | Platform | GUI/CLI | Features |
| Technitium MAC Address Changer | Windows | GUI | Easy GUI, supports permanent spoofing, popular |
| macchanger | Linux (Ubuntu) | CLI/GUI | CLI tool with GUI frontends, persistent changes |
| TMAC (Technitium MAC Address Changer) | Windows | GUI | GUI, multiple device support |
| BusyBox (MAC Spoofing) | Android (rooted) | CLI | Terminal command support on rooted devices |
Why Use These Tools?
- They simplify the complex manual steps.
- Allow quick switching between MAC addresses.
- Provide options for temporary or permanent spoofing.
- Reduce risk of invalid MAC formats and errors.
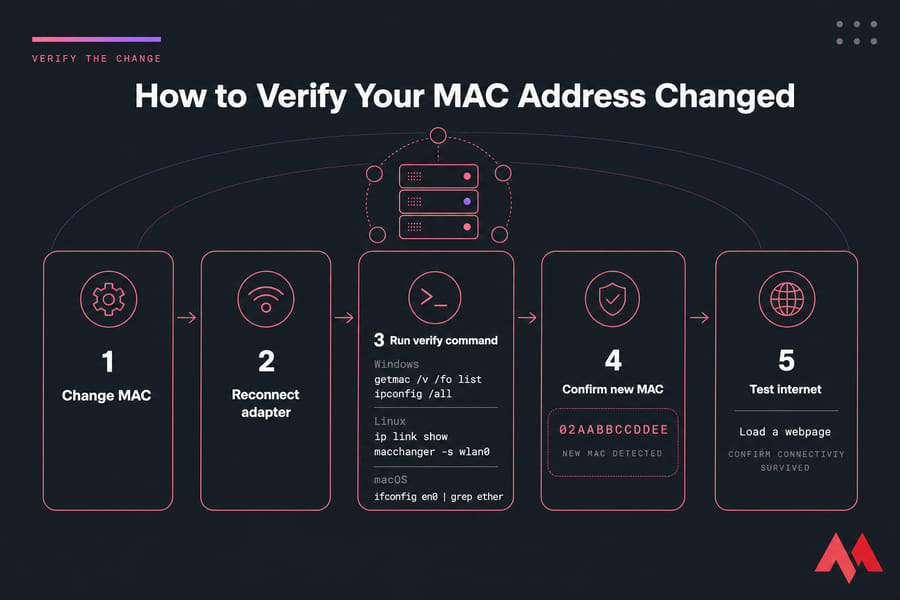
How to Verify Your MAC Address Changed
Don't assume it worked. Check it.
- Windows:
getmac /v /fo listoripconfig /all - Linux:
ip link showormacchanger -s wlan0 - macOS:
ifconfig en0 | grep ether
Then reconnect to the network and load a webpage to confirm connectivity actually survived the change.
Troubleshooting MAC Change Errors
"Access Denied" or "Permission Denied" Errors
- On Windows, ensure you run Command Prompt or PowerShell as Administrator.
- On Linux/macOS, prefix commands with
sudoto get root privileges. - Android requires root access for permanent spoofing.
MAC Address Reverts After Reboot
- Many OSes reset MAC changes after reboot unless configured for persistence.
- On Linux, configure network manager or systemd to keep changes permanent.
- On Windows, use Device Manager or registry edits for persistent spoofing (change MAC address through the registry).
- On macOS, SIP prevents permanent changes by default.
Network Address Option Missing
The driver doesn't expose it. Use the registry method on Windows, or grab a cheap USB Wi-Fi adapter that supports spoofing.
Invalid MAC Format Errors
MAC addresses must be 12 hexadecimal digits, typically in pairs separated by colons or dashes. Avoid special characters or spaces. Example valid MAC: 00:11:22:33:44:55.
No internet after changing
Likely a DHCP lease mismatch or NAC block. Release and renew your IP, or revert to your original MAC.
Conclusion
Understanding how to change MAC address is essential for network admins, developers, and privacy-conscious users who want to enhance their security or bypass network restrictions. Whether you want to change MAC address on Windows 10/11 via Device Manager or PowerShell, spoof your MAC on Linux using CLI tools or macchanger, or figure out how to spoof MAC address Android on a rooted device, it's crucial to follow platform-specific steps carefully.
Always weigh the permanent vs temporary MAC address changes, use trusted tools like Technitium MAC Address Changer or macchanger, and ensure you comply with local laws and ethical guidelines. For more details on what a MAC address is and how to find it, check out our article on what is MAC address and how do I find it. If you want a Linux VPS to experiment safely, consider our reliable Linux VPS Hosting solutions a clean lab where a mistake costs you nothing but a reinstall. For heavier testing environments, a dedicated server gives you full hardware control.