In the fast-paced world of technology, knowing How to make bootable USB Windows 10 using CMD (Command Prompt) can be a valuable skill. Whether you're a tech enthusiast, a professional, or someone troubleshooting their system, the ability to boot from a USB drive can prove to be a lifesaver. In this guide, we'll walk you through the process step by step, demystifying the intricacies of creating a bootable USB using the command line.
Why Make a Bootable USB Stick on Windows?
Before delving into the "how," let's explore the "why." Creating a bootable USB stick on Windows serves multiple purposes, each more crucial than the last. Imagine a scenario where your operating system (OS) crashes, leaving you with a non-functional computer. A bootable USB comes to the rescue by allowing you to reinstall or repair your operating system, ensuring your computer gets a fresh start.
Furthermore, having a bootable USB is indispensable for system administrators and IT professionals. It provides a portable solution for deploying operating systems, running diagnostics, and performing system maintenance tasks. Instead of relying on physical installation media, a bootable USB offers flexibility and convenience.
What is a Bootable USB Drive Used For?
Now that we understand the importance, let's delve into the versatility of a bootable USB drive. Think of it as a digital Swiss Army knife for your computer. Here are some key uses:
Operating System Installation
A bootable USB allows you to install a new operating system or reinstall your existing one. This is particularly handy when you need a clean slate or want to upgrade to the latest version.
System Recovery and Repair
When your system encounters errors or becomes unresponsive, a bootable USB provides access to recovery tools and options. This can include troubleshooting and repairing startup issues.
Virus and Malware Removal
If your computer is infected with viruses or malware, a bootable USB with antivirus tools can help you clean and restore your system without the need to boot into the infected operating system.
Data Backup and Migration
Need to transfer files or back up your data? A bootable USB enables you to access your files and perform data backup or migration tasks.
System Diagnostics
System administrators often use bootable USB drives to run diagnostic tools, check hardware health, and perform maintenance tasks without booting into the regular operating system.
How to Create a Bootable USB on Windows 11/10/8/7?
Make Sure Your USB is Bootable
Before learning “How to boot USB with cmd windows 7/10/11”, it's crucial to ensure that your USB drive is bootable. Not all USB drives have this capability by default. You can easily check and, if needed, make your USB bootable using various tools available online.
Follow these steps to boot from a USB using CMD:
- Start by opening the Command Prompt application, as detailed earlier.
- After launching the Command Prompt, type "diskpart" and press Enter.
- This initiates the Diskpart command-line application in the Command Prompt window. Proceed by entering the "list disk" command and pressing Enter.
- Look for your USB drive in the list and check the Status column. If it displays "No Media," your USB drive is bootable.
- Congratulations! You're now ready to boot from the USB using CMD.
Part 1. Create Bootable Windows Installation USB Media via CMD
Step 1: Insert Your USB Drive
Begin by plugging your USB drive into an available USB port on your Windows computer. Ensure that the drive is empty or that you've backed up its contents, as the process will erase all existing data.
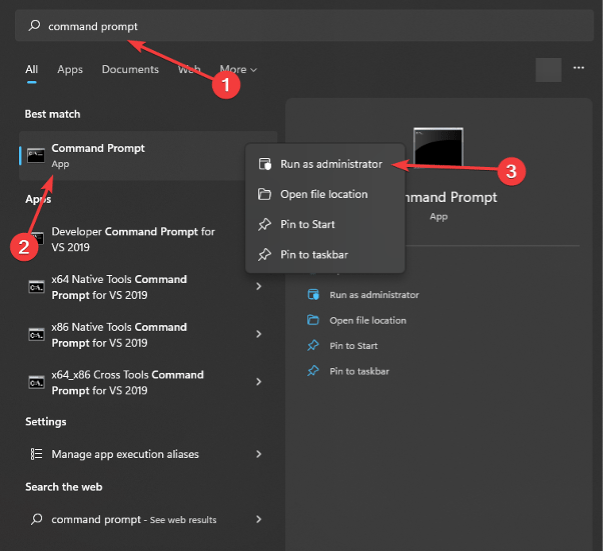
Step 2: Open Command Prompt as Administrator
Search for "Command Prompt" in the Start menu, right-click on it, and select "Run as administrator" to open CMD with elevated privileges. Discover step-by-step instructions for opening Command Prompt as an Administrator here.
Step 3: Navigate to the USB Drive
Use the `cd` command to navigate to the USB drive. For example, if your USB drive is assigned the letter E, type `cd E:` and press Enter.
Step 4: Run Diskpart
Type `diskpart` and press Enter to open the DiskPart utility.
Step 5: List Disks
Type `list disk` and press Enter. Identify your USB drive in the list (make sure to select the correct disk to avoid data loss).
Step 6: Select the USB Disk
Type `select disk X` (replace X with your USB drive number) and press Enter.
Step 7: Clean the Disk
Type `clean` and press Enter. This will erase all data on the USB drive.
Step 8: Create a Bootable Partition
Type `create partition primary` and press Enter.
Step 9: Format the Partition
Type `format fs=fat32 quick` and press Enter. This formats the partition with the FAT32 file system.
Step 10: Assign a Drive Letter
Type `assign` and press Enter.
Step 11: Copy Windows Installation Files
Copy all the files from your Windows installation media to the USB drive. You can do this manually or use the `xcopy` command.
Step 12: Make the USB Drive Bootable
Type `bcdboot X:\windows` (replace X with the letter assigned to your USB drive) and press Enter.
Part 2. Create a Bootable USB Drive for Windows Repair
Creating a bootable USB drive for Windows repair involves a similar process but with a focus on repair tools and options.
Follow the steps outlined in Part 1 up to Step 7.
Step 8: Create a Bootable Partition for Repair
Type `create partition primary` and press Enter.
Step 9: Format the Partition
Type `format fs=ntfs quick` and press Enter. This time, we're using the NTFS file system for repair tools.
Step 10: Assign a Drive Letter
Type `assign` and press Enter.
Step 11: Copy Windows Repair Files
Copy the necessary repair files to the USB drive. These files can include system recovery tools and diagnostic utilities.
Step 12: Make the USB Drive Bootable
Type `bcdboot X:\windows` (replace X with the letter assigned to your USB drive) and press Enter.
Your USB drive is now equipped with Windows repair tools, ready to assist in troubleshooting and fixing system issues.
Part 3. Create a Bootable USB Drive for Portable Windows Device
Sometimes, you may need a portable Windows environment for on-the-go computing. Here's how to create a bootable USB drive for a portable Windows device:
Follow the steps outlined in Part 1 up to Step 7.
Step 8: Create a Bootable Partition for Portability
Type `create partition primary` and press Enter.
Step 9: Format the Partition
Type `format fs=exfat quick` and press Enter. Using the exFAT file system ensures compatibility with various devices.
Step 10: Assign a Drive Letter
Type `assign` and press Enter.
Step 11: Copy Portable Windows Files
Copy the files you need for your portable Windows environment to the USB drive. This can include applications, documents, and settings.
Step 12: Make the USB Drive Bootable
Type `bcdboot X:\windows` (replace X with the letter assigned to your USB drive) and press Enter.
Now, you have a versatile bootable USB drive for your portable Windows device, allowing you to carry your personalized computing environment wherever you go.
How do I bring back my bootable USB files if I deleted them accidentally?
Creating a bootable USB flash drive involves erasing all existing data on it. If you find yourself without backups for the USB files, there's no need to panic; there are methods to recover your data.
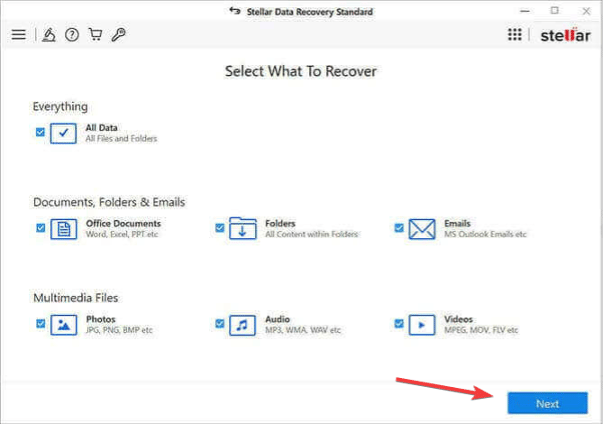
Stellar Data Recovery software is an effective solution that can retrieve all your lost data and files using cutting-edge data recovery technology. It boasts support for a wide range of file formats and ensures a swift and efficient recovery process.
Follow these simple steps:
- Install the Stellar Data Recovery software.
- Launch the application, choose the type of data you wish to recover, and click Next.
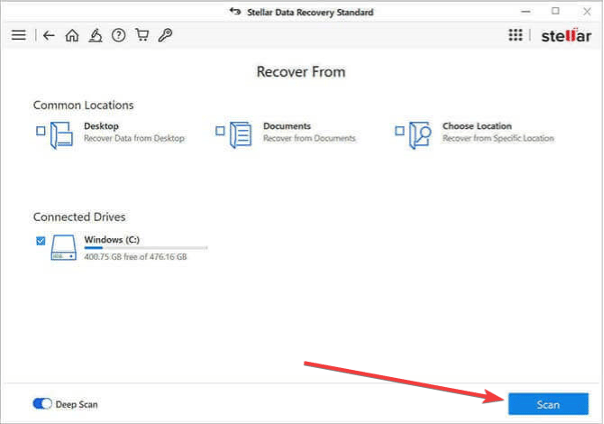
- Select the USB drive and initiate the scanning process by clicking Scan.
- After the scan, choose the files you want to recover and click the Recover button to save the data restored by the application.
Boot from a USB effortlessly!
If you're looking to slap Windows onto any computer, the smoothest ride is with a trusty USB flash drive. Just gotta kick it into gear. Skip the headache of third-party software for a bootable USB; CMD's the wizard here. But, and it's a big but, follow those CMD steps for booting USB like your tech life depends on it.
Get your hands on a solid flash drive – USB 3.0 is the speed demon now that USB 2.0's out of the game. And don't skimp on space – aim for more than 8 GB so your bootable masterpiece doesn't hit a snag.
Once your flash drive is all jacked up and ready to roll, stash your data there. Tuck it away in a cozy folder so Windows can do its thing without breaking a sweat. Piece of cake!
Final Words
In conclusion, learning “How to boot USB with cmd windows 11/10/7” opens a world of possibilities for Windows users, offering a versatile solution for installation, repair, and on-the-go computing. By steering clear of third-party software pitfalls and relying on CMD's straightforward steps, users can confidently navigate the process. Remember, the choice of a reliable USB 3.0 flash drive with ample storage is pivotal to a seamless experience, ensuring better transfer rates and avoiding potential glitches. Whether it's breathing new life into a system, troubleshooting issues, or creating a portable Windows environment, the bootable USB emerges as a digital Swiss Army knife, ready to tackle diverse computing challenges. So, armed with the know-how shared in this guide, users can confidently embark on their journey of USB mastery, unlocking the full potential of this indispensable tool in the realm of Windows computing.

Hello, everyone, my name is Lisa. I'm a passionate electrical engineering student with a keen interest in technology. I'm fascinated by the intersection of engineering principles and technological advancements, and I'm eager to contribute to the field by applying my knowledge and skills to solve real-world problems.