Here's a detail most beginners miss: a database backup is not a full website backup. Your PHP files, images, email accounts, and server config aren't in there. This guide walks through exporting correctly, picking the right format, restoring cleanly, and fixing the errors you'll probably hit at some point.
What Is a phpMyAdmin Database Backup?
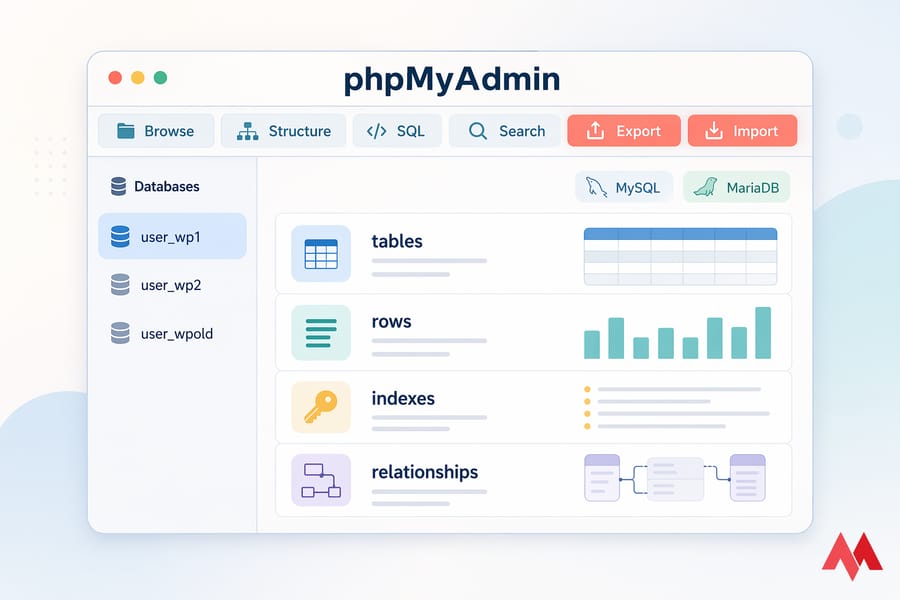
A phpMyAdmin database backup is essentially an export — a single file that contains your database's structure, its data, or both. The tool writes out every table, row, index, and relationship into a portable dump you can re-import later if something goes sideways. Works for both MySQL and MariaDB, since phpMyAdmin speaks to both.
When You Should Back Up a Database
Honestly? More often than you think. I've watched developers skip a five-minute export and then spend two days rebuilding a WooCommerce catalog from memory. Don't be that person.
Back up the database before any of the following:
- Updating WordPress core, plugins, or themes
- Switching themes or changing major site settings
- Migrating to a new host or server
- Running manual SQL queries or editing tables directly
- Troubleshooting database errors or slow queries
- Installing anything that touches the database schema
- Major content purges or bulk edits
Frequent backups shrink your recovery window. If something breaks at 3 p.m. and your last backup was this morning, you lose hours — not weeks.
What You Need Before Exporting a Database in phpMyAdmin
A bit of prep now saves you from "why isn't this working" later.
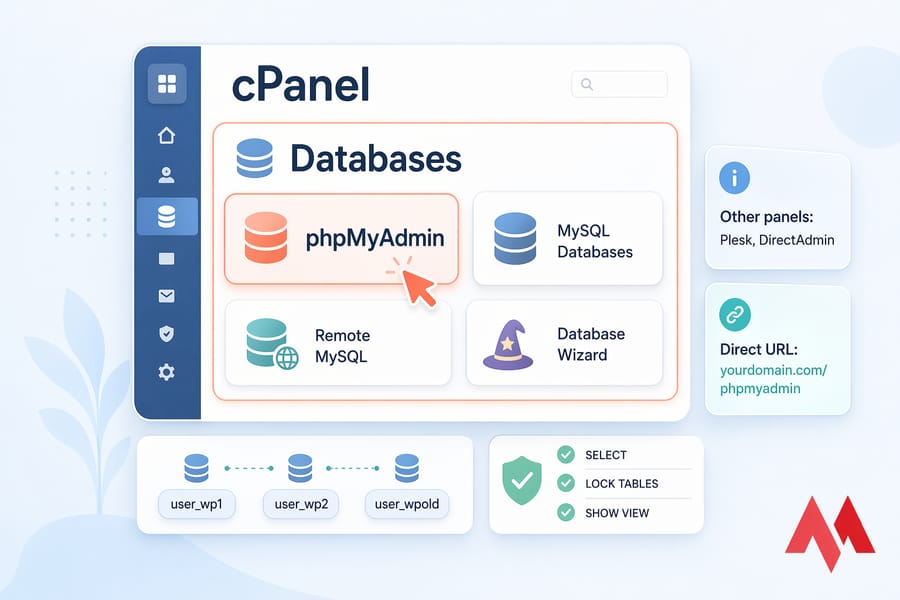
Access to phpMyAdmin or cPanel
You'll need login access to your hosting panel (cPanel, Plesk, DirectAdmin) or a direct phpMyAdmin URL with valid database credentials. On most shared hosts, phpMyAdmin lives under the Databases section of cPanel. If you're on a VPS, it might be at yourdomain.com/phpmyadmin or a custom path your admin set up.
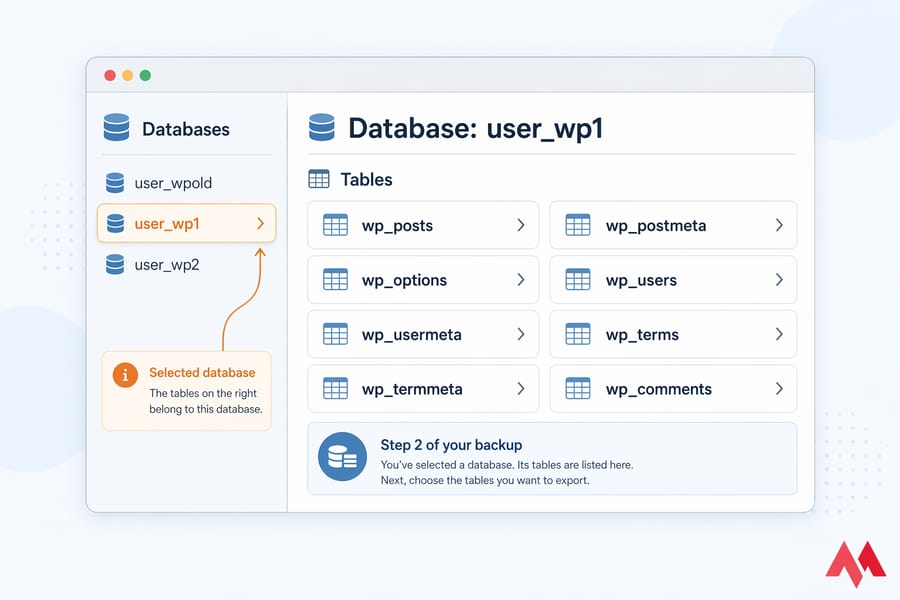
Choosing the Correct Database
This is where people slip up. If you've got ten WordPress installs on one account, the database names often look similar — user_wp1, user_wp2, user_wpold. Confirm the exact name in your site's wp-config.php (or equivalent config file) before you touch anything.
Checking Database Size and Permissions
A 40 MB database exports in seconds. A 4 GB database through a browser? That's where timeouts and half-written SQL files come from. Check the size in phpMyAdmin's left panel — if it's over a few hundred megabytes, you'll probably want to look at mysqldump instead (more on that later).
Also confirm your MySQL user has SELECT, LOCK TABLES, and SHOW VIEW privileges. Without those, the export silently misses pieces.
How to Backup a Database from phpMyAdmin Step by Step
This is the core of the whole article. Take it slow the first time — after one or two backups, it becomes muscle memory.
Step 1: Log In to cPanel and Open phpMyAdmin
Log in to cPanel (or whatever panel your host uses). Scroll to Databases and click phpMyAdmin. It opens in a new tab with your databases listed on the left. If your host uses a different panel, the icon is almost always labelled the same — just look under database tools.
Step 2: Select the Database You Want to Back Up
Click the database name in the left sidebar. The right pane refreshes to show all its tables. Double-check the name at the top of the page matches what your application is actually using. Wrong database = useless backup.
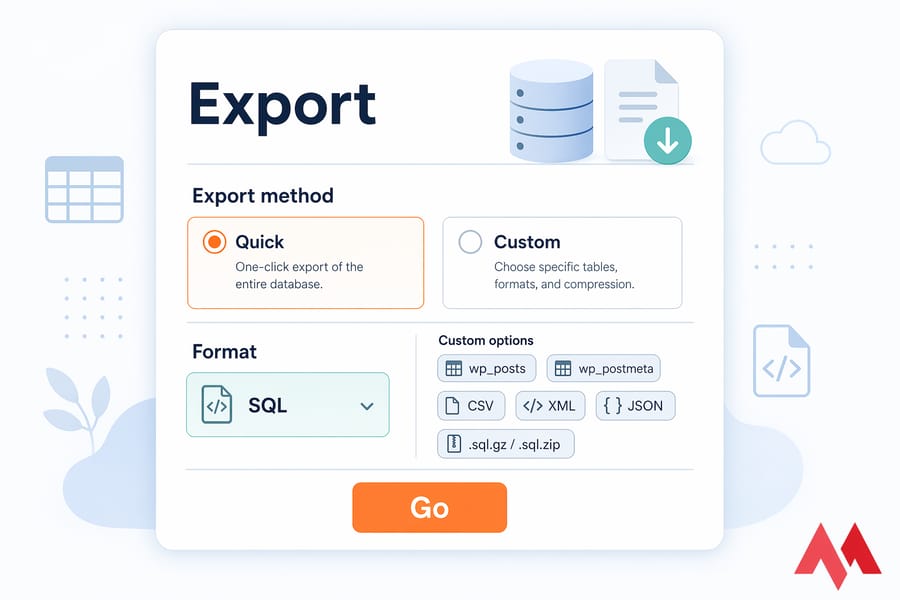
Step 3: Open the Export Tab
At the top, click Export. You'll land on a page with two export methods: Quick and Custom. Don't panic — the defaults are sensible for most situations.
Step 4: Choose Quick or Custom Export
Quick exports the entire database with default settings in SQL format. It's one click and done — great for typical WordPress sites, small apps, and routine pre-update backups.
Custom opens up the full control panel: pick specific tables, change compression, include or skip routines and triggers, tweak SQL compatibility mode, add DROP statements, and so on. Use it when you need something specific — like exporting just wp_posts and wp_postmeta for a content migration.
Step 5: Select SQL or Another Output Format
Leave the format as SQL. This is the only format that preserves structure, data, and relationships in a way phpMyAdmin can fully restore later. CSV, XML, and JSON have their uses (more below) but they are not proper backups.
Step 6: Click Go to Download the Backup
Hit the Go button at the bottom. Your browser downloads a .sql file (or .sql.gz / .sql.zip if you selected compression in Custom mode). For a 100 MB database, this usually takes under a minute on decent hosting.
Step 7: Verify and Store the Backup Safely
Don't just dump the file in Downloads and forget it. Do these three things:
- Check the file size — a 12-byte file means the export failed silently
- Open the first few lines — a valid SQL dump starts with
-- phpMyAdmin SQL Dumpfollowed by version info - Rename it clearly — something like
mysite-wpdb-backup-2025-01-15.sql
Then move a copy off your local machine. Cloud storage, an external drive, whatever — just not the same server the database lives on. If the server dies, you don't want your backup dying with it.
Quick Export vs Custom Export in phpMyAdmin
This is the question that stalls most people. Here's the short version in table form.
| Feature | Quick Export | Custom Export | Best For |
|---|---|---|---|
| Table selection | All tables | Pick individual tables | Custom wins for partial exports |
| Format choice | SQL only | SQL, CSV, XML, JSON, PDF, others | Custom for non-SQL needs |
| Compression | None | gzip or zip | Custom for large databases |
| Routines, triggers, views | Included by default | Toggle on/off | Custom for schema control |
| DROP TABLE statements | Off | Optional | Custom when restoring over existing tables |
| Speed of use | One click | Multiple options to review | Quick for fast backups |
When Quick Export Is Enough
For 90% of small-to-medium WordPress, Joomla, and custom app backups, Quick does the job. You want a full, SQL-format snapshot. That's what Quick gives you.
When to Use Custom Export
Reach for Custom when you need to export only specific tables, add compression to shrink a big download, include DROP TABLE IF EXISTS statements for a clean reimport, or change character set and SQL compatibility for a cross-version migration.
Recommended Custom Settings for Full Backups
If you do use Custom, these settings give you a bulletproof full backup:
- Tables: select all
- Output: Save output to a file, compression set to gzipped
- Format: SQL
- Object creation options: check Add DROP TABLE / VIEW / PROCEDURE / FUNCTION / EVENT / TRIGGER
- Data creation options: set export type to INSERT, and enable Use hexadecimal for BINARY columns
- Include routines, triggers, and views
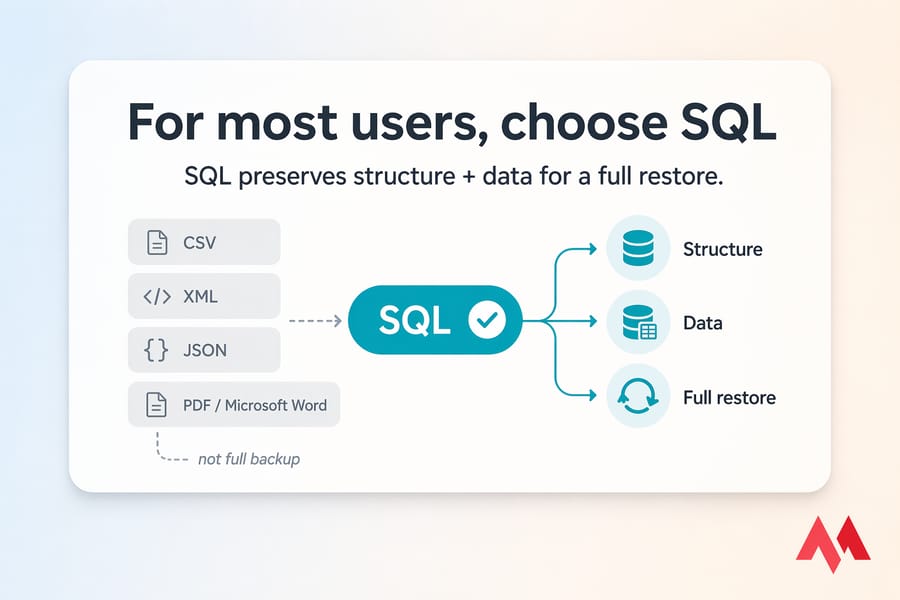
Which Export Format Should You Use?
Format confusion is real, especially when the dropdown lists eight options. Let's cut through it.
| Format | Good For | Restore-ready? |
|---|---|---|
| SQL | Full backups, migrations, disaster recovery | Yes — the gold standard |
| CSV | Exporting single-table data for Excel or analytics | Partial — data only, no structure |
| XML | Data exchange with other XML-aware systems | Limited |
| JSON | Feeding data into APIs or modern apps | Limited |
| PDF / Microsoft Word | Documentation snapshots, printed records | No |
SQL for Full Database Backups
SQL is the only format that fully round-trips. Structure, data, indexes, foreign keys, triggers — everything lands in one file you can replay against an empty database to rebuild it identically. For backups, this is always the correct choice.
CSV for Table Data Exports
CSV is handy when someone in marketing wants the email list in a spreadsheet, or you need to massage data in Excel before importing it elsewhere. It's not a backup format. Don't confuse the two.
Compression Options for Large Backups
In Custom export, turn on gzipped compression for anything over ~50 MB. SQL compresses beautifully — it's mostly repeated keywords and text — so expect 70-90% size reduction. A 500 MB raw dump becomes a 60 MB .sql.gz file. Your browser and your storage will thank you.
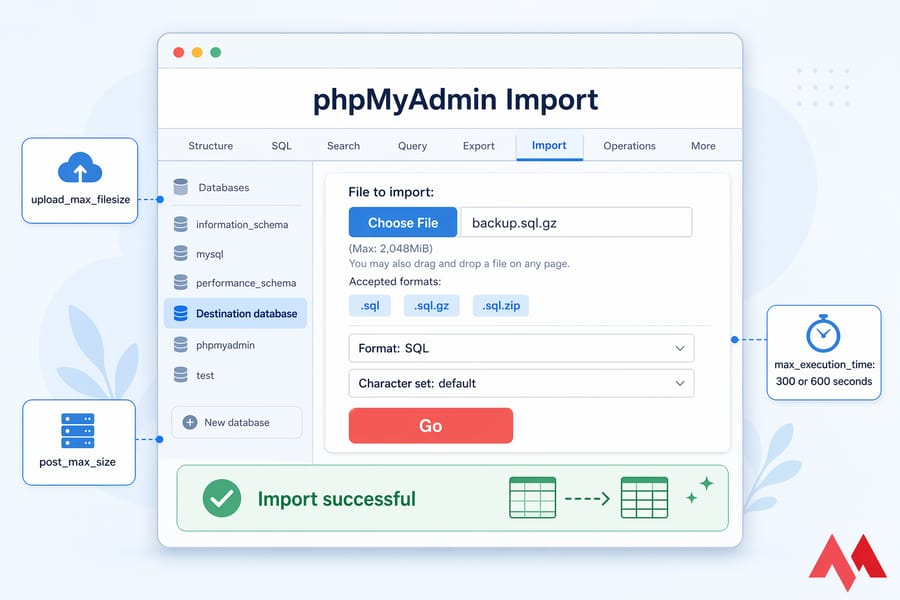
How to Restore a Database Backup in phpMyAdmin
A backup you can't restore is just a file taking up space. Here's the import side.
- In phpMyAdmin, select the destination database from the left sidebar (create a new empty one if needed via the Databases tab)
- Click the Import tab at the top
- Click Choose File and select your
.sql,.sql.gz, or.sql.zipfile - Leave format as SQL, keep default character set, scroll down and click Go
- Wait. Depending on size, this can be instant or several minutes
- When it's done, you'll see a green success message and the tables appear in the left panel
Two gotchas to know about:
- Upload limits. phpMyAdmin respects PHP's
upload_max_filesizeandpost_max_size. If your.sql.gzis 80 MB but the limit is 50 MB, the import refuses. Either editphp.ini, upload the file to the server via FTP into the phpMyAdmin/uploadfolder, or use the command line. - Timeouts. Long imports can hit
max_execution_time. Bumping it to 300 or 600 seconds inphp.iniusually fixes this for mid-size databases.
Test restores on a staging database when possible. Restoring over a live production database without verification has ruined many a weekend.
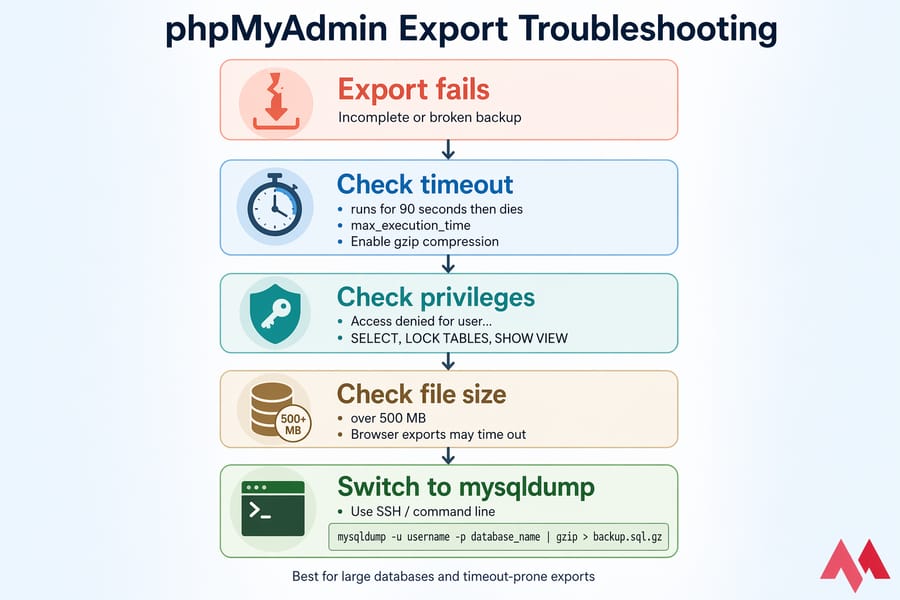
Common phpMyAdmin Backup Errors and How to Fix Them
Even a clean process breaks sometimes. Here are the issues I see most often.
Export Option Missing or Inaccessible
If the Export tab is greyed out or missing, your MySQL user probably lacks read privileges on the database. Ask your host to grant at least SELECT, LOCK TABLES, and SHOW VIEW. On shared hosting, this is rare — but on custom VPS setups with restricted users, it happens.
Backup Download Stops or Times Out
Classic symptom: the download starts, runs for 90 seconds, then dies with an incomplete file. This is the web server timeout or PHP's max_execution_time killing the request. Fixes:
- Enable gzip compression in Custom export to shrink transfer time
- Raise
max_execution_timeandmemory_limitinphp.ini - Use
mysqldumpvia SSH instead — browsers aren't built for this
Large Database Export Problems
Anything over 500 MB through a browser is pushing your luck. Use the command line:
mysqldump -u username -p database_name | gzip > backup.sql.gzThat single command handles databases of any size without touching PHP or browser limits.
SQL File Is Incomplete or Corrupted
Open the file in a text editor and scroll to the bottom. A complete dump ends with something like -- Dump completed on .... If it cuts off mid-INSERT, the export died partway. Re-run it, ideally with compression enabled, or switch to CLI.
Access Denied or Missing Privileges
"Access denied for user..." errors mean the MySQL user account doesn't have rights on the database you're trying to export. Log in to cPanel's MySQL Databases, assign the user to the database with ALL PRIVILEGES, and try again.
Best Practices for Database Backups
A few habits that separate casual users from people who've been burned once and never again.
Keep Multiple Backup Copies
One backup is one corruption event away from no backup. Keep at least three rolling copies — daily, weekly, monthly. Storage is cheap, downtime isn't.
Store Backups Off-Server
If the backup is on the same server as the database, a disk failure kills both. Push copies to S3, Backblaze B2, Google Drive, or a separate VPS. Automate this if you can.
Test Restores Regularly
I'll say it once more because it matters: an untested backup is not a backup. Spin up a staging database every few months and actually restore a recent dump. You'll catch problems before they matter.
Back Up Before Updates or Migrations
Non-negotiable. WordPress core update, plugin update, PHP version change, theme swap — export first. It takes two minutes and saves entire evenings.
If you run multiple sites or a business-critical stack, look into VPS hosting with scheduled snapshots so you're not relying on manual exports alone.
phpMyAdmin Backup vs mysqldump: Which Should You Use?
Both tools do fundamentally the same thing — dump a MySQL database to a portable file. The difference is interface and scale.
| Aspect | phpMyAdmin | mysqldump |
|---|---|---|
| Interface | Web-based, click-driven | Command line |
| Learning curve | Gentle | Needs SSH comfort |
| Best database size | Small to medium (< 500 MB) | Any size, including multi-GB |
| Automation | Manual | Easy to cron-schedule |
| Typical user | Shared hosting, WordPress owners | Sysadmins, VPS and dedicated server users |
Use phpMyAdmin for routine backups on shared hosting or when you don't have SSH access. Move to mysqldump once the database grows, or the second you need scheduled automated backups. If you're already on a VPS or dedicated box, learning mysqldump takes an hour and pays off forever. See our guide on Linux VPS hosting if you're considering the switch.
People Also Read

I’m Oliver k. I have MS degree in Computer Engineering. For nearly 5 years that I have been working on web programing and also in last 2 years I have worked on windows and Linux VPS. This is my honor to share my experiences with a new community.