![How to Install PIP on Windows/Linux? [A Complete Guide]](/wp-content/uploads/2021/06/cover390-main.webp)
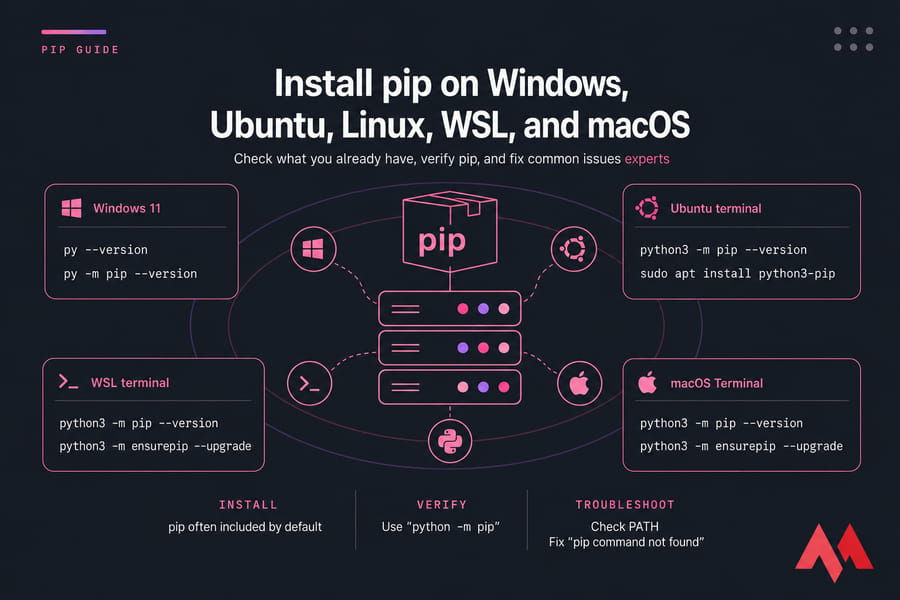
pip is Python's package manager. It pulls packages from the Python Package Index, or PyPI, and installs the dependencies your project needs. If you're trying to install pip on Windows, Ubuntu, Linux, WSL, or macOS, the good news is that modern Python setups often include it already. When you are dealing with Python, there is a requirement for tons of packages — you can use the available ones with the help of the default package manager, but PIP might be required to install some not included in the Python Standard Library.
That said, "often" isn't the same as "always." I've seen clean installs where pip worked immediately, and I've seen fresh systems throw pip command not found before the coffee finished brewing. This guide uses the current methods, not the old Python 2-era stuff, and shows you how to verify pip, fix PATH issues, use python -m pip, and avoid the common traps.
📦 What Is pip and What Does It Do?
pip is the standard Python package manager. You use it to install Python packages, update them, remove them, and inspect what's already on your system. Most of the time, pip talks to PyPI, which is the central package index for Python software. So when you run a command like installing requests or flask, pip downloads the package and its dependencies into your Python environment.
Modern Python 3 releases usually bundle pip by default, especially when you install Python from python.org or common package sources. That's why the first step isn't "download get-pip.py." It's "check what you already have." One more thing: Python 2 is end-of-life. Don't use old instructions like python-pip unless you're maintaining some ancient box.
🔍 Before You Install pip
Check Python first. Then check pip. It saves time.
Check Whether Python Is Installed
python --version
python3 --version
On Windows, you can also try:
py --versionIf none of those work, install Python before worrying about pip.
Check Whether pip Is Already Installed
pip --version
pip3 --version
python -m pip --version
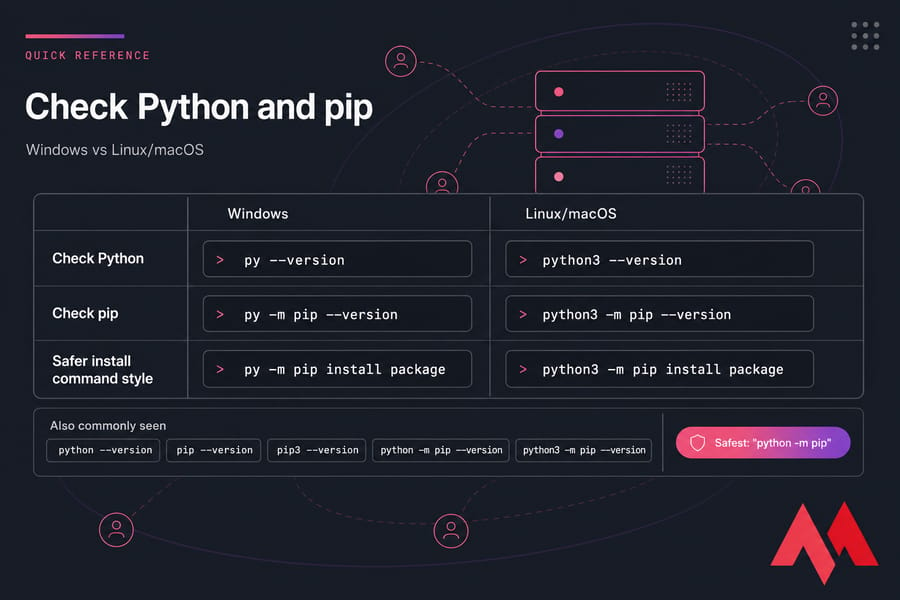
python3 -m pip --versionI prefer python -m pip because it targets the pip tied to that exact Python interpreter. It avoids the classic "wrong pip, wrong site-packages, wrong afternoon" problem.
Understand pip, pip3, and python -m pip
pip: often points to the default pip on the systempip3: commonly used on Linux to make it clear you mean Python 3python -m pip: safest option when multiple Python versions exist
| Task | Windows | Linux/macOS |
| Check Python | py --version |
python3 --version |
| Check pip | py -m pip --version |
python3 -m pip --version |
| Safer install command style | py -m pip install package |
python3 -m pip install package |
💻 How to Install pip on Windows 10 and Windows 11
This is the section most people need. And yes, Command Prompt and PowerShell both work.
Install Python from python.org with pip Included
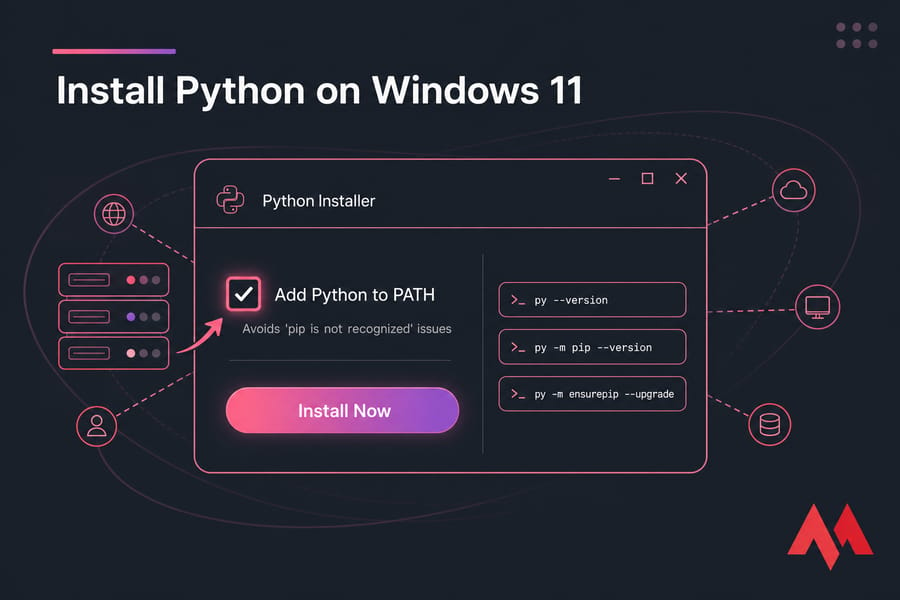
Go to python.org downloads and download the current Python installer for Windows. Run it, and make sure you check Add Python to PATH before clicking Install. The official installer typically includes pip. That's the cleanest way to install pip on Windows 10 and Windows 11.
Verify Installation
py --version
py -m pip --version
If that works, you're done. You can also test:
pip --versionInstall pip If Missing
If Python is installed but pip isn't available, try:
py -m ensurepip --upgradeHow to Upgrade pip
If you wish to upgrade your PIP version, it discards the older version and installs the latest one:
python -m pip install --upgrade pipHow to Downgrade pip
There are times when you install a new version and it does not work seamlessly. To sort that issue, downgrade to revert to the previously installed version:
python -m pip install pip==18.1Fix Windows PATH Issues
First, see what Windows can find:
where python
where pip
If pip fails but py -m pip works, your Scripts directory probably isn't on PATH. Typical paths look like this:
C:\Users\YourUser\AppData\Local\Programs\Python\Python312\C:\Users\YourUser\AppData\Local\Programs\Python\Python312\Scripts\
Add both to your PATH environment variable, then open a new shell and test again. Until then, you can safely use py -m pip. If you're managing Python deployments on a remote server, a Windows VPS gives you full control over your environment and PATH configuration.
🐧 How to Install pip on Linux
Now, Python Package Index is used by pip as the default source for the packages in Linux. When you type pip install package_name, this command searches for a specific package in PyPI. If you're setting up a Python environment on a Linux VPS, pip is usually the first tool you'll reach for after the initial server setup.
Ubuntu and Debian
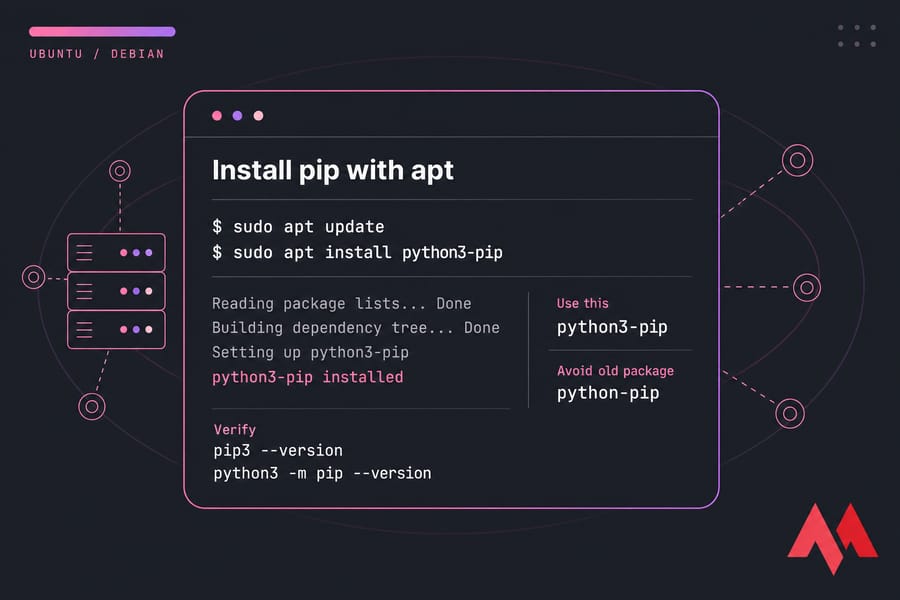
sudo apt update
sudo apt install python3-pip
This installs pip for Python 3. The old python-pip package name belongs to the Python 2 era and shouldn't be your default on current systems. Here is a step-by-step guide with actual terminal screenshots:
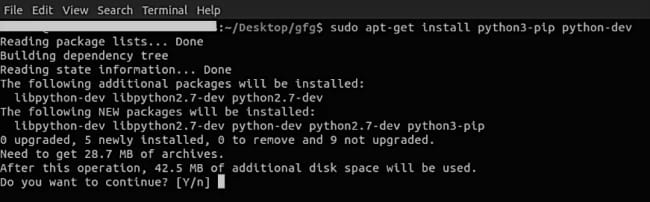
Step 1: Start the installation
sudo apt-get install python3-pip python-dev
Step 2: Review disk space
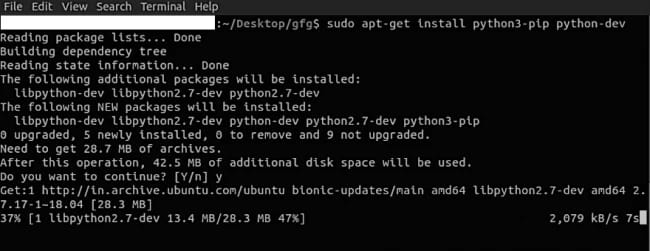
Step 3: Downloading libraries
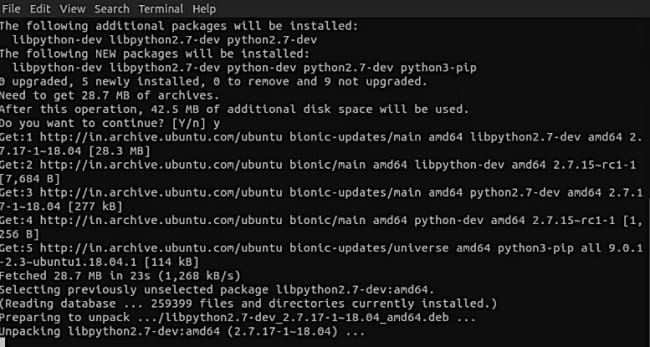
Step 4: Unpacking packages
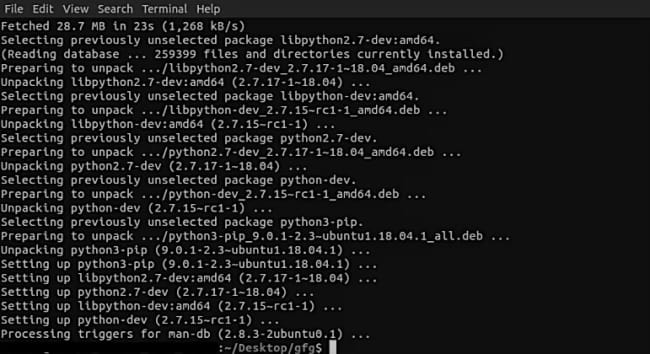
Step 5: Final installation steps
General Syntax for Installing Packages
root@ubuntu:~# pip3 install <package name>As we have taken the example of the Numpy library:
root@ubuntu:~# pip3 install numpy
Search for Packages
root@ubuntu:~# pip3 search numpy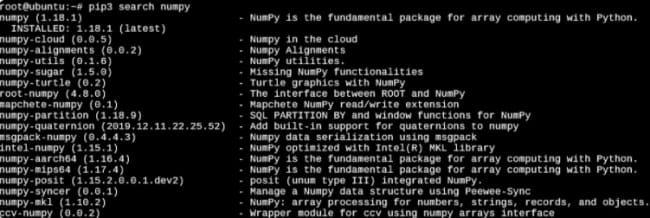
List All Installed Packages
root@ubuntu:~# pip3 list
Show Package Information
root@ubuntu:~# pip3 show numpy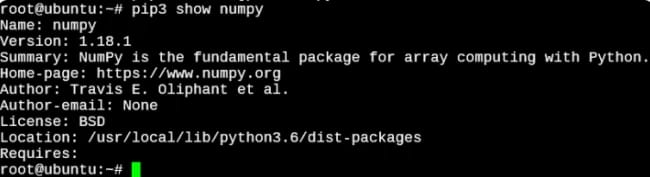
Uninstall Packages
root@ubuntu:~# pip3 uninstall numpy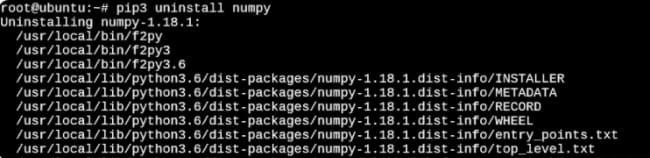
Fedora
sudo dnf install python3-pip
python3 -m pip --version
CentOS, RHEL, AlmaLinux, and Rocky Linux
sudo yum install python3-pip
python3 -m pip --version
On newer releases, dnf may replace yum:
sudo dnf install python3-pipArch Linux
sudo pacman -S python-pip
python -m pip --version
How to Install pip in WSL
WSL behaves like Linux, not Windows. That trips people up all the time.
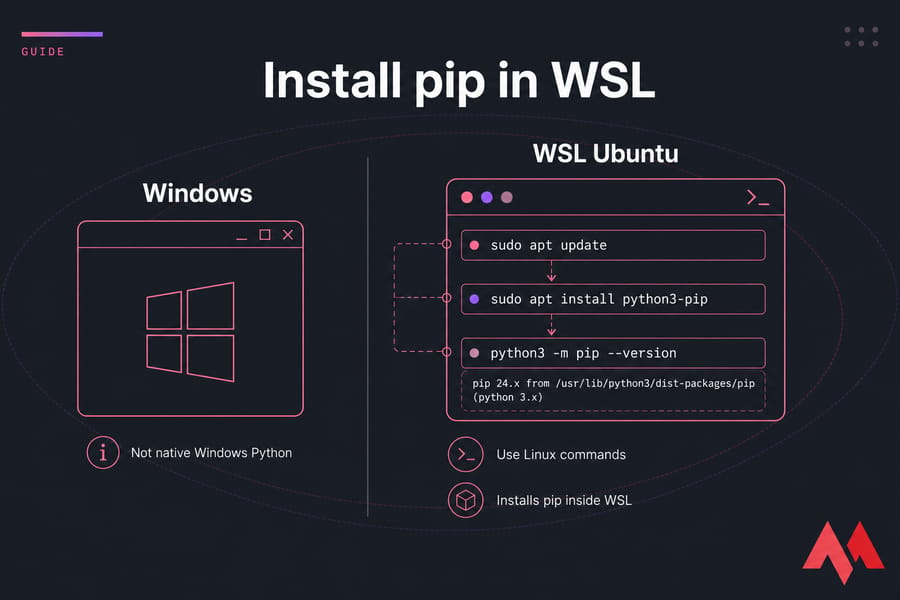
If you're running Ubuntu inside Windows Subsystem for Linux, use Linux commands:
sudo apt update
sudo apt install python3-pip
python3 -m pip --version
That installs pip inside the WSL environment, not in native Windows Python. Keep those worlds separate unless you really know why you're mixing them.
🍎 How to Install pip on macOS
Option 1: Using Homebrew
brew install python
python3 -m pip --version
This will install both Python and pip on your system.
Option 2: Manual Installation
If you already have Python installed but need to install pip:
Step 1: Download the get-pip.py file from https://bootstrap.pypa.io/get-pip.py
Step 2: Open a command prompt and navigate to the directory containing the get-pip.py file.
Step 3: Run the following command:
python get-pip.py✅ How to Verify Your pip Installation
Don't stop at "the command ran once." Verify version and path:
pip --version
pip3 --version
python -m pip --version
python3 -m pip --version
Then check the executable location:
where pip
where python
which pip3
which python3This tells you what binary is actually being used. On systems with multiple Python versions, that matters a lot.
📝 Basic pip Commands to Get Started
Once pip works, these are the commands you'll use constantly:
python -m pip install requests
python -m pip install --upgrade requests
python -m pip list
python -m pip show requests
python -m pip uninstall requests
python -m pip install --upgrade pip
On Linux, swap that for python3 -m pip if needed. Same idea.
📦 How to Install Packages in a Virtual Environment
You really should use a virtual environment for app work. On servers, I'd call it standard practice.
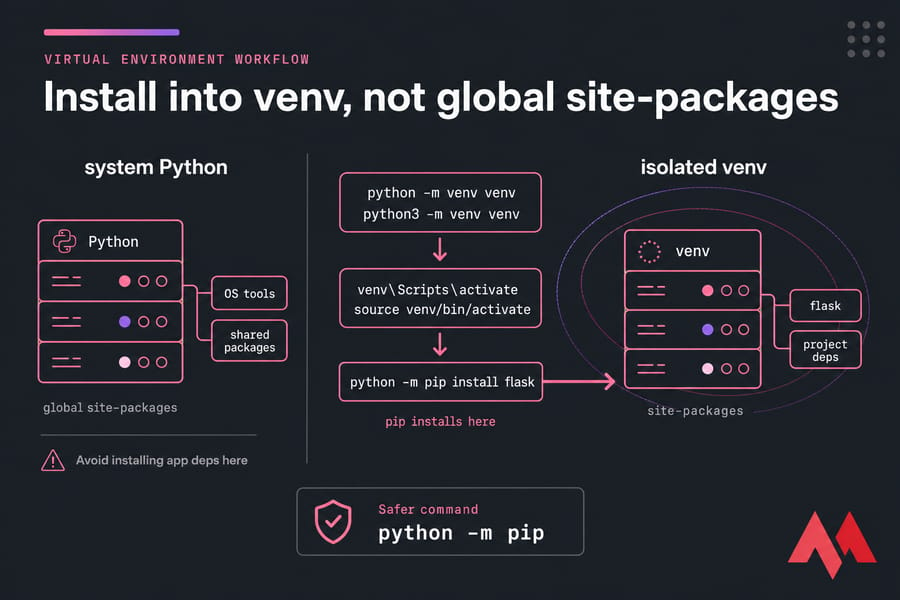
Create a Virtual Environment
python -m venv venvOr on Linux if needed:
python3 -m venv venvActivate the Environment
Windows:
venv\Scripts\activateLinux and macOS:
source venv/bin/activateInstall Packages with pip
python -m pip install flaskWhy Virtual Environments Matter
They isolate package installation from the system interpreter. That means fewer conflicts, cleaner deployments, and much less chance of breaking OS-managed Python components. Beginners skip this all the time. Then six months later they understand why everyone kept insisting on venv.
⚠️ Common pip Errors and Fixes
pip command not found
Cause: pip isn't installed, or it isn't on PATH. Fix: try python -m pip --version or python3 -m pip --version. If that fails, install pip with your OS package manager or use ensurepip.
No module named pip
Cause: Python is installed, but the pip module is missing.
python -m ensurepip --upgrade
python3 -m ensurepip --upgrade
pip is not recognized on Windows
Cause: PATH issue. Fix: use py -m pip right away, then correct PATH with the Python and Scripts directories.
Permission denied / sudo issues
Cause: trying to install globally without proper permissions. Fix: prefer a virtual environment. Avoid random sudo pip install on servers unless you understand the impact on system packages.
externally-managed-environment on Linux
This one shows up on newer Debian and Ubuntu systems. The OS is protecting the system Python environment from direct pip changes. Use a virtual environment, pipx for standalone tools, or the distro package manager.
SSL/certificate, proxy, or firewall issues
In locked-down offices or VPS environments behind strict egress rules, pip may fail to reach PyPI. Check system CA certificates, proxy settings, and outbound firewall policy.
🛡️ pip Best Practices for Servers and VPS Environments
- Use a non-root user when possible
- Create a separate virtual environment per app
- Pin versions for production deployments
- Avoid global
sudo pip installunless there's a very specific reason - Keep your package list reproducible with a requirements file
If you're deploying Python apps on Ubuntu servers or a Linux hosting environment, this discipline pays off fast. Cleaner upgrades. Easier rollbacks. Fewer 2 a.m. surprises. For teams that prefer to offload server management entirely, managed hosting takes care of the infrastructure while you focus on your Python code.
🎯 Conclusion
We hope that with the help of this article, you have successfully learned how to install pip on Windows, Linux, macOS, and WSL environments. If you want speed, check with pip --version first — you might already have it. If not, use ensurepip or your OS package manager, not random blog commands from 2017. You can now easily manage your packages with Python pip. For production Python workloads that need guaranteed resources, a dedicated server provides the isolation and performance your applications deserve. If you face any issues during the installation or have questions, please leave them in the comment box below.
Keep learning and Keep Sharing!
People also read:
