Building a website in 2026 is easier than it's ever been. You don't need to know how to code, you don't need a designer on speed dial, and you definitely don't need a five-figure budget. What you do need is a clear plan, the right tools, and about a weekend of focused effort.
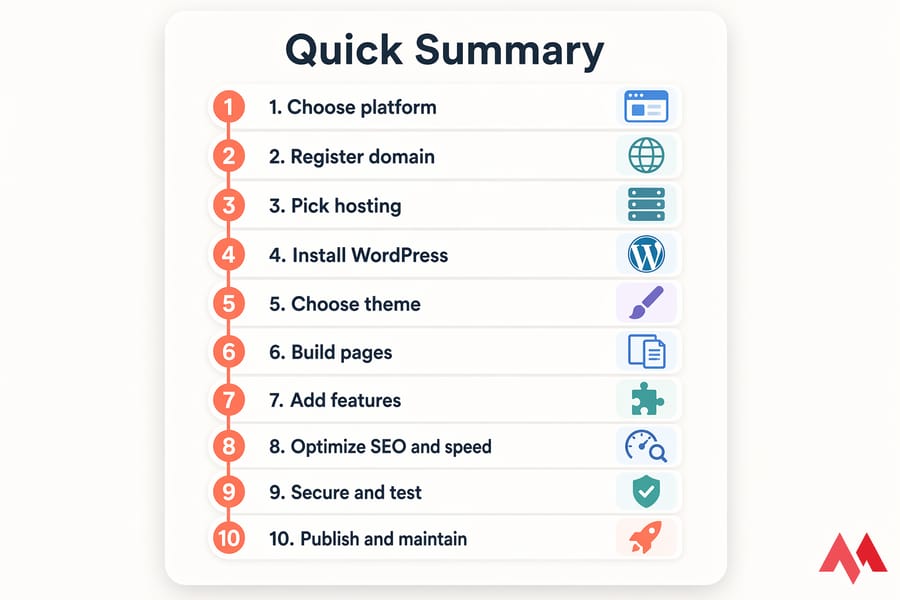
This guide walks you through every step, start to finish. Domain, hosting, WordPress setup, pages, SEO, security, launch — all of it. I've helped plenty of first-time site owners through this process, and the ones who succeed aren't the most technical. They're just the ones who don't skip steps.
What You Need Before You Create a Website
Decide what type of website you want
Before you touch a single setting, answer one question: what is this website for? The answer shapes every decision that follows — platform, hosting, theme, pages, even the domain name.
Most sites fall into one of six buckets:
- Business website — a digital storefront for a local or service business. Needs trust pages, clear contact info, and strong local SEO.
- Blog — content-first site built around regular publishing. SEO and readability matter most here.
- Portfolio — visual showcase for creatives, freelancers, and agencies. Image performance and clean design are the priority.
- Ecommerce store — selling products or digital goods online. Requires a platform that handles payments, inventory, and shipping.
- Landing page — single-page site focused on one offer or lead magnet. Conversion-optimized, minimal distractions.
- Personal website — résumé, hobby, or identity site. Lower stakes, fewer pages.
Pick one. If your project overlaps (say, a business site with a blog), choose the primary purpose and treat the rest as secondary.
Gather your brand name, content, and goals
Here's a step most beginners skip: prep your content before you start building. I mean it. Writing homepage copy while staring at a blank WordPress editor is a special kind of painful.
At minimum, have these ready:
- Brand or business name (and a few domain ideas)
- A short description of what you do and who it's for
- 3–5 bullet points on your services or offer
- A logo (even a simple text logo works for launch)
- 4–6 decent photos or graphics
- Contact details — email, phone, address if relevant
Goals matter too. Are you trying to get phone calls? Email signups? Online sales? Your goal drives the page structure and the calls-to-action you'll need later.
Step 1: Choose How You Want to Build Your Website
You've got three main paths: a hosted website builder, a self-hosted CMS like WordPress, or a fully custom-coded site. Most people should pick one of the first two. Custom coding is overkill for 95% of projects.
Website builder vs CMS vs custom-coded site
Let's break these down honestly.
Website builders (Wix, Squarespace, Shopify) bundle hosting, design, and the editor into one subscription. You drag, you drop, you publish. Fast to launch, but you're locked into their ecosystem and pay monthly forever.
Content Management Systems like WordPress, Joomla, or Drupal run on your own hosting. You own everything — the files, the database, the flexibility. More setup upfront, but far more control and much lower long-term cost.
Custom-coded sites are written from scratch by developers. Total freedom, but you need a developer (or to become one). Skip this unless you have a specific reason.
| Platform | Ease of Use | Flexibility | Cost | SEO | Best For |
|---|---|---|---|---|---|
| WordPress | Moderate | Excellent | $4–30/mo hosting | Excellent | Blogs, business sites, most use cases |
| Wix | Very easy | Limited | $17–39/mo | Good | Small portfolios, quick launches |
| Squarespace | Easy | Moderate | $16–49/mo | Good | Designers, creatives, boutique brands |
| Shopify | Easy | Good (ecom) | $29–399/mo | Good | Ecommerce stores |
| Joomla | Difficult | Excellent | Hosting only | Good | Complex community sites |
| Drupal | Very difficult | Excellent | Hosting only | Excellent | Enterprise, government |
Why WordPress is a popular choice for beginners
WordPress powers roughly 43% of all websites on the internet. That's not marketing fluff — that's the actual number. And there's a reason.
It's free. It's open source. There are thousands of themes and plugins. It scales from a one-page brochure site to a publication doing millions of visits a month. Almost every web host supports it with one-click installs. And if you ever hire a developer, finding WordPress talent is trivial.
The trade-off: you have to pick your own hosting, keep it updated, and handle backups. None of this is hard, and I'll walk you through all of it.
When Wix, Squarespace, or Shopify may be better
Builders aren't bad. They're the right call in specific situations:
- You need a site live by next Tuesday and can't afford a learning curve
- You want zero maintenance and are fine paying monthly forever
- You're running a pure ecommerce store (Shopify is purpose-built for this)
- You're a designer or photographer who values Squarespace's visual polish
For everyone else — especially anyone serious about SEO, content, or long-term cost — WordPress is the better play. The rest of this guide assumes that route.
Step 2: Register a Domain Name
Your domain is your address on the web. yoursite.com. It's the one thing that should never change, so spend a bit of time getting it right.
What a domain name is
Technically, a domain name is a human-readable label that maps to an IP address via DNS. Practically, it's your brand's permanent home. When someone types it into a browser, a series of lookups routes them to your hosting server. If you want the deeper version, here's how DNS works under the hood.
Tips for choosing a memorable domain name
A few rules I give every client:
- Keep it short. Aim for under 15 characters. Shorter names are easier to type, remember, and say out loud.
- Make it brandable. Invented words (Google, Spotify) age better than keyword stuffing (best-cheap-shoes-online.com).
- Easy to spell. Say it to a friend over the phone. If they ask "how do you spell that?", scrap it.
- No hyphens or numbers. They look spammy and cause confusion. "Is that the word five or the digit 5?"
- Check trademarks. A quick search on the USPTO or your country's trademark database can save you a lawsuit later.
- Check social handles. Grab matching usernames on Instagram, X, LinkedIn — whatever's relevant.
- Avoid trends. Names ending in "ly" or "ify" felt fresh in 2015. They don't now.
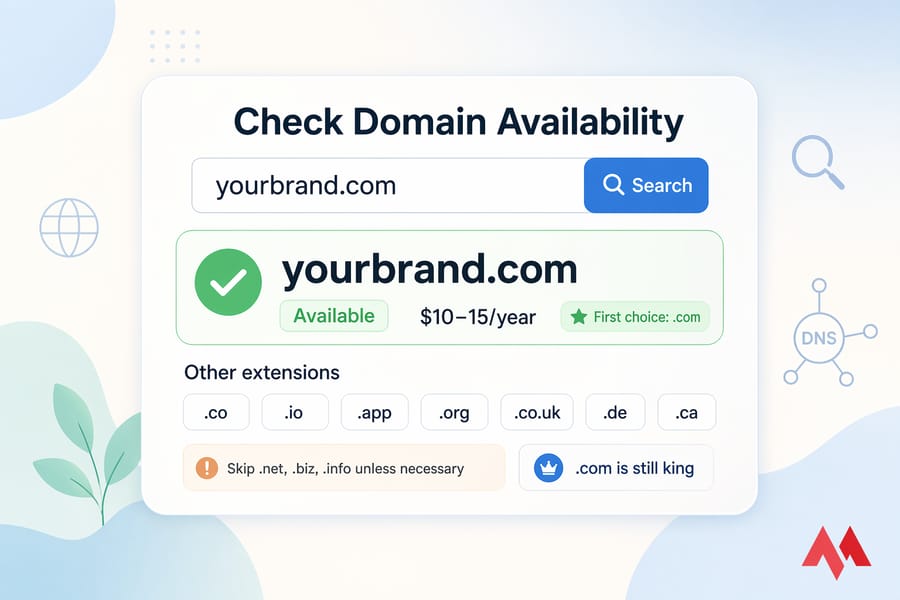
How to choose the right domain extension
The extension (also called a TLD) is the part after the dot. .com is still king. It's what people type by default and what search engines trust most.
Consider alternatives only when it makes sense:
- .com — always first choice for global brands
- .co / .io / .app — fine for startups and tech products
- .org — non-profits and community projects
- Country TLDs (.co.uk, .de, .ca) — use if your audience is local
- .net, .biz, .info — skip unless you have no other option
Most registrars charge $10–15/year for a .com. Don't overpay for "premium" domains unless you've got budget to burn. For a deeper walkthrough, see how to register a domain name.
Step 3: Choose a Web Hosting Provider
Hosting is where your website actually lives. Every image, every page, every database entry — it all sits on a server somewhere, waiting for visitors to request it.
What web hosting is
Think of it like renting space in a building. Your domain is the street address; the hosting is the actual apartment with all your stuff in it. If the hosting goes down, your site goes down — no matter how great the domain looks. For a full primer, here's what web hosting is and why it matters.
Shared hosting vs WordPress hosting vs VPS hosting
Four flavors worth knowing:
| Hosting Type | What It Is | Price Range | Best For |
|---|---|---|---|
| Shared Hosting | Many sites on one server, splitting resources | $3–10/mo | Personal sites, small blogs, first projects |
| Managed WordPress Hosting | Shared-style but tuned for WordPress with caching and auto-updates | $10–30/mo | Business sites wanting simplicity |
| VPS Hosting | Virtual private server with dedicated resources | $15–80/mo | Growing sites, stores, higher traffic |
| Cloud Hosting | Resources pulled from a pool of servers, auto-scaling | $20–200+/mo | Unpredictable traffic, SaaS, enterprise |
Start with hosting plans for beginners if you're just launching. As your traffic grows past a few thousand visits a day, you'll want to look at VPS hosting for growing websites — more dedicated CPU, more RAM, fewer noisy neighbors.
What to look for in a reliable hosting provider
Don't just chase the cheapest plan. I've seen people "save" $3/month on hosting and then lose a weekend to downtime. Look for:
- Uptime guarantee — 99.9% or better, with a real SLA
- Fast servers — NVMe SSDs, recent CPUs, HTTP/2 or HTTP/3
- Free SSL — non-negotiable in 2026
- Daily backups — automated, easy to restore
- 24/7 support — ideally via live chat, with technical staff (not just ticket resetters)
- One-click WordPress install — saves you 20 minutes and a headache
- Data center location — closer to your audience = faster load times
Step 4: Install WordPress or Your Chosen Platform
Once your domain and hosting are sorted, installation takes about five minutes. Seriously.
How to install WordPress from your hosting dashboard
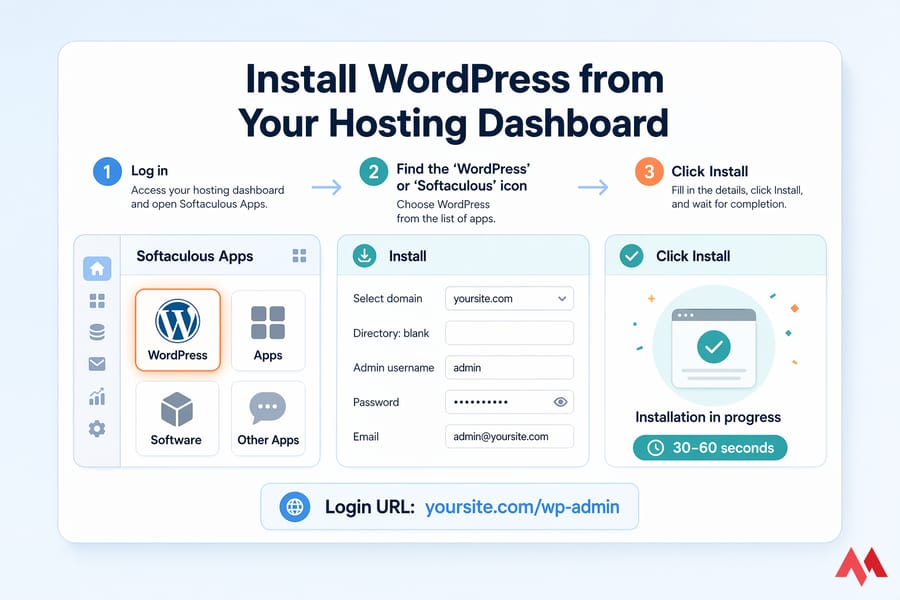
Nearly every host offers a one-click installer. Here's the typical flow:
- Log in to your hosting account (cPanel, Plesk, or a custom dashboard)
- Find the "WordPress" or "Softaculous" icon — usually under "Software" or "Apps"
- Click Install
- Select your domain from the dropdown
- Leave the directory field blank (so WordPress installs at the root)
- Set your admin username, password, and email — write these down somewhere safe
- Click Install and wait 30–60 seconds
That's it. You'll get a login URL like yoursite.com/wp-admin. Bookmark it. If you want the full walkthrough with screenshots, here's how to install WordPress step by step.
Basic settings to configure first
Before you do anything else — before you pick a theme, before you write a single page — lock in these settings. They save you from ugly surprises later.
- Site Title and Tagline — Settings → General. This shows up in search results and browser tabs.
- Timezone — Settings → General. Set it right so scheduled posts publish when you expect.
- Permalinks — Settings → Permalinks. Choose "Post name." The default ugly URLs kill your SEO.
- Search engine visibility — Settings → Reading. Make sure "Discourage search engines" is unchecked before launch.
- Comments — Settings → Discussion. Disable them if you don't want spam headaches.
- Delete default content — Remove the "Hello World" post, sample page, and any pre-installed themes you won't use.
Step 5: Choose a Theme and Design Your Website
The theme controls how your site looks. Good news: you don't need to hire a designer. Bad news: there are literally thousands of themes out there and most of them are bloated junk.
How to pick a responsive theme
"Responsive" means the theme adapts to any screen — phone, tablet, desktop. In 2026, this isn't optional. Google indexes the mobile version of your site first.
When picking a theme, prioritize:
- Speed — lightweight themes load fast. Astra, Kadence, GeneratePress, and Blocksy are all solid picks.
- Block editor compatibility — make sure it works with Gutenberg or Elementor
- Active development — check when it was last updated. Anything older than 12 months is a red flag.
- Good reviews — 4.5+ stars with at least a few hundred ratings
- Demo content — lets you import a full layout and just swap in your own text and images
Start with a free theme. You can always upgrade later. For more picks, check out best WordPress themes.
Customize your logo, colors, fonts, and header
Head to Appearance → Customize (or use the Site Editor in newer themes). You'll find settings for:
- Logo — upload a PNG with transparent background, roughly 200x60 pixels
- Colors — pick 2–3 brand colors and stick to them. More than that looks chaotic.
- Typography — one font for headings, one for body. System fonts load fastest.
- Header layout — centered or left-aligned, sticky or static
- Footer — copyright, contact info, legal links
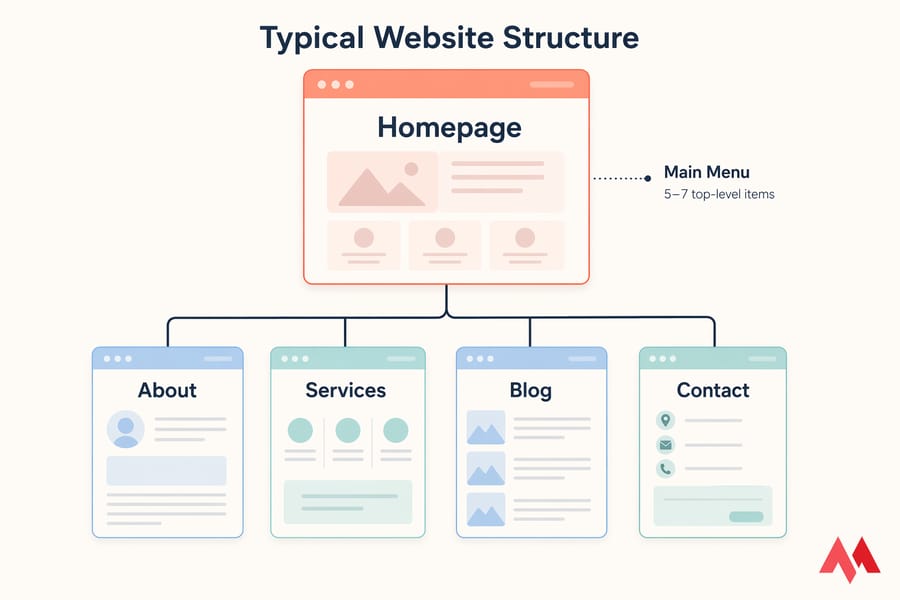
How to create menus and navigation
Clear navigation is the difference between visitors staying and bouncing. Go to Appearance → Menus, then:
- Create a new menu called "Main Menu"
- Add your key pages: Home, About, Services, Blog, Contact
- Drag them into the order that makes sense
- Assign the menu to your "Primary" location
Keep it to 5–7 top-level items. Anything more and visitors freeze up. If you have lots of content, use dropdowns or a mega menu.
Step 6: Create the Essential Pages
Every site needs a core set of pages. Skip any of these and you'll hurt trust, conversions, or both.
Homepage
Your homepage is the handshake. In about three seconds, a visitor should know: what you do, who it's for, and what to do next. Structure it like this:
- Hero section — headline, subheadline, primary CTA
- Social proof — logos, testimonials, or review snippets
- Services/benefits — three to five clear value points
- About snippet — a paragraph plus a "Learn more" link
- Final CTA — close with an action
About page
This is where you build trust. Skip the corporate bio nonsense. Write like a human. Cover: who you are, why you started, who you help, and what makes you different. Add a real photo. Real photos outperform stock every time.
Services or product page
For each service or product, include a clear name, a benefit-driven description, pricing (or "starting at" if it varies), and a CTA. If you've got more than three or four offerings, give each its own page.
Contact page
Make it easy to reach you. Include:
- A working contact form
- An email address (yes, in addition to the form)
- Phone number if relevant
- Physical address if you have one
- A map embed for local businesses
- Links to social profiles
Blog and legal pages
A blog gives you an ongoing way to rank in Google for relevant topics. Even one post a month, if it's genuinely useful, compounds over time.
Legal pages are less fun but required. At minimum:
- Privacy Policy — required if you collect any data, even just email signups
- Terms of Service — sets the rules of engagement
- Cookie Notice — needed under GDPR, CCPA, and similar laws
Free generators like Termly or iubenda can draft these in minutes.
Step 7: Add the Features Your Website Needs
Plugins extend WordPress. They're how you add forms, SEO, security, and everything else. But here's the thing: more plugins = more weight = slower site. Be picky.
Contact forms
You need one. WPForms Lite or Fluent Forms cover the basics for free. Both give you drag-and-drop form building, spam protection, and email notifications. Wire it up to your contact page and test it by submitting a real message.
SEO plugins
Yoast SEO and Rank Math are the two main players. Either one works. They help you manage meta titles, descriptions, sitemaps, and schema. Install one — not both — and work through their setup wizard.
Security and backup tools
Security is non-negotiable. At minimum:
- Wordfence or Solid Security — firewall and malware scanning
- UpdraftPlus or BlogVault — scheduled off-site backups
- Limit Login Attempts Reloaded — blocks brute-force attacks
For a deeper dive, here's how to secure your website and a guide to website backup best practices. Don't skip either. These are the steps that separate "the site got hacked" stories from "the site's been running clean for three years."
Performance and caching tools
Caching serves pre-built versions of your pages instead of generating them on every request. Huge speed win.
- WP Rocket — paid, but the best. Set and forget.
- LiteSpeed Cache — free if your host runs LiteSpeed servers
- W3 Total Cache — free alternative, steeper learning curve
For more picks, see essential WordPress plugins. Rule of thumb: aim for under 20 active plugins total. Beyond that, performance tanks.
Step 8: Optimize Your Website for SEO and Speed
You can have the prettiest site on earth. If Google can't find it and it takes eight seconds to load, nobody's visiting.
Basic on-page SEO setup
Start here, then read up on on-page SEO for beginners once you've got the basics down.
- Title tags — each page needs a unique title, 50–60 characters, with the target keyword near the front
- Meta descriptions — 140–160 characters, compelling, written for humans
- Headings — one H1 per page (usually your page title), H2s for main sections, H3s for subsections
- Permalinks — clean, descriptive URLs.
/aboutbeats/?p=7every time. - Internal links — link from one page to another when it makes sense. Helps users and Google.
- Image alt text — describe what's in the image. Helps accessibility and image search.
- XML sitemap — your SEO plugin generates one automatically. Submit it to Google Search Console.
Mobile-friendliness and user experience
Over 60% of web traffic is mobile. Test your site on a phone before launch. Look for:
- Text large enough to read without pinching
- Buttons big enough to tap with a thumb
- Menus that work on touch
- Forms that don't break on small screens
Google's Mobile-Friendly Test tool gives you a quick pass/fail check.
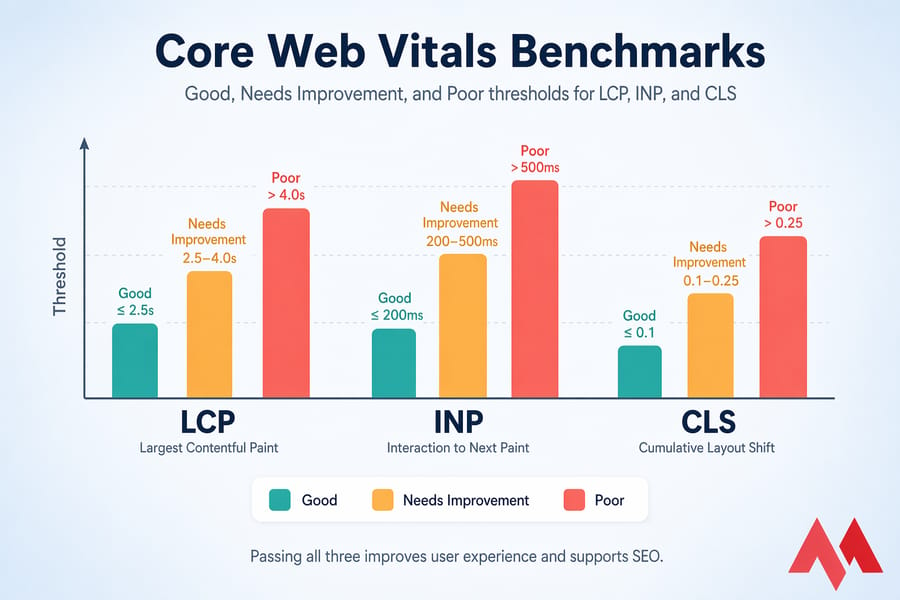
Image optimization, caching, and Core Web Vitals
Core Web Vitals are Google's three main performance metrics: Largest Contentful Paint (LCP), Interaction to Next Paint (INP), and Cumulative Layout Shift (CLS). Pass all three and you get a ranking bump plus a better user experience.
The fastest wins:
- Compress images — use WebP format. Plugins like ShortPixel or Imagify handle this automatically.
- Enable caching — covered in Step 7
- Use a CDN — Cloudflare has a free tier. It serves your site from servers near each visitor.
- Lazy load images — WordPress does this by default now
- Minify CSS and JavaScript — most caching plugins include this
Use how to check website speed to benchmark your site with PageSpeed Insights and GTmetrix. For advanced techniques, see how to improve website performance.
Step 9: Secure and Test Your Website Before Launch
Slow down here. I know you want to hit publish. Five minutes of testing now saves hours of cleanup later.
SSL certificate and HTTPS
SSL encrypts the connection between visitor and server. Google flags non-HTTPS sites as "Not Secure" in the address bar — instant trust killer. Every decent host offers free SSL via Let's Encrypt. Activate it, then force HTTPS in your WordPress settings.
Want the full background? Here's what an SSL certificate does in plain English.
Backups, updates, and strong passwords
Three non-negotiables:
- Automated backups — daily for active sites, weekly for static ones. Stored off-site (not just on your server).
- Regular updates — WordPress core, themes, and plugins. Turn on auto-updates for minor releases.
- Strong passwords + 2FA — no more "admin" / "password123." Use a password manager. Enable two-factor authentication on your admin account.
Pre-launch website checklist
Run through this before you tell anyone about your site:
- All pages have unique titles and meta descriptions
- Contact form works (send yourself a test)
- Links don't 404 (use Broken Link Checker)
- Images load and have alt text
- Site displays correctly on phone, tablet, desktop
- Page speed is under 3 seconds on mobile
- SSL is active — URL shows
https://with a padlock - "Discourage search engines" is unchecked in Settings → Reading
- Favicon is set
- Privacy policy and terms are live
- Backup is running and you've tested a restore
- Admin password is strong, 2FA is enabled
- Google Analytics and Search Console are connected

Step 10: Publish and Maintain Your Website
You've launched. Congrats. Now the real work starts — because a website isn't a one-and-done project.
Submit your site to Google Search Console
Search Console is a free Google tool that tells you how your site performs in search. Set it up on day one:
- Go to search.google.com/search-console
- Add your property (use the domain property option)
- Verify ownership via DNS record or HTML tag
- Submit your sitemap (yoursite.com/sitemap.xml)
- Request indexing for your key pages
It takes Google a few days to a few weeks to start showing you data. Be patient.
Track performance with analytics
Google Analytics 4 (GA4) tells you who's visiting, where they're coming from, and what they're doing. Install it via a plugin like Site Kit by Google or by adding the tracking code to your theme.
Don't obsess over numbers for the first couple of months. Focus on trends over time, not daily spikes.
Keep your site updated over time
A monthly maintenance routine takes about 30 minutes and prevents 90% of problems:
- Update WordPress core, themes, and plugins
- Review backup logs — make sure they're running
- Run a malware scan
- Check Search Console for errors or manual actions
- Review analytics for traffic trends
- Update outdated content (stats, prices, screenshots)
- Test your contact form
- Fix any broken links
Set a recurring calendar reminder. Future you will thank present you.
How Much Does It Cost to Create a Website?
Costs vary wildly based on what you're building. Here's a realistic breakdown for three budget tiers:
| Expense | Budget (DIY) | Small Business | Professional |
|---|---|---|---|
| Domain | $12/yr | $12/yr | $12–50/yr |
| Hosting | $3–10/mo | $15–30/mo | $50–200/mo |
| Theme | Free | $50–100 (one-time) | $100–300 (one-time) |
| Plugins | Free versions | $100–200/yr | $300–600/yr |
| Design help | $0 (DIY) | $500–2,000 | $3,000–10,000+ |
| Maintenance | $0 (DIY) | $50–150/mo | $200–500/mo |
| Year 1 total | $60–200 | $1,500–4,500 | $6,000–20,000+ |
Budget website cost
Under $200 for the first year is totally doable. Shared hosting, a free theme, free plugins, your own time. This is how most personal sites and first businesses start.
Small business website cost
Expect $1,500–4,500 in year one if you want it done properly. That covers better hosting, a premium theme, a few paid plugins, and some design help to make it look polished. Plus monthly maintenance so you're not patching plugins at midnight.
Ongoing maintenance costs
Budget roughly 10–20% of your build cost per year for ongoing upkeep. Hosting renews. Plugin licenses renew. Content needs updating. Security matters. If you're not doing it yourself, a maintenance retainer with an agency runs $50–500/month depending on scope.
Common Mistakes to Avoid When Creating a Website
I've seen every one of these play out in real life. Avoid them and you're ahead of 80% of first-time site owners.
- Choosing hosting based on price alone. Cheap hosts oversell their servers. Your site gets slow, unreliable, and throttled during traffic spikes. Spend $10/month instead of $3.
- Installing 40 plugins. Each one adds code, database queries, and attack surface. Stick to essentials.
- Ignoring SEO from day one. Retrofitting SEO after launch is brutal. Set permalinks, install an SEO plugin, write meta descriptions as you go.
- Forgetting mobile. Preview every page on your phone before hitting publish.
- Launching without SSL. It's free. There's no excuse. "Not Secure" in the address bar tanks conversions.
- No backups. Your host having backups is not the same as you having backups. Run your own.
- Using weak passwords. "admin/password" is how sites get pwned. Password manager + 2FA.
- Overdesigning. You don't need animations on every scroll. Clean and fast beats flashy and slow.
- Writing for yourself, not your audience. Nobody cares about your "innovative synergy." They care about what you can do for them.
- Never updating the site after launch. An abandoned site signals Google — and visitors — that nobody's home.
