
Do you want to create a new account in CWP (CentOS Web Panel) and gain control over your web hosting environment? Look no further! In this blog post, we will walk you through the process of creating a new account in CWP, allowing you to manage your website with ease. Whether you're a new or seasoned user, this tutorial will offer you everything you need to get started. So, let's dive in and harness the power of CWP together!
Why do we need to create a user account in CWP?
Setting up a user account in CWP (CentOS Web Panel) is critical for effective web server management. It enables resource allocation, improves security by segregating user permissions, and simplifies customization and control over several areas of server administration. Individual accounts register user activity, making them easy to monitor and audit. This multi-user environment not only improves communication and teamwork but also acts as the foundation for scaling server operations as your hosting requirements expand. Finally, user accounts in CWP help to maintain a well-organized, secure, and scalable server environment.
If you want to know how to add a user in CWP, follow the tutorial below.
Prerequisites to Create a New Account in CWP
To create a new account in the Control Web Panel (CWP), you must normally meet certain requirements. Here are the common prerequisites:
- Access the CWP: Make sure you can access the CWP interface using a web browser or a control panel program.
- Server Setup: The server should have the essential services installed, such as a web server (e.g., Apache or Nginx), a database server (e.g., MySQL or MariaDB), and other components that are important to your hosting needs.
- Server credentials: You should have the proper credentials to get into your server, usually using SSH (Secure Shell) or other remote access techniques.
- Domain Registration: If you are linking a domain to the new account, make sure it is registered and its DNS settings are correct.
- IP Address: Check that the server has an available IP address that may be assigned to the new account. I
- User Information: Gather the required information for the new account, including the preferred username, a strong and secure password, the principal domain name, and an administrator email address for account notification.
- Resource Allocation: Determine the new account's resource allocations, including disk space quota, maximum number of processes, and other pertinent variables based on your hosting needs.
- Backup and Security Considerations: Determine whether you want to allow features like backup options and shell access. Consider the security concerns and set up settings appropriately.
Step By Step Guide to Create Users in Control Web Panel (CWP)
Control Web Panel (CWP) is a web hosting control panel that lets you handle many parts of your server, such as creating and maintaining user accounts. Please keep in mind that the instructions may change slightly depending on whatever version of CWP you're running. The following is a generic step-by-step approach for creating users in CWP:
Step 1: Login to CWP
Open your web browser and navigate to the Control Web Panel login page. Enter your username and password to log in. If you haven't logged in yet, access your CWP7 dashboard. To do this, go to the IP Address of your server and append the port number "2030" at the end. It will appear in the following format:
192.168.1.183:2030
Once successfully logged in, your CWP7 Dashboard will be visible.
Step 2: Access the User Module
After logging in, look for a section or module related to user management. In CWP, this is typically labeled as "User Accounts" or something similar.

Step 3: Add a New User
the dropdown on the left, then click:

Now, you`ll see a page like this:
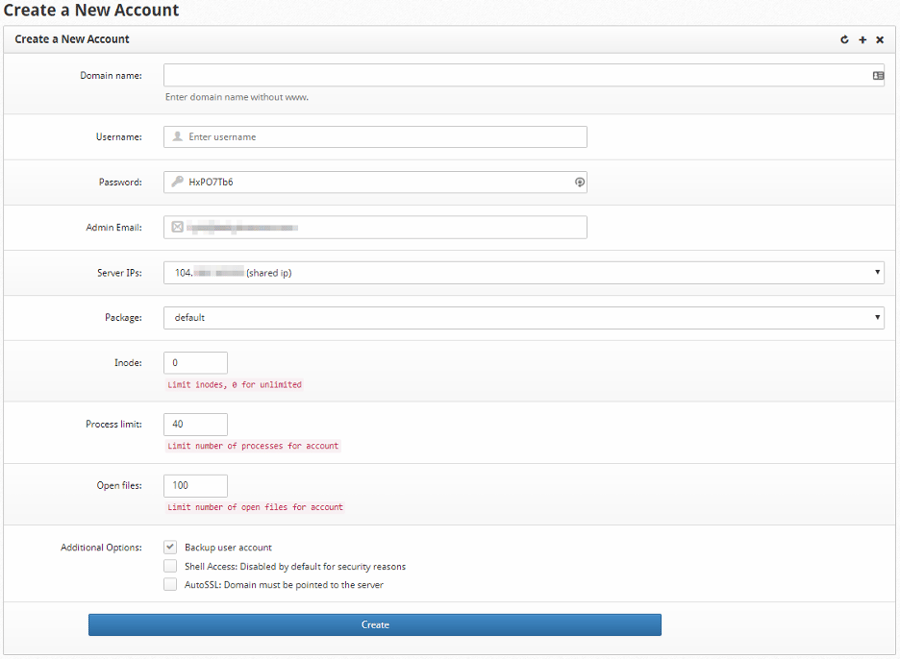
In the next step, we'll dissect each option, discussing their meanings and the impact they have on the user being generated.
Step 4: Fill in User Details
Provide the necessary details for the new user. This may include:
|
Domain Name |
put the primary domain name linked to the user account. To effectively utilize the account as a resolvable domain, put the domain registration or have control over the nameserver settings through the registrar. |
|
Username |
Specify the username to associate with the primary domain and server account. Ensure that the username aligns with the domain before the top-level domain (TLD). For example, if your domain is example.com, use "example" as the username. |
|
Password |
The newly created server user will receive the same password. Make certain that the password adheres to a minimum of 12 characters, incorporating a combination of letters, numbers, and symbols, and steer clear of commonly used phrases or words. |
|
Admin Email |
Specify the user's administrative email at this point. This email address will serve as the default destination for account notifications. You have the option to set it to an email address that may not necessarily exist. |
|
Server IPs |
Allocate an IP address to the user's account and domain in this section. Typically, the same IP address is used for most new accounts. If you require additional IP addresses, you can incorporate them through the Cloud Control Portal. |
|
Package |
You have the flexibility to continually oversee the available packages to meet specific requirements. While the default package is suitable for most scenarios, you might discover the necessity for additional adjustments. |
|
Inodes |
You can set inode limitations here if you want a different limit than the default package. If you leave this value at zero, there will be no restriction. Inodes are a mechanism for estimating the amount of space used on a storage device. |
|
Process Limit |
Specify the maximum number of Linux or PHP processes that the user can initiate in this section. In most cases, the default number provided here should be ample for typical website installations operating on a single domain. |
|
Open Files |
You have the option to restrict the overall number of open files that the user account can have concurrently. Generally, the default limit should suffice, but it can be raised if the user encounters resource allocation challenges. |
|
Additional Options |
The choices available here offer additional features or limitations for the user account. Enabling a backup user account permits the server backup script to include this account in the backup. Meanwhile, granting Shell Access allows the user account to execute scripts as a Linux user on the server. |
Step 5: Save the User
After filling in the user details, look for a "Save" or "Create" button. Click on it to save the new user.

Step 6: Verify and test
Once the user has been created, confirm that the new user account was successfully added. You may see a confirmation message or a list of users, including the new user.If applicable, log out of the control panel and log back in using the newly created user account to ensure that the account is working as expected.
User Management Tools
Here, we'll explore 2 tools designed to streamline the management of CWP server accounts.
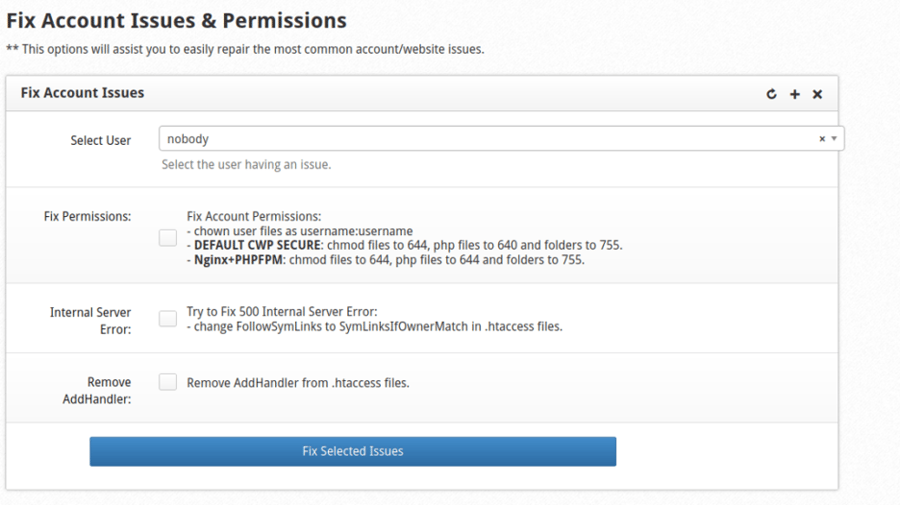
1- Fix Permissions
The Correct Permissions tool efficiently resolves two prevalent account-wide issues:
- Incorrect file and user permissions, frequently stemming from software misconfigurations. This tool resets files to be owned by the CWP user.
- 500 Internal Server Error, commonly triggered by coding errors in the web server. The tool addresses this by making necessary additions to the Apache .htaccess file.
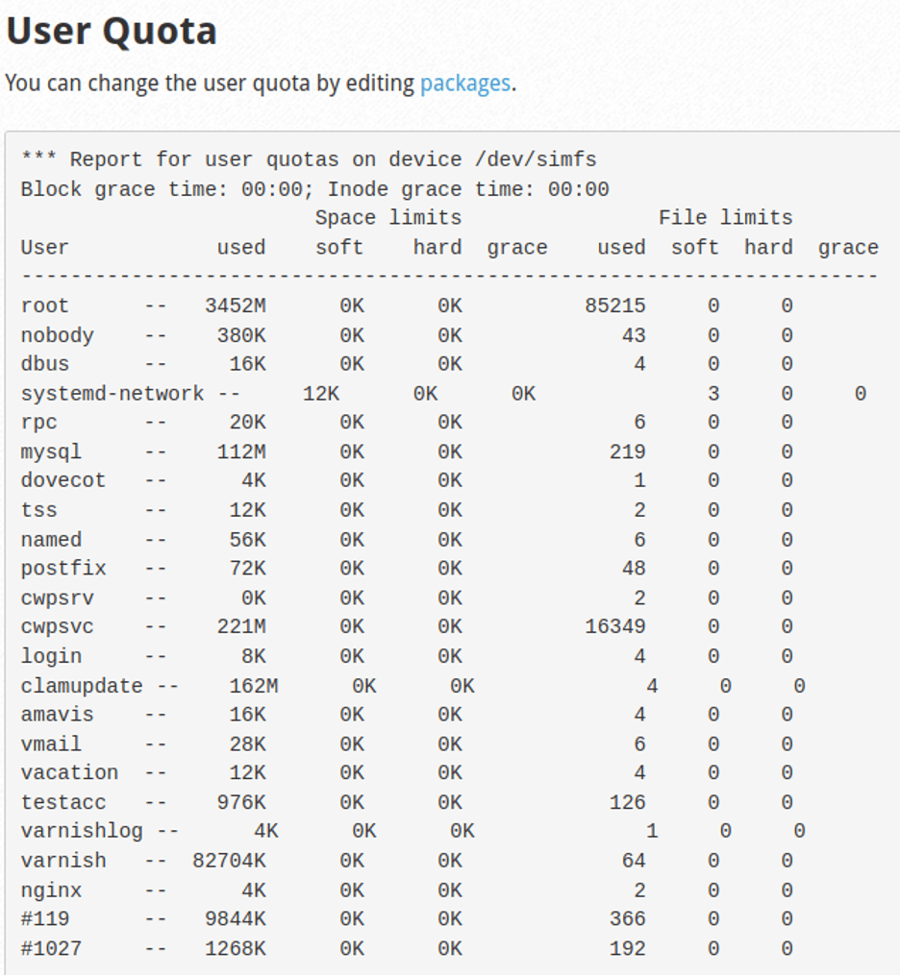
2- User Quota
Experiencing a shortage of disk space can significantly diminish system performance and hinder the creation of reliable backups. In the User Quota section, you get a quick overview of disk usage for all CWP server users, along with their respective disk space limits. The same information can be accessed in the CWP terminal using the following command:
repquota
Additional Tips and Troubleshooting
Here are further recommendations and troubleshooting measures to consider while creating a new account in Control Web Panel (CWP):
- Check that the domain you are associating with the new account has the correct DNS settings.
- Regularly review and adjust resource allocations like disk space, maximum processes, and memory limits.
- Implement regular monitoring of account activities using CWP tools or external monitoring solutions.
- Ensure that firewall settings are configured to allow necessary traffic for the new account.
- Explore additional CWP tools for server optimization, such as the Apache & Nginx Settings module.
Conclusion
Creating a new account in the Control Web Panel (CWP) is an important step in administering your server and hosting several websites or applications. By following the steps given and considering additional advice, you may ensure a seamless account setup while maximizing CWP's potential. Regularly monitoring and changing resource allocations, maintaining up-to-speed on upgrades, and applying security procedures will help your server run more efficiently and reliably.

My name is Linda, I have Master degree in Information Technology Engineering. I have some experiences in working with Windows and Linux VPS and I have been working for 2 years on Virtualization and Hosting.