
List of content you will read in this article:
The Minecraft game is widely popular amongst gaming enthusiasts. You can play it on several platforms, for instance, Windows, Android, iOS, or Mac. When we talk about RAM, by default the game consumes only 1 GB of RAM. In case you require more RAM, you have the liberty to do that. We are here to make you well acquainted with the process to allocate more RAM to your Minecraft server. But before we begin, here is a quick definition of a Minecraft server!
What is a Minecraft Server?
If you wish to play a multiplayer game in Minecraft, you need a Minecraft server. You can easily build a connection with other players through LAN or online.
Need Affordable MINECRAFT SERVER
Starting From $5.99/Monthly
🏅 Fast Delivery
🏅 25+ Data Centers
The server is managed and taken care of by administrators or operators. To host a server, you require several tools and resources. For instance, LAN, rented servers, dedicated servers, realms, etc.
How Much RAM Does Minecraft Need?
The exact amount of needed RAM depends on factors like the world size, the number of players, and any modifications or custom content being used. Allocating extra RAM can improve game speed and eliminate lag. The Minecraft's RAM needs depend on how you play:
- Basic gameplay: 2GB is the bare minimum, but expect lag, especially with bigger worlds or more players.
- Comfortable playing: 4GB is the sweet spot for most players. This gives you smooth performance with standard settings.
- Modded Minecraft: Mods and resource packs are RAM-hungry. If your modded game lags, a RAM upgrade (maybe to 8GB or more) can solve the problem.
Important: Be careful not to overdo it! Since too much RAM will slow down the game. If you allocate more RAM to Minecraft than your server, you may experience slowing things down.
How to check my actual RAM?
You need to know how much RAM you have on hand. This random-access memory (RAM) acts like your computer's workbench, and Minecraft needs enough space to build a world without running out of room. While most warriors (gamers) know their RAM capacity, if you're unsure, follow these steps to see how much firepower you're packing!
Method 1: Using the System window
- Press the “Windows key” and the “Pause/Break key” simultaneously. This will open a window with your system information.
- Look for the section labeled "System". Underneath, you'll see "Installed memory (RAM)" which displays the total amount of RAM installed on your computer.
Method 2: Using Task Manager
- Press “Ctrl + Shift + Esc” to launch the Task Manager.
- Click on the “Performance” tab.
- Under the section titled "Memory", you'll see the total amount of RAM installed on your computer.
Now that you know your RAM amount, you can use this information to decide how much RAM to allocate to Minecraft for optimal performance! Let`s see how to do that.
Why should I add more RAM to the Minecraft server?
Before we explain how to allocate more RAM to Minecraft, it`s better to know why you should do that! There are some benefits:
- Better performance for the server: With extra RAM, the server can manage more players and complex environments without lagging. This is because the server can keep more data in memory, eliminating the need to use the slower storage device.
- More fluid playing: With enough RAM, the server can load chunks and entities faster, resulting in a more engaging experience for players. This results in less stuttering and waiting for things to load up.
- You can run larger mods and resource packs: Adding more RAM allows you to run larger mods and resource packs without affecting performance, allowing for more customization for your server.
- Lower server crashes: RAM can cause server crashes, especially in complicated worlds or with a great deal of players. Upgrading RAM will help prevent these problems, keeping your server online and stable for you and your players.
How to add more RAM to the Minecraft server?
If you are looking forward to escalating the performance of your server and hence your gaming experience, you can add more RAM to the server. You have to make sure that your device has extra memory for this process to accomplish. To find how much RAM does a Minecraft server need, check this blog.
Here is the process in a step-by-step fashion:
- The first step is to avail access to the Minecraft directory on your respective device. The directory contains a file titled, ‘Minecraft_server.exe’.
- Go to Home and choose the option, New Item. Further, you need to select the Text document in order to create a Text document in the directory itself.
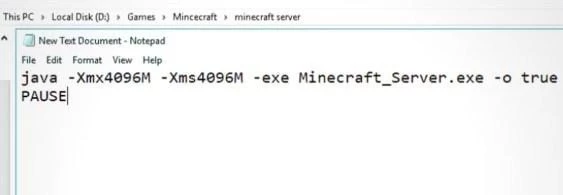
- Now, go to a new text document and type the following text: java -Xmx####M -Xms####M-exe Minecraft_Server.exe -o true PAUSE.
- You have to now replace the ‘####’, with whatever amount of RAM you want to add in MBs
- Now, go to File and click Save As. Set the type to All files. Change the extension to .bat
- This document is all set to become the new launcher for you. Double click on this file to start the launcher.
The next segment talks about the process to add additional RAM to the Minecraft server with the help of a default launcher.
How to add more RAM to the Minecraft server by Default Launcher?
To begin with, you must have the right version of Java on your device. Without it, your task won’t be accomplished.
The first step is to download the Java 8 64 bit version. Now, follow these steps to reach our desired goal:
- Go to Minecraft and then to your installation tab
- The next step is to choose your version and click on the 3 dots. Press Edit. After that, select More Options.
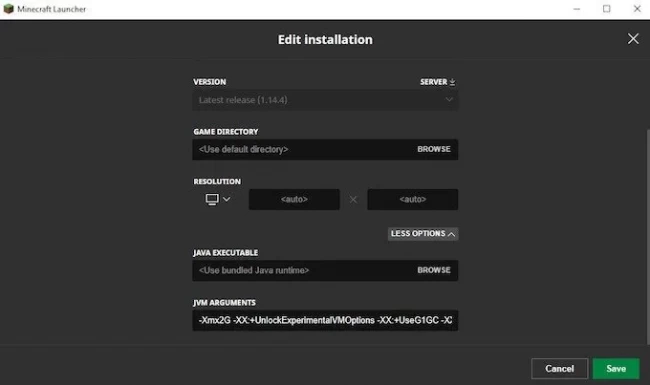
- Now, head towards JVM ARGUMENTS. Look out for an option like this: -Xmx2G-XX:+UnlockExperimentalVMOptions”
- As you can see, the initial term is Xmx2G - the 2, represents 2GB of RAM here
- You can change this number as per your wish. Be careful about the compatibility of your hardware with the amount that you enter
Well. That’s it! These simple steps lead you to attain more RAM for your Minecraft server in no time.
How to Allocate RAM to Minecraft through the Official Launcher?
You can allocate more RAM to Minecraft using different methods depending on the launcher you use. First, we want to start with the steps to allocate more RAM using the official Minecraft launcher.
Step 1: Open the Launcher and Select Game Version
- Open the Launcher: Launch the official Minecraft launcher. This can be for either the Bedrock or Java version.
- Select installations: At the top of the launcher, you will see several tabs. Click on "Installations."
- Choose the game version: You will see a list of available releases. Select the version of Minecraft you want to play. It’s recommended to choose the latest version.
Step 2: Edit the Allocated RAM
- Access Edit options: Now that you selected the game version, you will notice three white dots on the right side of the launcher. Click on these dots and choose "Edit."
- Go to JVM Arguments: In the edit menu, select "More Options" and look for the field labeled "JVM Arguments."
- Adjust RAM Allocation: You will see a line of code that looks like this: `-Xmx1G`. For example, you may see the "1G" which represents the amount of RAM currently allocated to Minecraft. Change the number to reflect the amount of RAM you want to allocate. For example, to allocate 6GB, change it to `-Xmx6G`.
- Save changes: Click "Save" and restart the launcher for the changes to take effect.
How to Allocate RAM to Minecraft through the ATLauncher?
ATLauncher is a Minecraft third-party launcher that simplifies modpack management and installation. It provides a user-friendly interface for searching and downloading modpacks, as well as customizing RAM allocation and Java versions. ATLauncher also provides tools for updating Minecraft installations and modpacks, thus it's a popular choice among mod fans. Follow these procedures to allocate more RAM to Minecraft on ATLauncher:
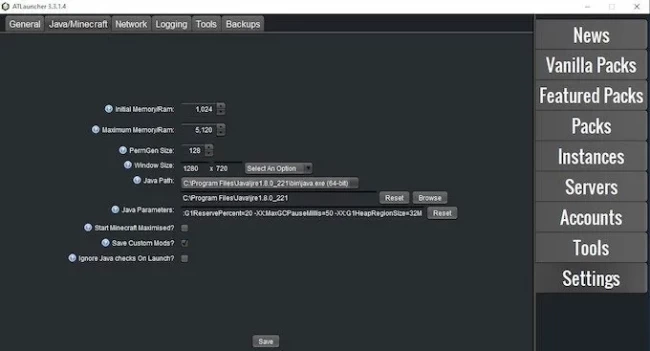
Step 1: Open ATLauncher and Head to Settings
- Launch the ATLauncher application.
- On the right-side menu panel, click on the "Settings" tab.
Step 2: Go to RAM Settings
- In the Settings menu, click on the "Java/Minecraft" tab. This will open a new drop-down menu with different options.
- Look for the option labeled "Maximum Memory/RAM" and click on it.
Step 3: Change the RAM Input
- A new input field will appear, allowing you to set the amount of RAM you want to allocate. Use the arrows to increase or decrease the amount of RAM.
- After selecting the desired amount of RAM, save the changes.
How to Allocate RAM to Minecraft Server on a PC?
Running a Minecraft server on your PC is fantastic, but lag can ruin the experience for you and other players. Who is responsible? Not enough RAM! The good news is that adding more RAM to your server is simple and very similar to what we did with the other methods. Following these instructions can quickly turn your server into a lag-free ideal world:
Step 1: Finding the Server's Core
First, you'll need to locate the heart of your Minecraft server the server files!
- Go to the folder where these files are stashed.
- Once you're there, right-click on the server file and choose "Edit" or "Open With"
- Then select a text editor. Most computers come with Notepad, which works perfectly for this task.
Step 2: Edit the Amount of Dedicated RAM to the Minecraft Server
Open the file in your text editor and prepare to interpret some code (don't worry, it's easy!). Look for a line that begins with "java -Xmx", followed by a number and either a "M" for megabytes or a "G" for gigabytes. This line regulates how much RAM your server may use.
Step 3: Cracking the Code (and Boosting RAM)
To expand your server's RAM, simply raise the value following "-Xmx". For example, if the current line is "-Xmx1024M" (which allocates 1GB of RAM), you can modify it to "-Xmx2048M" to provide your server with 2GB of RAM. Once you've made your modifications, save them to the file.
Close the text editor and start your Minecraft server as usual. Allocate more RAM to Minecraft based on your server's demands. Also, ensure that your PC has enough free RAM to handle the increase you're giving the server.
How to allocate more RAM to Minecraft using CurseForge Launcher?
CurseForge is a massive library filled with mods, custom content, and packs designed to make your games better. In addition, the CurseForge launcher simplifies the process of downloading and installing everything, with automatic updates and checks to ensure that nothing clashes. Here's an illustrated tutorial for allocating extra RAM with the CurseForge Launcher:
Step 1: Open CurseForge Launcher and Select Minecraft
- Open the CurseForge Launcher on your computer.
- From the main screen, click on the Minecraft icon to open the Minecraft settings.
Step 2: Access Profile Options
- In the Minecraft section, you will see a list of installed modpacks or Minecraft versions. Hover over the profile you want to modify and click on the three dots (menu icon) that appear.
- Select "Profile Options" from the menu.
Step 3: Unlock Memory Settings
- Ensure that the "Locked" toggle is turned off to unlock the memory settings.
- You will now see a field for "Memory Settings" or "Allocated Memory."
Step 4: Adjust the RAM Allocation
- Use the slider or manually enter the amount of RAM you wish to allocate to Minecraft. For example, if you want to allocate 4GB, type in "4096 MB" (1GB = 1024 MB).
- Click "Save" to apply the new memory settings.
Step 5: Restart the Launcher
Close and reopen the CurseForge Launcher to ensure the changes are applied.
Adding More RAM to a Minecraft Server Using Voidswrath Launcher?
Another popular launcher for modded Minecraft experiences is Voidswrath. Now we want to show you how to allocate more RAM to Minecraft using it:
- Launch the Voidswrath application on your computer.
- Go to the "Mod Packs" tab and select the server or modpack you want to adjust.
- Click on the "Settings" or gear icon associated with the server.
- Look for the “Memory Settings” or “RAM Allocation” option.
- Use the slider or input field to increase the amount of RAM. For example, set it to 4GB by entering "4096 MB" (1GB = 1024 MB).
- Save the changes and restart the Voidswrath launcher.
Allocating more RAM using Technic Launcher
Follow the below steps to add more RAM to the Minecraft server using Technic Launcher which is another popular launcher for modded Minecraft:
- In the top right corner, click "Launcher Options."
- Look for the "Java Settings" tab and adjust the "Memory" dropdown.
- Pick the amount of RAM you want (like 4GB) and save your settings.
- Restart the launcher for the changes to take effect!
How to Allocate More RAM to Minecraft in Windows 10
Here's how to increase the amount of RAM your server can utilize. Please remember that these instructions are only for servers operating from a Windows 10 PC.
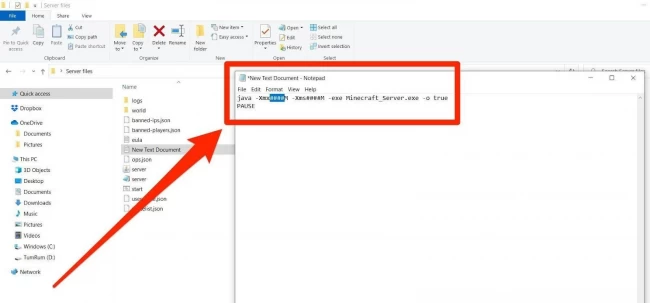
- Navigate to the folder that contains all of your Minecraft server directories.
- Select "New" and "Text Document" from the menu that appears when you right-click on any black space in the folder. And temporary, you may call the file whatever you like.
- Open the document and insert the following code:
java -Xmx####M -Xms####M -exe Minecraft_Server.exe -o true
PAUSE
Instead of "####," enter the quantity of RAM you wish to assign. You'll input the allocation in megabytes, thus if you wish to allocate 3GB, type "3072," creating the code:
java -Xmx2048M -Xms3072M -exe Minecraft_Server.exe -o true
PAUSE
- When entering the quantity of RAM you want, be sure your GB to MB conversions is right. Now, choose "File," then "Save As..." Change the "Save as type" to "All Files" in the option that appears. Keep it.
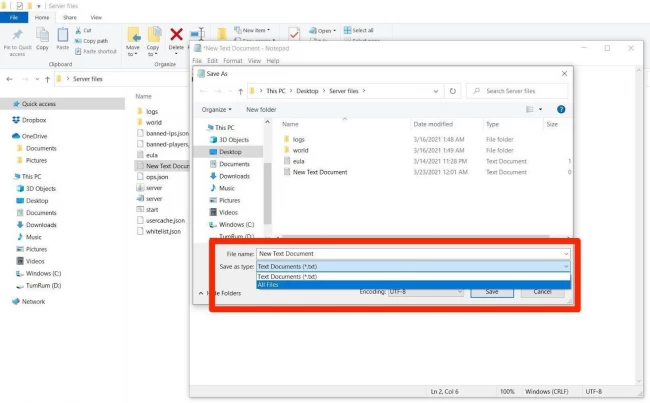
Saving as "All Files" allows you to alter the document's extension afterward.
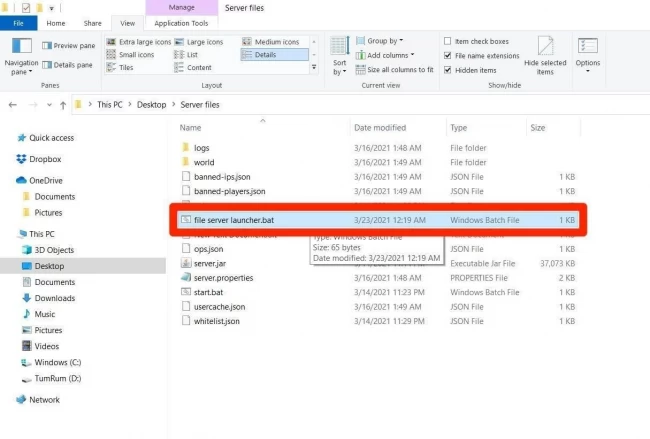
- Once you have successfully saved the document and it is visible in your folder, rename the file as "file server launcher.bat" - without quotation marks.
- What started as a text file has evolved into the new Minecraft server launcher. Double-click the new.bat file to restart your server with the increased RAM.
Allocating more RAM using FTB App (Feed the Beast)
And the last method is FTB App! It is widely used for managing and playing modded Minecraft packs. to use this method, follow this instruction:
- Open the FTB App!
- Click the gear icon for Settings.
- Head to the "Minecraft" tab.
- Drag the "RAM Maximum" slider or type in the amount (e.g., 4096 MB for 4GB).
- Save your changes and restart the FTB App to unlock the new power!
Conclusion
In a nutshell, this article helps you to allocate additional RAM to your Minecraft server. We hope that the details and information provided in this tutorial gives you a hand in solving your ambiguities related to the topic. Keep exploring. Keep practicing.
