
Configuring additional IP addresses in CentOS 7 can be essential for various networking requirements. Whether you need to add secondary IPs manually or through network management tools, this guidewill help you learn how to add an extra IP to CentOS 7.
Add Secondary IP Address Manually
Learn how to add an extra IP to CentOS 7 manually involves editing network configuration files in the /etc/sysconfig/network-scripts/ directory. This method allows precise control and customization of each additional IP address.
Step-by-Step Guide:
- Log in as root: Access your CentOS server with root privileges to perform administrative tasks.
- Navigate to the network scripts directory: Use the command cd /etc/sysconfig/network-scripts/ to move to the directory containing network configuration files.
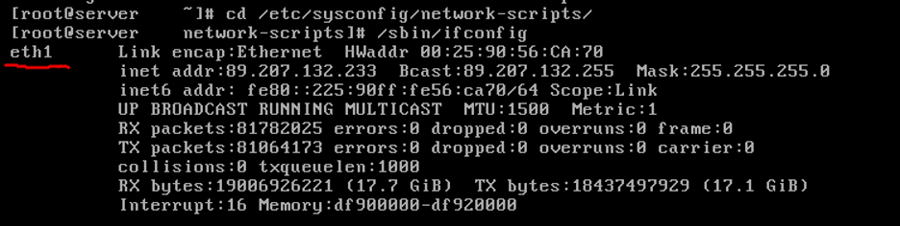
- Determine the interface: Identify the specific network interface to which you want to add a secondary IP by utilizing the /sbin/ifconfig command. This command will display information about the existing network interfaces.
- Create configuration files: Generate a new configuration file for each secondary IP address. For instance, if your primary interface is eth1, you can create additional configurations such as ifcfg-eth1:0, ifcfg-eth1:1, etc. The number after the colon indicates the virtual interface number.
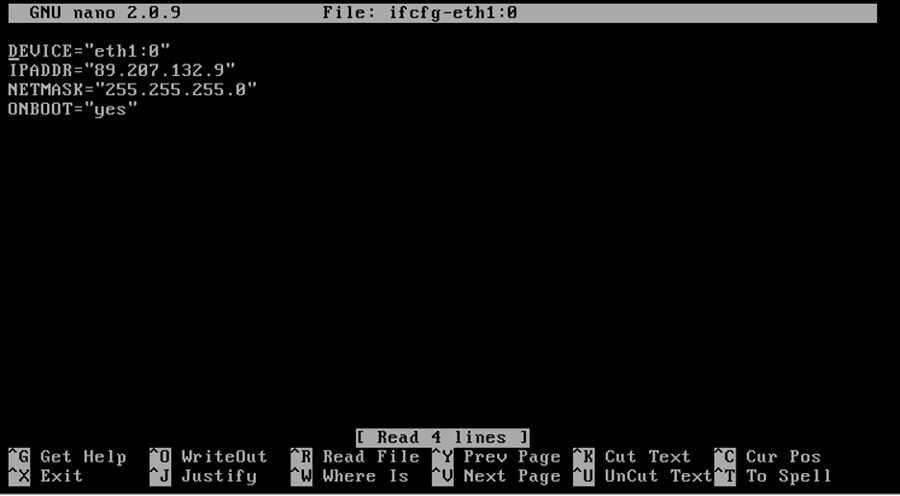
- Edit the configuration file: Use a text editor like nano or vi to modify the configuration file you created. For example, execute nano ifcfg-eth1:0 to open the file. Add the following fields and customize them according to your requirements:
DEVICE="eth1:0" IPADDR="YOUR_SECONDARY_IP_1" NETMASK="YOUR_NETMASK" ONBOOT="yes"
Replace YOUR_SECONDARY_IP_1 with the desired secondary IP address and specify the appropriate NETMASK for your network.
- Save and exit: Press Ctrl+O to save the changes, then Enter, and Ctrl+X to exit the text editor.
- Restart the network service: Apply the new network configurations by restarting the network service. Execute /etc/init.d/network restart in the terminal.
- Verify the configuration: Check if you’ve done the CentOS add second ip address to interface process successfully by running the command /sbin/ifconfig. You should see the newly added secondary IP(s) associated with the specified interface.

Add Secondary IP Address using nmcli
The nmcli command-line tool in CentOS 7 provides a convenient method to manage network configurations, including the addition of secondary IP addresses to network interfaces. Here's a step-by-step guide on how to add an extra IP to CentOS 7 using nmcli:
Step-by-Step Guide:
- Open the terminal: Access the terminal or command-line interface on your CentOS server.
- Launch nmcli: Type nmcli in the terminal and press Enter to start the nmcli tool.
- List available connections: Enter the command nmcli connection show to display a list of available network connections/interfaces.
- Identify the target connection: Locate the network interface to which you want to add a CentOS secondary IP address from the list displayed.
- Add the secondary IP address: Use the following nmcli command to add the secondary IP address to the chosen interface:
nmcli connection modify INTERFACE_NAME +ipv4.ADDRESS SECONDARY_IP_ADDRESS/MASK
Replace INTERFACE_NAME with the name of your network interface (e.g., eth0), and specify the SECONDARY_IP_ADDRESS along with its subnet mask.
For example:
nmcli connection modify eth0 +ipv4.addresses 192.168.1.100/24
- Apply the changes: Execute the modification by pressing Enter. The command updates the network configuration to include the specified secondary IP address on the chosen interface.
- Verify the configuration: Ensure that the secondary IP address has been successfully added by checking the network configuration details using the command:
nmcli connection show INTERFACE_NAME
Replace INTERFACE_NAME with the name of the interface you modified (e.g., eth0). Verify that the secondary IP address is listed in the output.
Add Secondary IP Address Using Network Manager
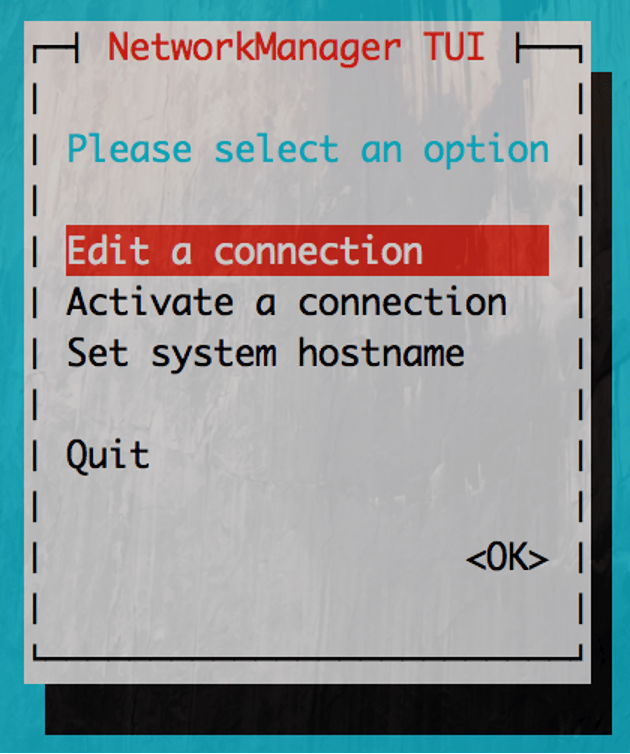
When you learn how to add an extra IP to CentOS 7 using Network Manager, it provides a graphical and user-friendly method to manage network configurations in CentOS 7. Here's a step-by-step guide to adding a secondary IP address through Network Manager:
Step-by-Step Guide:
- Open Network Manager: Access the graphical interface of Network Manager. You can usually find it in the system settings or launch it via the terminal using the nm-connection-editor command.
- Select the Network Interface: From the Network Manager interface, identify and select the network interface to which you want to add the secondary IP address. Right-click on the connection or interface and choose the "Edit" option.

- Access Connection Settings: In the network connection settings, locate the IPv4 settings tab (or IPv6 if applicable) and select it to access the IP configuration options.
- CentOS Add Secondary IP: Look for the "Additional Addresses" or "Add" button within the IPv4 settings. Click on it to add a new IP address.
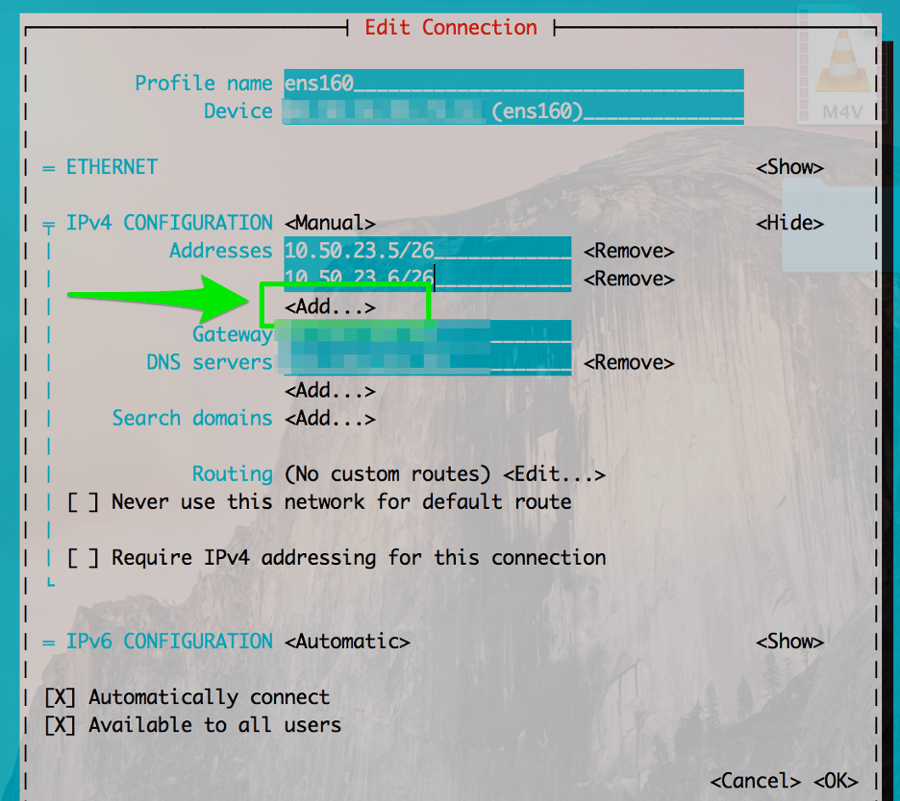
- Configure the Secondary IP Address: Enter the secondary IP address and its corresponding subnet mask into the provided fields. Ensure that you specify the correct details for the secondary IP you want to add.
- Save the Changes: After adding the secondary IP address, save the changes by clicking "Apply" or "OK" in the Network Manager interface.
- Verify the Configuration: To confirm that the secondary IP address has been added successfully, you can check the network settings. Use commands like ifconfig or nmcli connection show in the terminal to view the updated configuration details.
Adding a Temporary IP Address
Adding a temporary IP address in CentOS 7 using the ip command provides a quick and transient solution, useful for temporary network configurations. If you’ve learned how to add an extra IP to CentOS 7, here's a guide on how to add a temporary IP address:
Step-by-Step Guide:
- Open the Terminal: Access the terminal or command-line interface on your CentOS server.
- Use the ip command: To add a temporary IP address to a specific interface (e.g., eth0), execute the following command:
ip addr add YOUR_TEMPORARY_IP/MASK dev INTERFACE_NAME
Replace YOUR_TEMPORARY_IP with the temporary IP address you want to add and MASK with the subnet mask. Substitute INTERFACE_NAME with the appropriate network interface (e.g., eth0) where you wish to add the temporary IP.
For example:
ip addr add 192.168.1.200/24 dev eth0
This command adds the IP address 192.168.1.200 temporarily to the eth0 interface with a subnet mask of 24 (equivalent to 255.255.255.0).
- Verification: Confirm the addition of the temporary IP address by using the ifconfig or ip addr show command. This allows you to check the current configuration of network interfaces and verify if the temporary IP address has been successfully added.
- Temporary Nature: Keep in mind that a temporary IP address added using the ip command will persist until the next network service restart or system reboot. Afterward, the temporary IP will no longer be associated with the interface.
Wrapping Up
Learning how to add an extra IP to CentOS 7 is a valuable skill that allows you to adapt your server's network configuration to suit various requirements. Whether you've chosen to manually do the CentOS add secondary IP process or utilized user-friendly tools like nmcli or Network Manager, you've gained insight into manipulating network settings effectively.
Remember, the method you select should align with your specific use case and preferences. Adding temporary IPs using the ip command offers quick adjustments, while Network Manager's graphical interface streamlines the process for those more comfortable with a visual approach.

My name is Sophia H. My degree is MS in Information Technology Engineering. I have been working for 5 years on Java developing (j2ee), Computer Networking (Optical Networks), Virtualization and Hosting.