List of content you will read in this article:
Nowadays, almost any website you visit you will see the same thing, a small lock icon next to the URL of the site. This means that the website is secured via transport layer security (TLS). In fact, if a site does not have an SSL certificate, most browsers will show a warning saying that the site is unsafe.
Today, we will delve a little deeper into what is an SSL, types of validation for SSL certificates. Then, we will show you how to install Sectigo SSL on cPanel.
What is an SSL?
Secure Sockets Layer (SSL) is a protocol for enabling data encryption and site authentication on the Internet. This is done by making sure that all data transferred between the user and the site, or between two systems remain impossible to read if intercepted.
Credit card numbers, medical details, and other sensitive information are transmitted only after being converted into a secure code. It uses encryption algorithms to scramble the data during transit, which prevents hackers from gaining access to it.
Domain authentication reassures site users that they're interacting with the site identified in the URL bar. Without SSL, online transactions would be vulnerable to interception by unauthorized parties.
SSL is commonly used to protect communications between web browsers and servers. However, it is also used for server-to-server communications and for web-based applications.
SSL Validation Types
All SSL certificates are classified by their validation levels. Before a certificate authority can provide an SSL certificate to an organization, they have to do a small investigation to make sure the organization is a valid one. This is done so that there is a guarantee that the organization/individual requesting the domain actually owns and operates it.
As you probably already guessed, not all validation levels are the same. While one type could have just a bare minimum verification process, others could include a full-blown background investigation.
It is important to note, however, that while the validation levels could be different, all SSL certificates provide the same level of TLS encryption. They only vary by the level of authentication the certificate authority has used to verify the client’s identity.
Domain Validation
This is the most basic level of validation available within the SSL certification process. Getting one such certificate is quite simple; you only need to prove that you have control over the domain. This can be done by altering the DNS record associated with the domain, or sometimes by simply sending an email to the certificate authority from the domain’s email. More often than not, this process is carried out automatically.
Such a level of validation is the cheapest and most suitable for sites such as blogs, portfolios, or small businesses that are looking to quickly have HTTPS. Basically, if you do not sell products or services via your website, the
Organization Validation
Now we move onto the intermediate level of SSL validation. It involves a manual vetting process that usually includes the certificate authority contacting the organization that requested the SSL certificate and sometimes even some further research.
Extended Validation
Lastly, we have the professional level of SSL validation. Extended validation involves a full background check of the organization. First and foremost, the certificate authority will verify that the organization actually exists and is legally registered as a business, present at the address they specified. While taking the longest and costing the most, this level of SSL validation is the most trustworthy.
If you have ever visited a website and seen the URL turn green, then they have an Extended Validation SSL.
Installing SSL on cPanel
To install the SSL service on cPanel, the below-mentioned steps must be followed:
- Creating an email account under the domain name
- Generating the CSR
- Sending CSR to the CA Company
- Domain Control Validation
- Download and install the Certificate
Create an email account under your domain name
As the first step, we will create an email account to set this account as the base email address for configuring the SSL certificate. This email address will be used for receiving the verification emails and the certificate which will be sent from the Certificate authority (CA). Also, we will use this email account when we want to generate the CSR code.
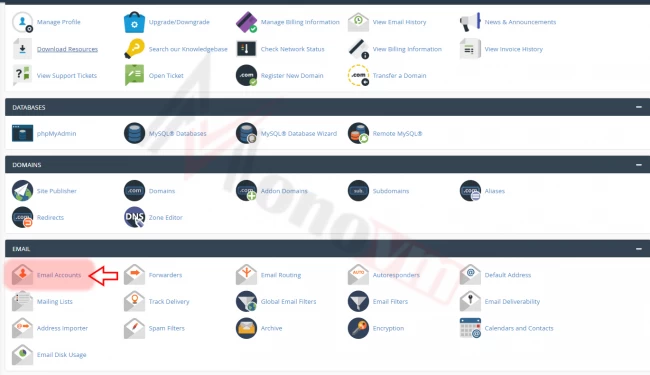
- For creating the email account, log in to cPanel and, click on the Email Accounts option in the EMAIL section.
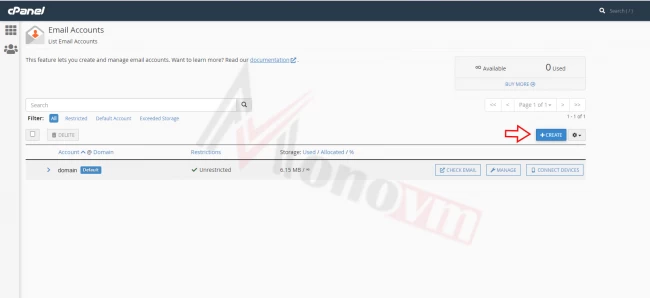
- Then click on the +Create button.
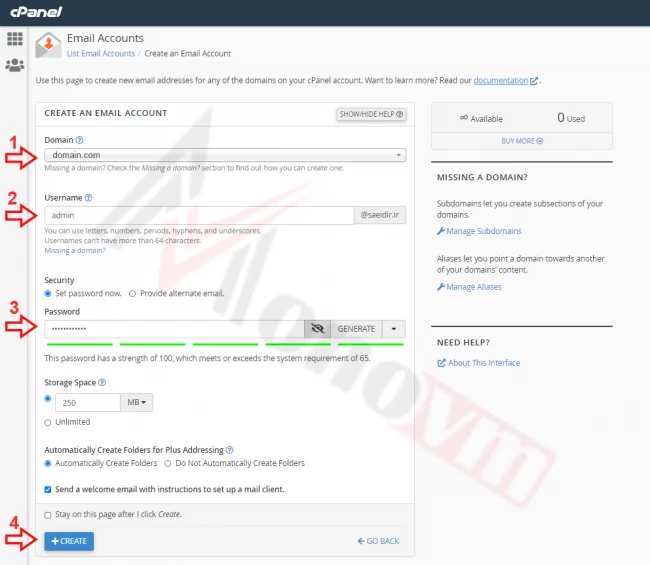
We have to create an email account named admin, or administrator, or webmaster, or postmaster or, hostmaster.
In this tutorial, we create an email account with the name 'admin'. Enter the username (admin), generate a password and, click on the '+Create' button.
Generate the CSR (Certificate Signing Request)
A CSR is a block of encoded text that is given to the CA company when applying for an SSL Certificate. The CSR contains information that will be included in the certificate such as:
- the organization name
- domain name
- locality
- country
It also contains the public key that will be included in the certificate.
For generating the CSR,
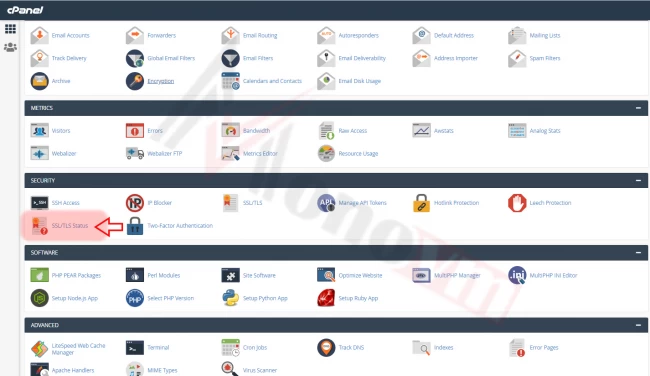
- find the Security section on cPanel main page and click on the SSL/TLS option
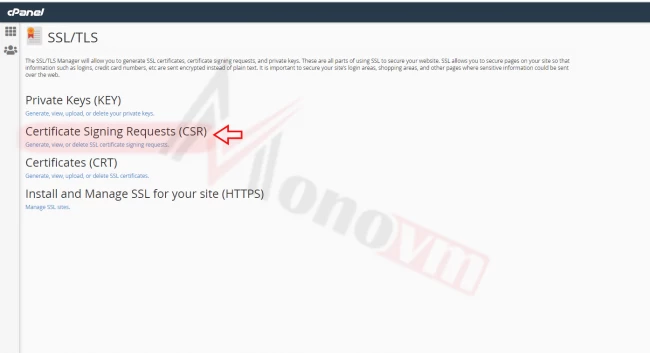
- In SSL/TLS page click on the Certificate Signing Requests (CSR) option.
- Fill in the required information in the CSR generation form and click on the Generate button.
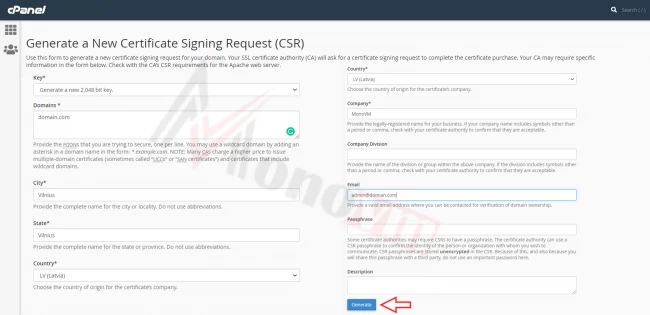
Key: It is better to select the default value (2,048 Bit). If you select the 2048-bit key, a completely new Private Key will be generated.
Domains:
- In the Domains text box, enter the domain name of the website that the certificate will secure (common name).
- The common name for all Wildcard certificates should be represented with an asterisk in front of the domain (*.domain.com).
- To create your CSR code for multiple domains, enter each domain in a new line.
City/State: Enter the complete name of your city and state (or region) in related boxes.
Country: Select your country from the drop-down list.
Company: Enter the officially registered name for your business. Also, you can enter the domain name without the extension.
Email: We will use the email account that we created in the previous step.
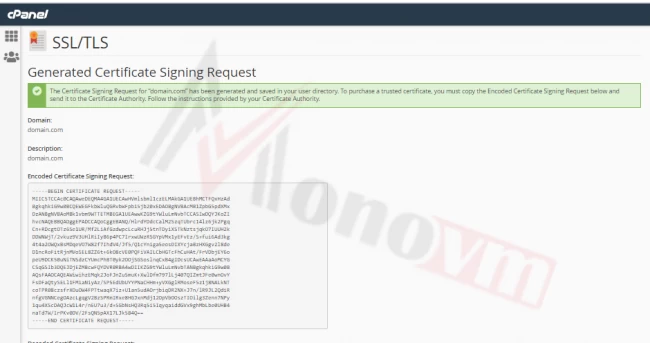
Click on the Generate button. The next page will show the newly generated CSR code. You can now use the Encoded Certificate Signing Request to activate the certificate.
Sending CSR to the CA Company
At this step, we have to send the generated CSR and the contact information to the CA company by filling a form.
In order to access the mentioned form,
- Login to your client area on Monovm website, and select the purchased Sectigo or PositiveSSL service in your service’s list
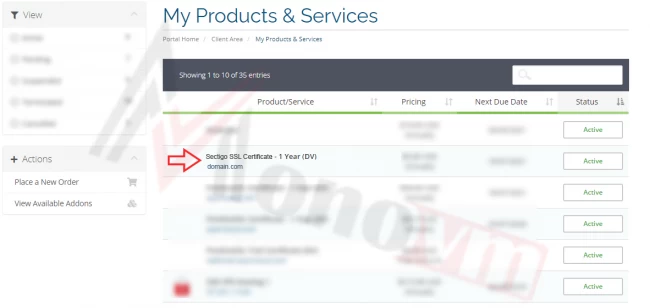
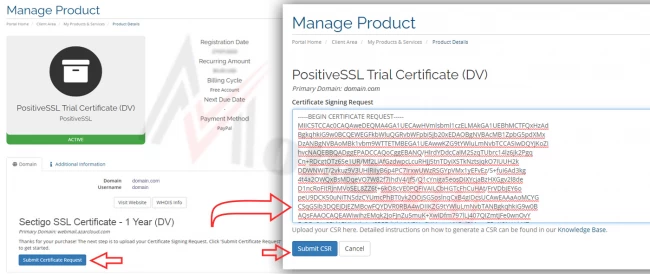
- After selecting and opening the service page, click on the Submit Certificate Request button.
- In the next page, we have to copy and paste the generated CSR in the relavant text box and click on "Submit CSR" after completion.
Domain Control Validation
A Domain Control Validation (or DCV) must be completed before issuing an SSL certificate in order to verify the person making the request is in fact authorized to use the domain related to that request.
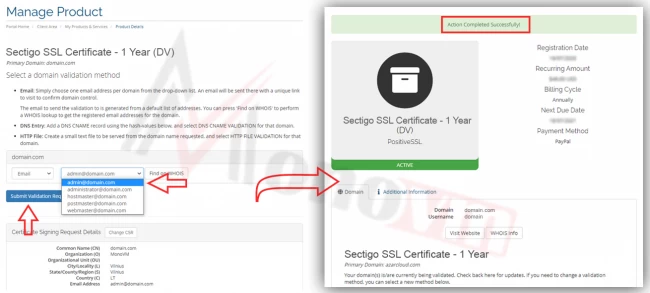
By clicking on Submit CSR button, a new page will appear.
On this page, we can define an email account as the main account for receiving the validation email.
Also, we can check the generated CSR details. We select the created email account via the drop-down menu and click on the Submit Validation Request button. By clicking on this button we will receive a validation email in the predefined email address.
Note: Receiving the validation email may take up to a few minutes to an hour.
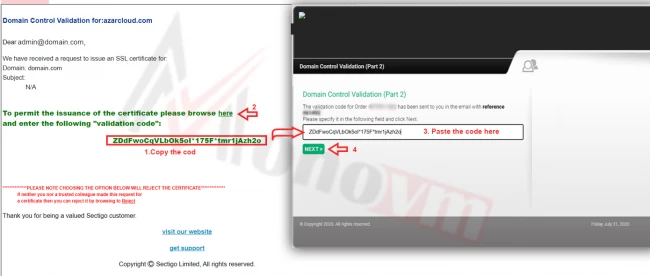
Now let's go and check the received email.
After receiving the Domain Control Validation email, click on the portal link and enter the validation code.
Download and install the Certificate
After submitting the validation code the CRT file will be accessible on the service page.
Open the service page in the Monovm client area > click on the Download CRT button > download the zip file which contains the CRT files.
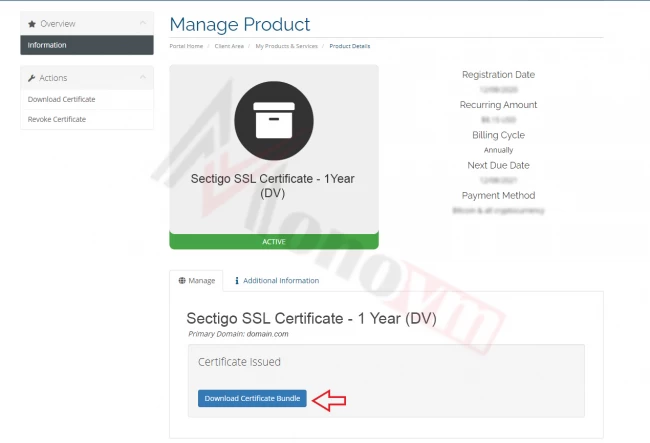
After downloading the file, extract it.
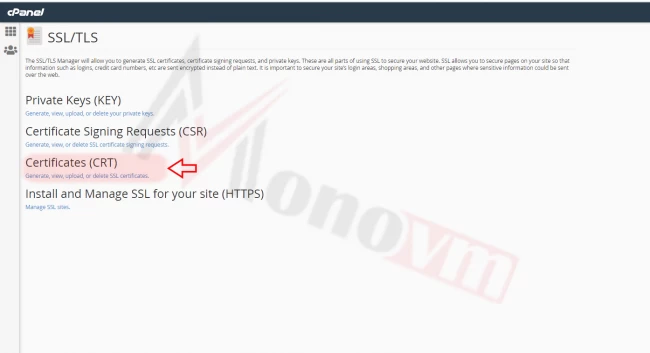
Now we are going to install the certificate on cPanel. Login to cPanel once again and click on the SSL/TLS option via the Security section. In the SSL/TLS page click on Generate, view, upload, or delete SSL certificates option to open the certificate installation page.
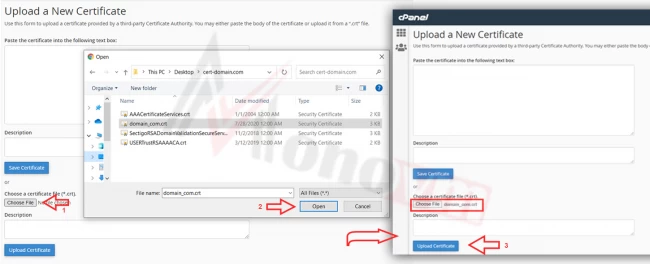
On the next page, we can install the downloaded certificate. Click on the Choose File button and open the downloaded CRT file. Then click on the Upload Certificate button.
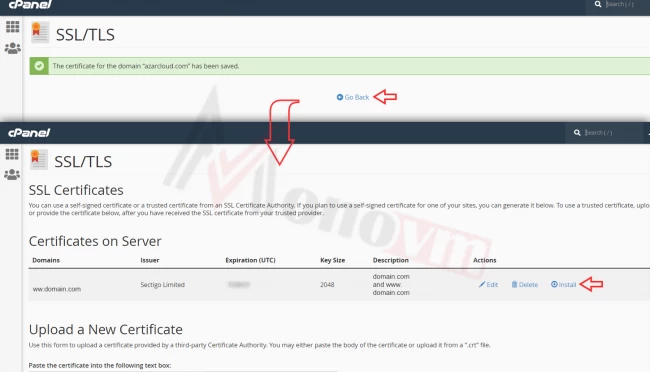
After saving the certificate we will be able to install the certificate. Click on the Go Back option to go back to the previous page. We will be able to see that the certificate has already been added to cPanel.
Click on install.
By selecting the install, the Certificate: (CRT), Private Key (KEY) and, Certificate Authority Bundle: (CABUNDLE) boxes will fill automatically.
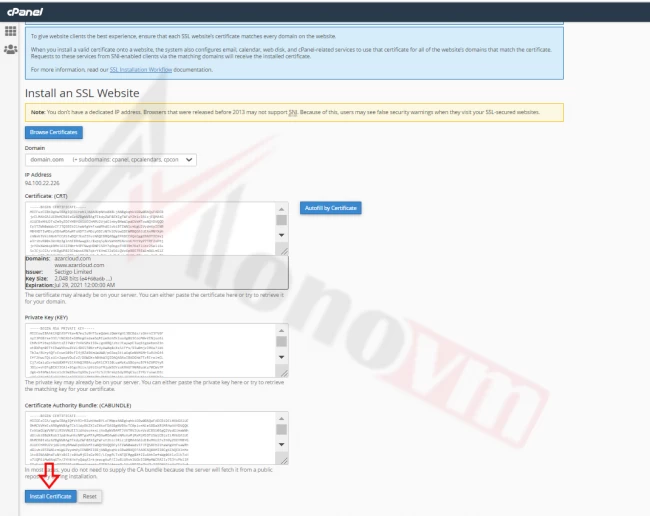
Click on the Install Certificate button to complete the SSL installation steps.
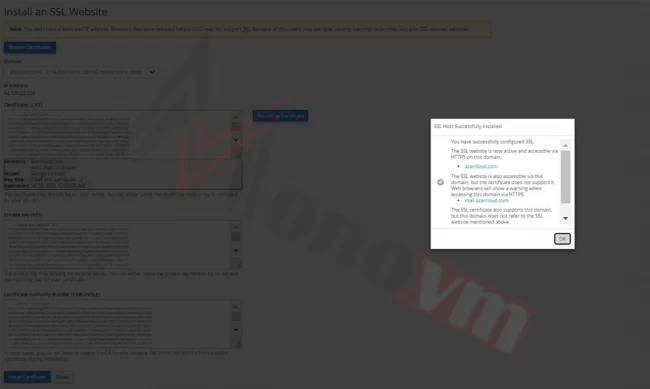
Now we have completed the SSL installation and our website can be redirected to https so it will be loaded with the security protcol.
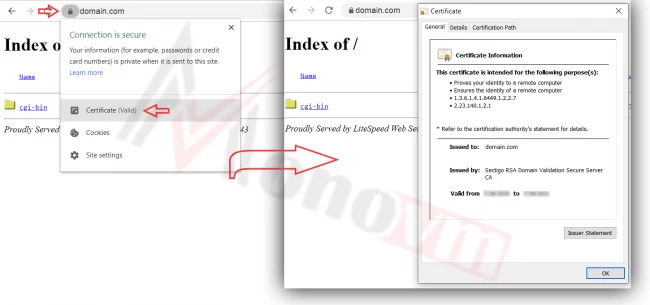
Open your website, click on the lock sign beside the URL bar, and select the Certificate option. We can check the certificate information in the opened box.
Conclusion
We hope that with the help of this in-depth article you were able to understand a little better about SSL certificates and how they are distributed. Additionally, the detailed in-depth tutorial should help you effortlessly install a Sectigo SSL certificate on cPanel. If you have any questions or suggestions, please leave them in the comment section below.
