If you work in the world of technology and server infrastructure, you already know that there are not many virtualization tools capable of delivering flexibility, stability, and cost efficiency at the same time. Microsoft has achieved this with Microsoft Windows Server Hyper-V, providing exactly such a tool. This is why, if you are using the Windows ecosystem, Windows Server Hyper-V should be at the top of your list. In this post, we intend to cover everything about Hyper-V, including what it is, why it is still an ideal choice for organizations in 2025, and how it is installed, managed, and licensed. Stay with us on MonoVM.
What is Windows Server Hyper V?
Hyper-V is a Type 1 hypervisor which means that it operates right on the hardware and provides a virtualized environment for guest O.S. Every virtual machine is totally independent of other VMs and can use dedicated resources like CPU, RAM, and disk, even though these resources are shared by Hyper-V. This hypervisor sits directly on the physical hardware and forms a highly efficient and lightweight layer that imposes the minimum possible overhead on system resources.
Hyper-V is architectured in a modular and layered manner that it can offer features like lifecycle tagging at VM level, provisioning event logging, and giving configurations that are audit-ready. These features are very important in places where lifecycle tracking and compliance are a must.
Key Benefits and Use Cases of Microsoft Windows Server Hyper-V
the Hype-V feature is integrated directly into Windows Server, thus it is financially advantageous for companies that are already part of the Microsoft ecosystem. Apart from the cost benefits, Hyper-V is also offering two other strategic advantages:
- High Availability: Hyper-V can Live Migration, Failover Clustering, and Hyper-V Replica to move VMs between servers without downtime and to enable disaster recovery.
- Development Flexibility: It permits the quick set-up of the enclosed development as well as testing environments and various virtual networks.
- Security: By means of features like Secure Boot and Shielded VMs, Hyper-V supports the security of workloads.
These major benefits make Hype-V a potent weapon to us in server consolidation, rapidly creating test and development environments, and enabling hybrid cloud scenarios where VMs are running both on-premises and in public cloud environments. E.g., Microsoft states that Hyper-V is good for development environments that require faster release cycles or for infrastructures that combine a datacenter with cloud services.
To better understand the foundation of Windows Server itself and explore its broader applications beyond virtualization, you can refer to What is a Windows Server for the basics, and the Windows Server Use Cases article for a deeper dive into practical scenarios and deployment examples.
How to Install Windows Server Hyper V (Step by Step)
In this section, we will discuss how to install Windows Server Hyper V and manage it step by step
Pre-requirements and hardware/firmware checks
It is very important that you check the server's hardware if it is compatible for the installation of the Hyper-V role. Without that the setup will fail or the VMs will not run properly.
|
Item |
Description |
Key Notes |
|
CPU and SLAT Support |
The processor must be 64-bit and support SLAT (Intel EPT or AMD NPT). |
Without SLAT, Hyper-V will not install or VM performance will drop significantly. |
|
Enable Virtualization in BIOS/UEFI |
Features such as Intel VT-x, AMD-V, and VM Monitor Mode Extension must be enabled. |
Always verify BIOS/UEFI settings before installing Hyper-V. |
|
Sufficient RAM |
A minimum of 4 GB is recommended, but enough RAM must be reserved for both Host and VMs. |
Microsoft: 300 MB for the hypervisor + 32 MB for the first GB per VM + 8 MB per extra GB. |
|
Software Conflict Check |
Third-party virtualization tools (like VMware Workstation) may conflict with Hyper-V. |
To avoid errors, keep only one hypervisor active at a time. |
You also need to check the server's support for Hyper-V. To check this, enter the following command in PowerShell:
PS C:\Users\Administrator> Systeminfo
Scroll down to the Hyper-V Requirements section. The result should look like this:
Hyper-V Requirements: VM Monitor Mode Extensions: Yes
Virtualization Enabled In Firmware: Yes
Second Level Address Translation: Yes
Data Execution Prevention Available: Yes
If all the items are yes, you can follow the steps in the Hyper-V installation tutorial.
Install Windows Server Hyper V
Once you have checked all the requirements, you can go ahead and install windows server hyper v. The instructions below illustrate the procedure for the installation of Hyper-V on the Windows Server 2022 version. But if your server is running version 2025 or any other that is older than that, it is not a problem as the steps of the installation are almost the same, and this manual will still be helpful.
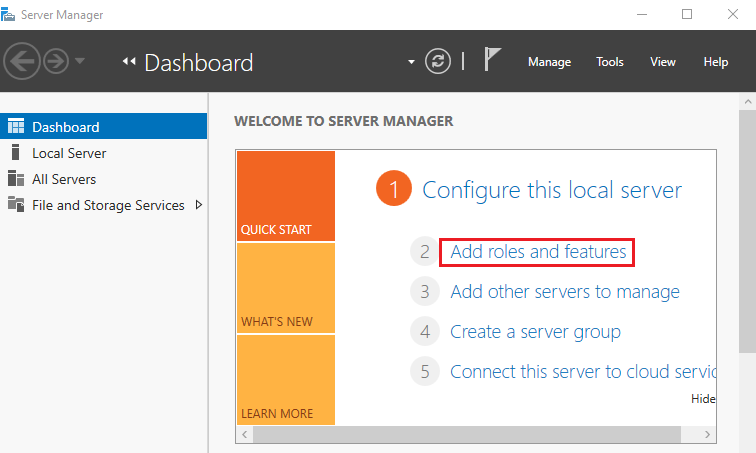
1. Open the Add Roles and Features Wizard
Open the Server Manager dashboard and click Add roles and features.
This wizard is used for adding server roles, features, and configuration components.
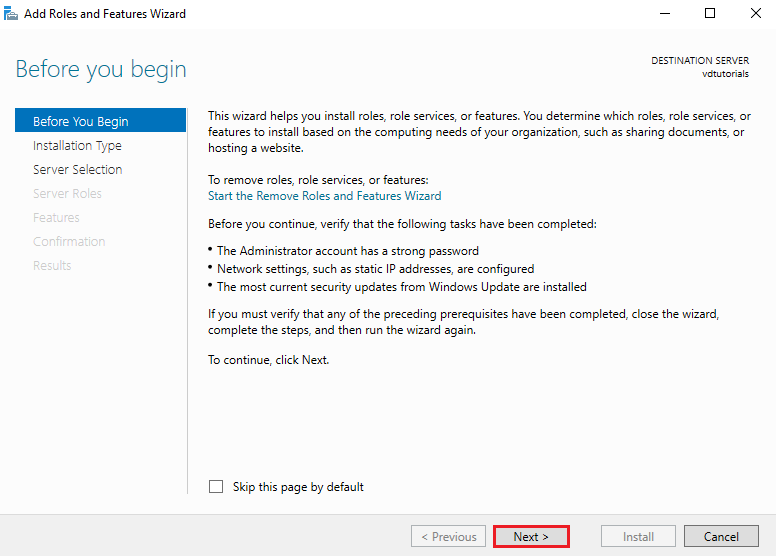
Click Next on the Before You Begin page to proceed.
2. Choose Installation Type
Select Role-based or feature-based installation, which is the standard method for adding server roles like Hyper-V.
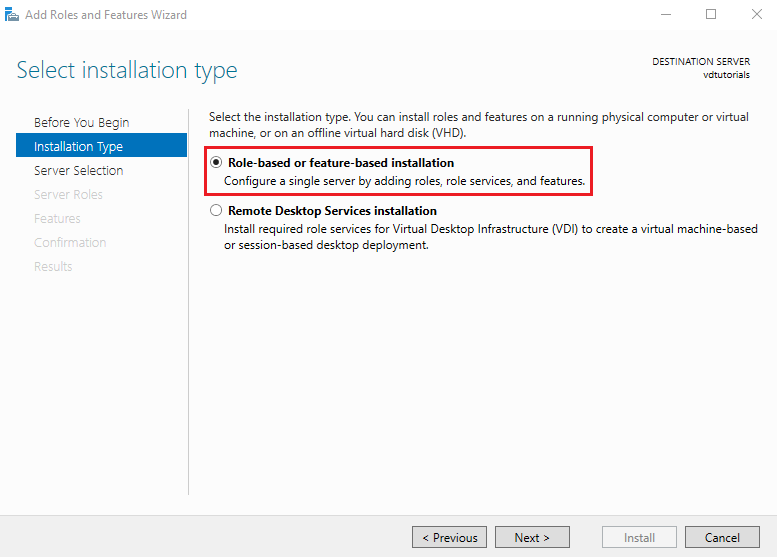
Click Next to continue.
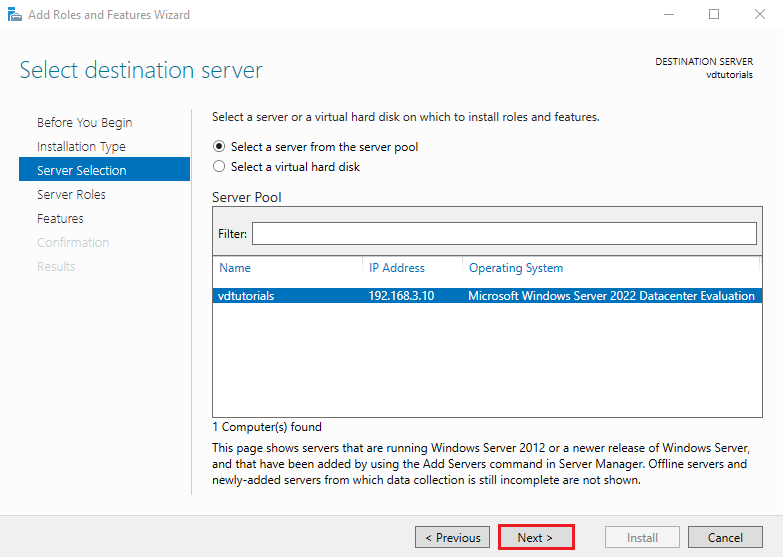
3. Select the Destination Server
Choose the server host on which you want to install Hyper-V.
Make sure you select the correct machine, especially in multi-server environments.
Click Next.
4. Select Server Roles
From the Server Roles list, check the box for Hyper-V.
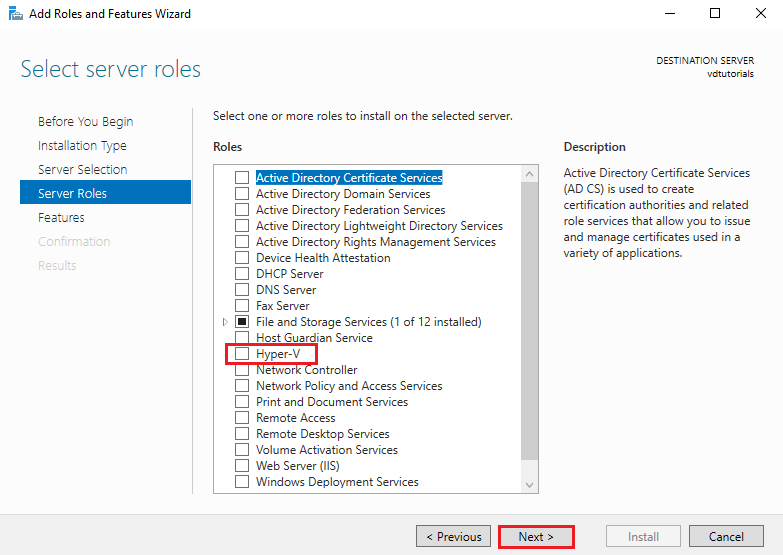
A dialog will pop up asking to add required features for Hyper-V.
Click Add Features, then click Next to continue.
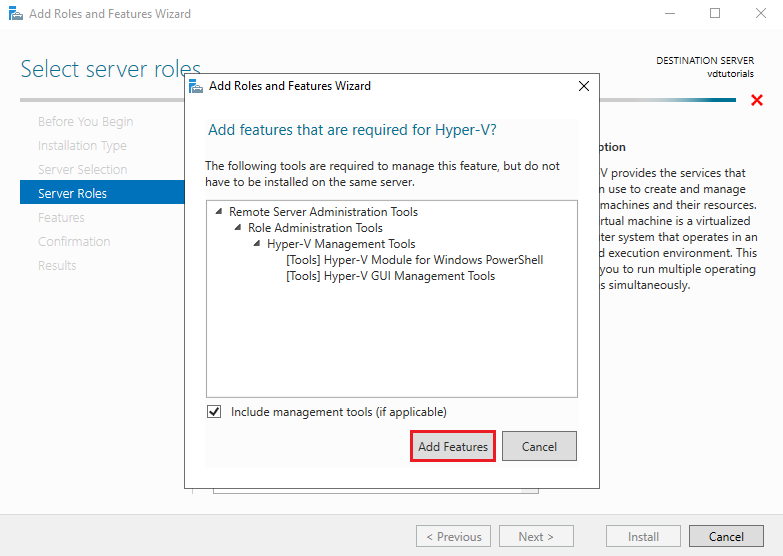
These required features include management tools and virtualization dependencies.
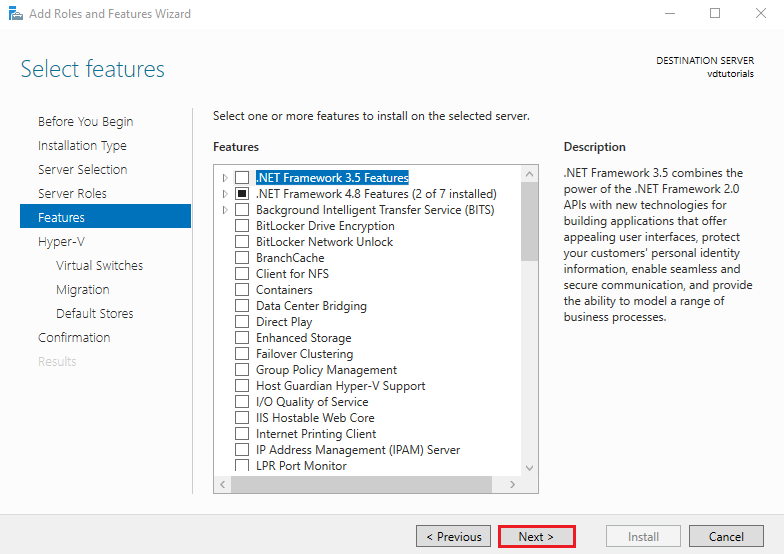
5. Select Additional Features
In the Select Features section, no extra features are needed for basic Hyper-V functionality.
Simply click Next to proceed.
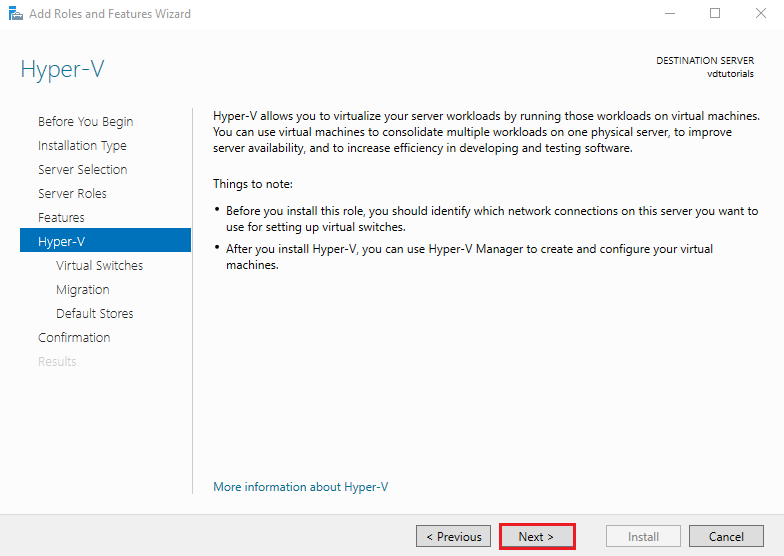
6. Hyper-V Configuration
You will now see an overview about Hyper-V. Click Next.
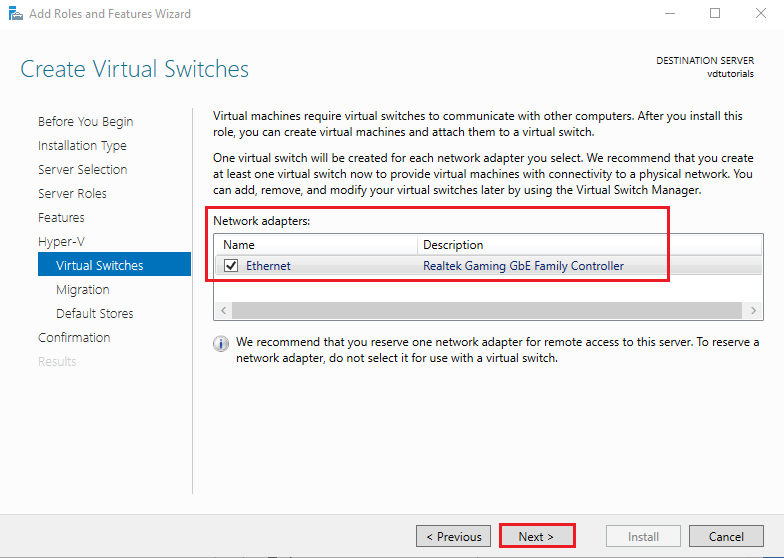
Choose the network adapter you want to use for your virtual switch.
This determines how VMs will connect to your physical network.
Click Next.
The next section is about VM migration settings. We leave it at default for this setup. Click Next.
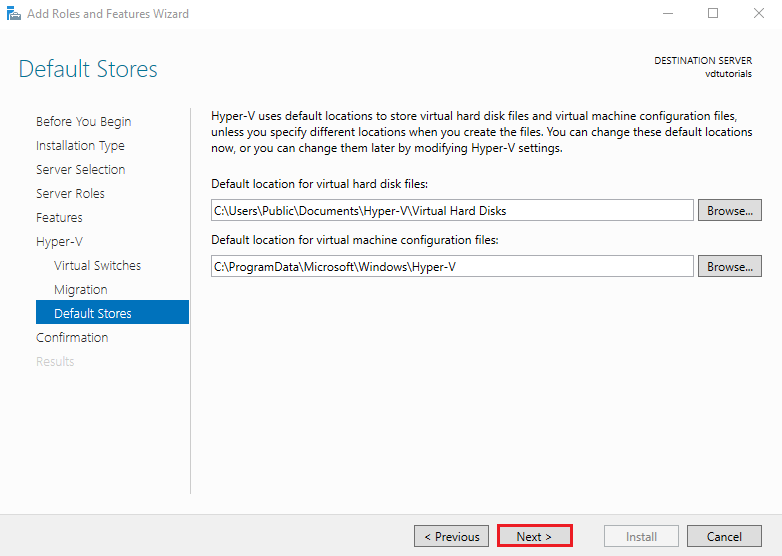
Next, Specify the default storage paths for:
- Virtual hard disks (VHD/VHDX)
- Virtual machine configuration files
Choosing fast storage (SSD/NVMe) is recommended for optimal VM performance.
Click Next.
7. Confirm Selections and Install
Review the installation summary and click Install.
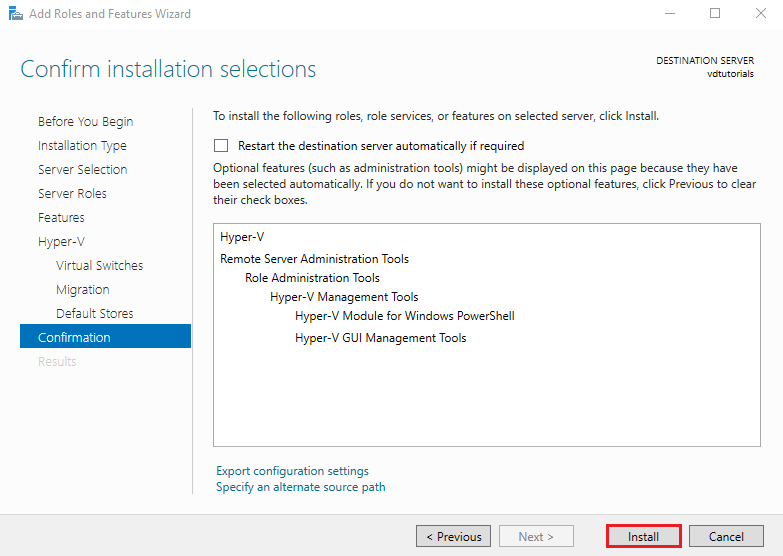
The installation may take several minutes.
After completion, click Close and restart the server to enable the Hyper-V hypervisor.

Managing via Windows Server Hyper V Manager
After installation, you begin interacting with the virtual infrastructure through management tools, including Hyper-V Manager. Below, we will walk you through the steps to configure a virtual machine in Hyper-V.
1. Open Hyper-V Manager
Go to Server Manager → Tools → Hyper-V Manager.
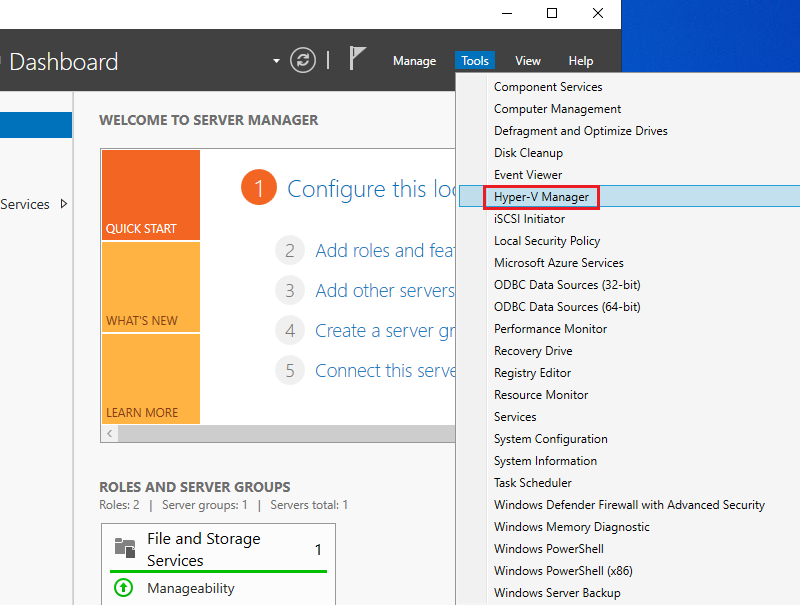
This is the main console for creating and managing virtual machines.
2. Run the New Virtual Machine Wizard
Right-click your Hostname, select New, then choose Virtual Machine.
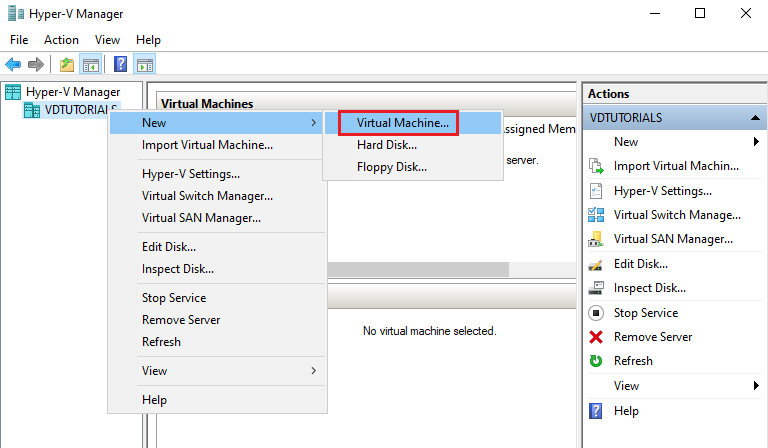
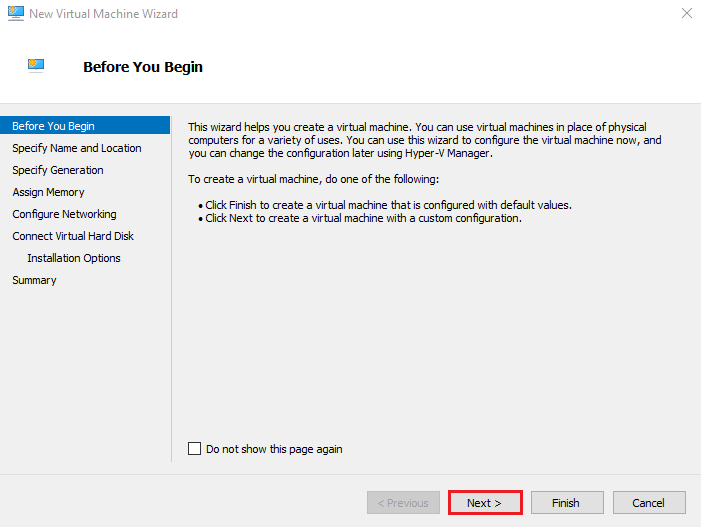
A welcome page appears — click Next.
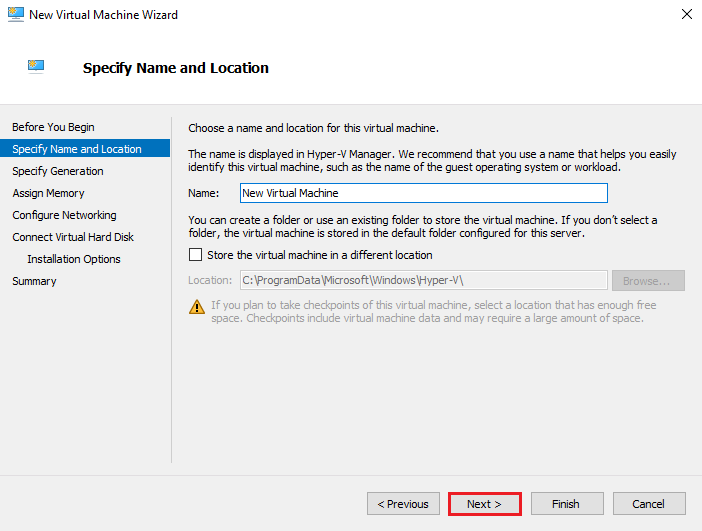
3. Specify Name and Location
Enter a VM name and choose a storage location. Leaving the default location is fine for most setups. Click Next.
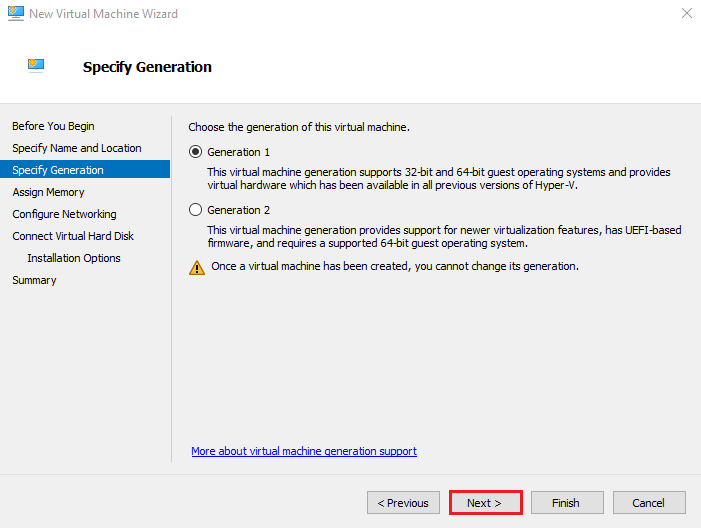
4. Choose the VM Generation
Select Generation 1 (recommended unless you need UEFI or newer features).
Click Next.
5. Assign Memory
Allocate RAM for the virtual machine.
Example: 4096 MB (4 GB).
Click Next.
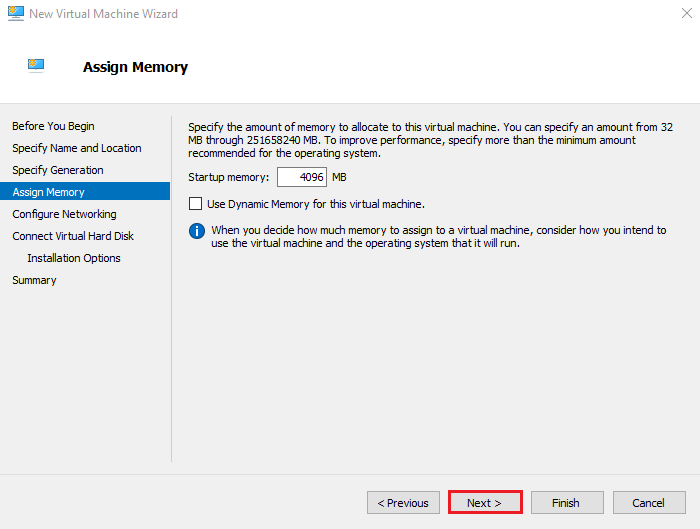
You may also enable Dynamic Memory later to optimize RAM usage.
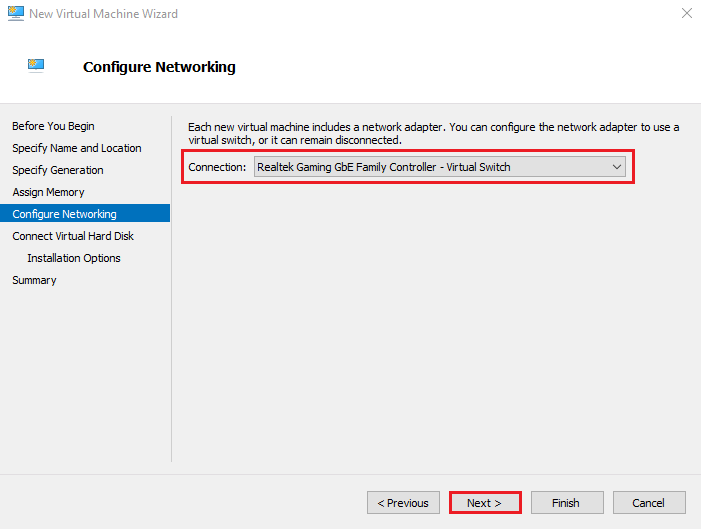
6. Configure Networking
Select a Virtual Switch that the VM will use to access the network.
Click Next.
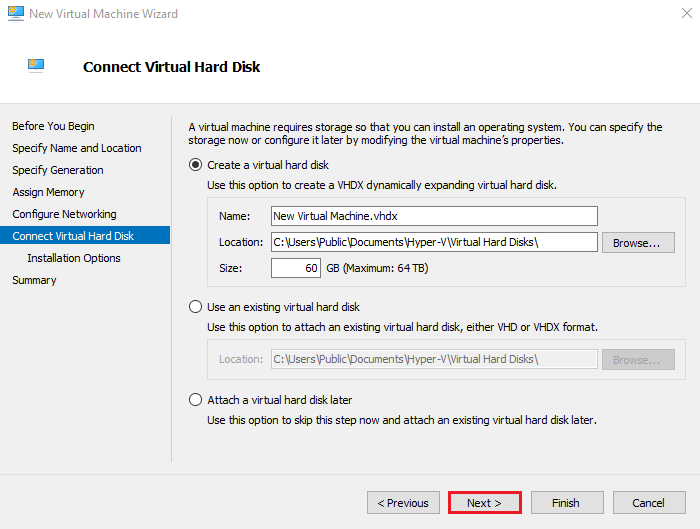
7. Connect a Virtual Hard Disk
Configure the virtual hard disk:
- Name: New Virtual Machine.vhdx
- Location: Default is fine
- Size: 60 GB (or based on your needs)
Click Next.
8. Installation Options
Choose how the OS will be installed.
Select: Install the operating system later
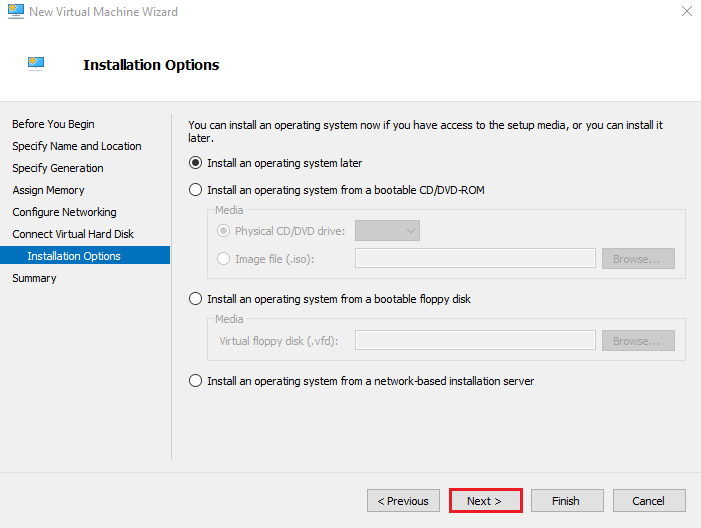
This lets you attach the ISO after creation. Click Next.
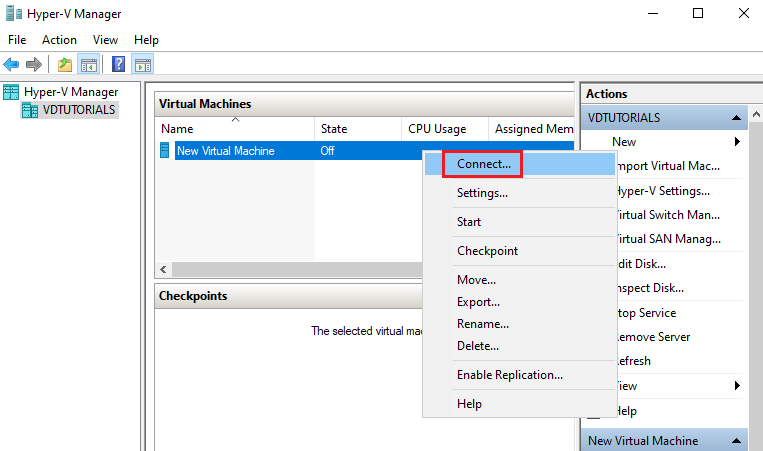
Click Finish to create the virtual machine.
Then, Right-click the VM → Connect
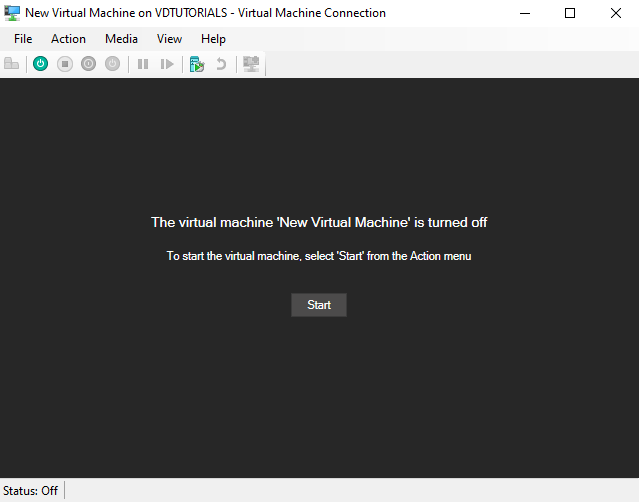
9.Starting the VM
At the end, click Start to boot it. Congratulations, you have completed all the steps to install and manage Hyper-V.
If you’re planning your virtualization setup and want to choose the most suitable platform, check out our guide on Best Windows Server Versions to make an informed decision for your environment.
Licensing & Version Considerations
Windows Server Hyper-V licensing is determined by the operating system version. Every version has varied capabilities to run virtual machines (VMs) and also different sets of management features. You should decide, based on how many VMs you intend to run and which features you require. Besides that, it is worth mentioning that the free Hyper-V Server edition has been discontinued in the latest versions.
|
Edition / Feature |
Windows Server Standard |
Windows Server Datacenter |
Hyper-V Server (Free, 2019) |
|
VMs allowed |
Up to 2 VMs per license |
Unlimited |
Unlimited, but with significant feature limitations |
|
Hyper-V features |
Live Migration, Failover Clustering |
Full Enterprise features + SDN + Shielded VM |
No Live Migration, no Failover Clustering |
|
Best for |
Small to medium environments, limited number of VMs |
Datacenters, large-scale or consolidated scenarios |
Test environments or simple usage |
|
Licensing model |
Per-core (minimum 16 + CAL) |
Per-core (minimum 16 + CAL) |
Free, no CAL required |
|
Latest version |
2022 / 2025 |
2022 / 2025 |
2019 only |
|
Advanced security (Shielded VM) |
❌ No |
✔️ Yes |
❌ No |
|
Software-Defined Networking (SDN) |
❌ No |
✔️ Yes |
❌ No |
|
Full enterprise support |
✔️ Yes |
✔️ Yes |
❌ Limited |
Knowing thoroughly the distinctions of these editions, you will be able to make a more suitable choice of which license to use for your virtualization infrastructure and then proceed to look at the other essential features of Hyper-V.
Virtualization Architecture & Key Features
If you have successfully installed Hyper-V right now, it's a great occasion to review its main features and architecture.
Server Virtualization with Hyper-V and System Center
In general, Hyper-V Manager can do the job for you on a daily basis. However, in the case of large infrastructures that are of enterprise scale, it is necessary to resort to technologically advanced tools:
- System Center Virtual Machine Manager (SCVMM): It facilitates the management and monitoring of virtual machines deployments, as well as hardware and software resources in the cloud and on-premises, through a single, integrated platform. Key features include:
- Windows Admin Center (WAC): WAC simplifies the management of on-premises resources by bringing them under a single pane of glass and facilitates their integration with Azure. In addition, it provides an in-depth connection with Hyper-V and Storage Spaces Direct (S2D).
Both instruments are commonly implemented by large-scale organizations.
HA Capabilities
The main goal of the HA capabilities offered by Hyper-V is to improve the overall stability of services as well as to guarantee that continuous operation is ensured. Some of the most important ones are:
- Live Migration: This feature lets the user transfer services, specifically virtual machines, that are compliant with the cluster, between different hosts in a cluster while at the same time maintaining a state that is almost indistinguishable from downtime. Live Migration achieves that with the help of several memory copy passes by which only the modified pages are transferred, followed by an extremely rapid interval during which CPU and device states are switched to the new host.
- Shielded VMs: They operate under the highest degree of security. To get the setup going, a Guarded Fabric is necessary, and this is the service that the Host Guardian Service (HGS) verifies. HGS is the entity that guarantees that the host is running on trusted hardware and issues the keys that are essential for VM start and to migrate it as well to another protected host through the Key Protection Service in a secure manner.
With these efficacy measures, your system will always be resistant to breakdowns, occurrences of unauthorized access and disturbances of operational continuity.
Gen 2 VM Scalability and Support for GPU Partitioning
It is mandatory for you to opt for Generation 2 virtual machines should you want to enjoy the incredible scalability of Windows Server 2025, to mention just one feature, the support for a maximum of 240 terabytes of RAM and 2,048 vCPUs. Gen 2 VMs support UEFI and do not depend on legacy IDE controllers anymore.
In addition to these capabilities, GPU Partitioning is an essential feature for modern workloads. It allows you to logically divide GPU resources and assign them to multiple virtual machines, with each VM viewing a virtual function as its own dedicated GPU.
Comparison Table: When to Use Hyper-V vs Alternatives
When you choose a virtualization platform, you are essentially selecting an entire ecosystem. Comparing Hyper-V with major competitors such as VMware vSphere (still a market leader) and open-source alternatives helps you make an informed decision.
|
Feature |
Hyper-V (Windows Server 2025) |
Main Competitor (VMware vSphere 8) |
Key Notes |
|
Pricing Model |
Included with Windows Server license (lower TCO) |
Separate licensing (higher cost at scale) |
Hyper-V is more cost-effective for users already in the Microsoft ecosystem. |
|
Maximum RAM per VM (Gen 2) |
240 TB |
16 TB |
Hyper-V 2025 offers a significant advantage in VM scalability. |
|
Resource Management (Load Balancing) |
Dynamic Memory, Resource Metering |
Distributed Resource Scheduler (DRS) |
VMware DRS provides more maturity and granularity in CPU/RAM allocation. |
|
Software-Defined Storage (SDS) |
Storage Spaces Direct (S2D) |
vSAN (Virtual SAN) |
Both are strong HCI solutions, but S2D is optimized for Windows environments. |
|
Cloud Integration |
Native, deep integration with Azure Arc |
Requires more complex configuration with VMware Cloud |
Hyper-V is the best option for Azure-based hybrid environments. |
|
GPU Partitioning |
GPU-P (GPU Partitioning) with Live Migration |
vGPU (requires additional licensing) |
Hyper-V makes this capability essential for AI workloads. |
This comparison highlights the advantages and disadvantages of Hyper-V. The key advantages of this technology are:
- Hyper-V is deeply integrated with Windows and can be used without additional costs in the Windows license.
- It is easy to set up and you can create a VM in less than a few minutes. With Microsoft System Center (such as SCVMM) for enterprise, you can automate large-scale.
- Support for availability and strong security features make Hyper-V suitable for critical organizations and data centers.
Disadvantages that should not be overlooked include the following:
- Hyper-V is limited to the Microsoft ecosystem.
- Competitors like VMware are still more advanced than Hyper-V.
- The free version of Hyper-V (until 2019) has limited enterprise features.
These disadvantages make VMware or KVM perform better in environments with pure Linux workloads.
Best Practices & Common Mistakes
Below are the most important recommendations that improve performance, stability, and security when deploying Hyper-V.
- Allocate resources properly: Reserve enough CPU and RAM for each VM and avoid excessive overcommitment to prevent performance degradation.
- Perform regular backups: Always back up your VMs. Use Hyper-V-compatible backup tools or checkpoints, and avoid relying solely on the host’s physical disk.
- Use clustering and shared storage: For high availability, enable Failover Clustering and use Cluster Shared Volumes (CSV) so multiple Hyper-V hosts can access shared data.
- Update Integration Services: After installing the guest OS, make sure Hyper-V Integration Services are installed and updated for optimal performance and hardware compatibility.
- Monitor resource usage: Use monitoring tools to track host and VM resource consumption and prevent critical resource shortages.
Now that you know the best practices, let’s review the common mistakes you should avoid; here are the most frequent ones.
- Ignoring hardware prerequisites: Failing to enable virtualization in BIOS or using a CPU that lacks SLAT support, which prevents Hyper-V installation learn.microsoft.com.
- Overlooking licensing requirements: Not paying attention to Windows Server activation or edition limitations; understanding Standard vs Datacenter licensing is essential bdrshield.com.
- Running Hyper-V alongside another hypervisor: When Hyper-V is enabled, tools like VMware Workstation or VirtualBox usually will not run properly learn.microsoft.com.
- Incorrect network configuration: For example, neglecting network virtualization (NVGRE, VXLAN) when needed or misconfiguring virtual switches.
- Testing directly in production: Always test new scenarios in a lab environment first and verify backup and failover functionality.
If you follow these guidelines, you can take full advantage of Hyper-V’s capabilities and avoid common pitfalls.
Upgrade Your Virtualization Today
We have reached the end of this article, and as you saw, Microsoft Windows Server 2025 Hyper-V is a powerful virtualization solution that provides rich features and strong performance at a lower cost. If you want server virtualization with Windows Server Hyper-V and System Center with instant deployment and 24/7 support, we recommend MonoVM’s Windows VPS service. This service offers competitive advantages such as full technical support, global datacenters, and affordable pricing.
With our Windows VPS, you can quickly create your Windows virtual machine and focus on your business without worrying about technical support. For further guidance and to choose the best service for your needs, feel free to contact us.

An experienced tech and developer blog writer, specializing in VPS hosting and server technologies. Fueled by a passion for innovation, I break down complex technical concepts into digestible content, simplifying tech for everyone.