Are you looking to create your virtual communication hub for gaming, collaboration, or simply staying connected with friends and colleagues? Look no further! In this comprehensive guide, we'll walk you through the step-by-step process of setting up your very own TeamSpeak server. Whether you're a seasoned IT enthusiast or a beginner navigating the world of server hosting, this tutorial will provide you with all the necessary information to get started. From installation to configuration, we've got you covered. So, let's dive in and learn how to make a TeamSpeak Server.
What is VoIP?
VoIP or Voice over Internet Protocol is a technology that enables users to place phone calls over the internet connection. It allows groups or individuals to connect over the internet call while performing tasks simultaneously.
Among the numerous VoIP options currently available in the market, TeamSpeak 3 is all the rage. It is a robust VoIP platform that is mostly used by gamers to communicate with their groups, offering way more unique features and perks than its peers.
This blog is a step-by-step guide on how to set up the Teamspeak 3 server on Windows. But before getting into the steps, let’s learn about Teamspeak 3 in detail.
What is TeamSpeak 3?
![]()
Founded in 2001, TeamSpeak is a reliable and lightweight tool for communicating with friends or colleagues. TeamSpeak 3 server is one of the top choices for gamers who often need to communicate with each other during a game session.
The VoIP communication system also offers several additional features, and it empowers individuals to create virtual rooms in which they can enter and exit freely, talk, chat with other people, send and receive media files, and so on.
TeamSpeak 3 provides apps for computers and mobiles that allow users to communicate with their groups with cutting-edge VoIP technology for high-quality voice calls. Most people use it for gaming purposes to achieve feasible audio connections with their gaming buddies.
To make this service available to a wider audience, TeamSpeak 3 is compatible with Windows, Linux, Android, macOS, and iOS. The following features make Teamspeak 3 the cream of the crop:
- It liberates users to transfer files to other conference members and provides an option to save the same on the server. Its special architecture makes it work through all firewalls.
- Provides end-to-end security settings and specifies exactly who has access and what chat rooms can be entered and operated by whom.
- Implements easy customization, plugins, and tools as per the need. You can add skins, change color, and use plugins to extend the functionality.
- Also available for mobile devices. It can be used on smartphones running iOS and Android.
- If you’re up to gaming, you might require the whole screen. In this case, you can activate an in-game overlay that shows you the key information in small semi-transparent windows.
TeamSpeak 3 is Best-suited for:
Although anyone can use TeamSpeak, these are the ones who will get the most out of the popular VoIP communication system:
1. Online Gamers
Most users come under this umbrella because the TeamSpeak application is embedded with special features for online gaming. It allows online gamers to connect in real time while playing online games.
2. Business Professionals
Many organizations are adopting TeamSpeak as it provides file-sharing and chat options and VoIP calling. Also, it is cost-effective because the charges are inexpensive compared to conventional charges.
3. Students and Learners
Many educational organizations, especially during the Covid-19 outbreak, have adopted TeamSpeak. Leveraging the VoIP communication system helps facilitate inter-student communication in virtual classrooms and online courses.
What are the requirements for a TeamSpeak server?
Hosting a TeamSpeak server does not have particularly demanding needs, but it is important to maintain seamless operation, especially if you estimate a large number of users or plan on running different services on the same computer. Here are the basic prerequisites.
Operating System: TeamSpeak Server software can be downloaded for Windows, Linux, and Mac. Select an operating system that you are familiar with and that is suitable for your server environment.
Hardware:
- CPU: A modern multi-core processor should suffice. The more cores, the better, especially if you expect a high number of concurrent users.
- RAM: TeamSpeak itself doesn't consume much RAM, but having at least 1GB of RAM dedicated to the server is recommended. More RAM may be necessary depending on usage.
- Storage: TeamSpeak doesn't require much disk space for the software itself, but you'll need additional space for user data and logs. A few GBs should be enough unless you're storing extensive logs or file transfers.
Network:
- Bandwidth: A decent internet connection with sufficient upload speed is necessary, especially if you expect many simultaneous users or high-quality voice codecs.
- Static IP: For consistent access, a static IP address or a dynamic DNS service is recommended.
Software Dependencies: TeamSpeak Server software itself doesn't require many dependencies beyond basic system libraries, but ensure that your chosen OS is up to date and includes required libraries.
Firewall and Ports: Ensure that necessary ports are open for communication. TeamSpeak uses UDP ports by default (usually 9987 for voice, 30033 for file transfers, and 10011 for server-query). You may need to configure your firewall to allow traffic on these ports.
Security: To address any security dangers, update the operating system and TeamSpeak Server software on a regular basis. Also, use strong passwords and think about extra safety precautions like whitelisting IP addresses or firewall restrictions.
Monitoring and Management: Tools for monitoring can assist maintain track on the server's performance and user activities. Think about implementing backup methods to avoid losing information in the case of hardware failure or other concerns.
Note: These are basic prerequisites. As your computer's usage rises you might have to upgrade your hardware or adjust your configuration to improve speed and flexibility.
Steps-By-Step Guide on How To Setup a Teamspeak 3 Server on Windows
Setting up the Teamspeak 3 server on Windows is easy. All you have to do is download the VoIP application and install it. After installing, start the server on your computer and enable port forwarding on your computer using the default gateway.
Next, log in to your server and set a password. Then, at last, connect to the server and join the call. Pretty simple right? Let’s jump into the step-by-step detailed process:
Here’s a descriptive video tutorial for your ease and reference:
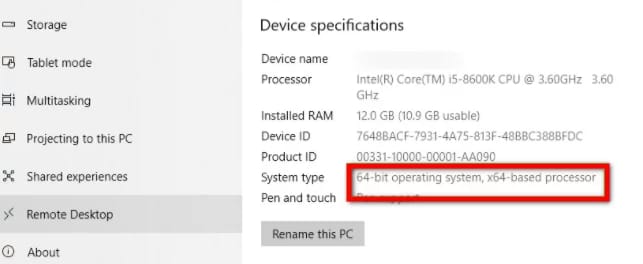
Step 1: Check the Windows Version
TeamSpeak has 2 different applications for 2 different versions - architecture - of Windows i.e. 32-bit and 64-bit. In case you don’t know which one you have, you can check your Windows version and download the server accordingly by searching/going to Device Specifications.
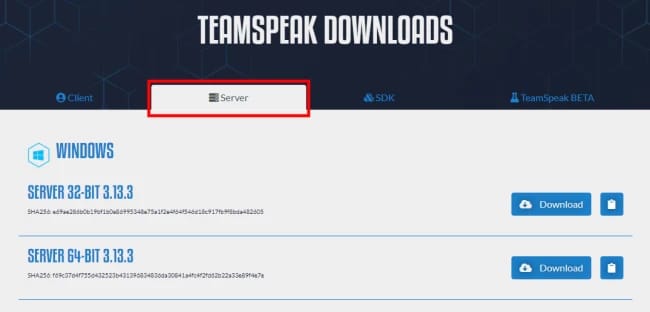
Step 2: Download TeamSpeak 3 Server
Visit TeamSpeak and download the Teamspeak 3 server as per your system type.
Step 3: Extract files and Install
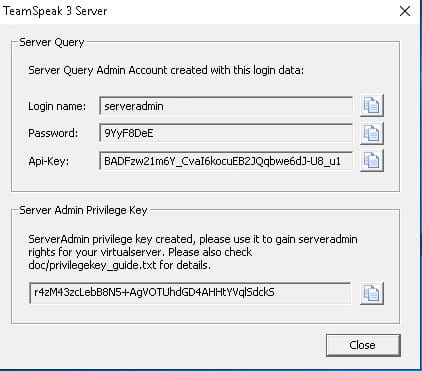
After downloading, extract the files to a directory and run the installer file i.e. ts3server.exe. After accepting the license agreement, you will see your server login credentials and a Server Admin Token.
Make sure to copy these fields onto a text file, as they will be required during the next step.
Now the TeamSpeak icon will be displayed on your taskbar. This means that the TeamSpeak 3 server is now running on your computer.
Step-4: Allow TeamSpeak 3 Ports on Windows Firewall
By default, incoming ports are not allowed on Windows for new services unless you allow it during the installation. Therefore, you have to do it manually and allow the required ports on the Windows firewall.
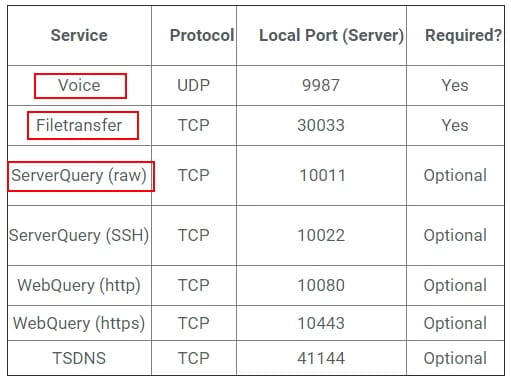
TeamSpeak uses various ports/protocols for feasible connection with the client and server. We will need only Voice, File transfer, and ServerQuery (raw) ports here.
Step-5: Connect via TeamSpeak 3 Client
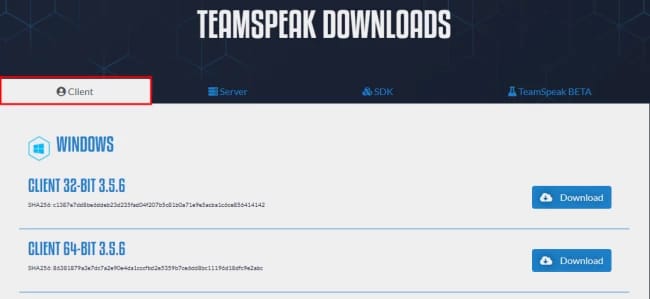
The TeamSpeak 3 installation process is now complete. Next, you need to connect with this server via the Teamspeak client as the admin. For this, you have to download the TeamSpeak Client again, accordingly, as per your Windows version.
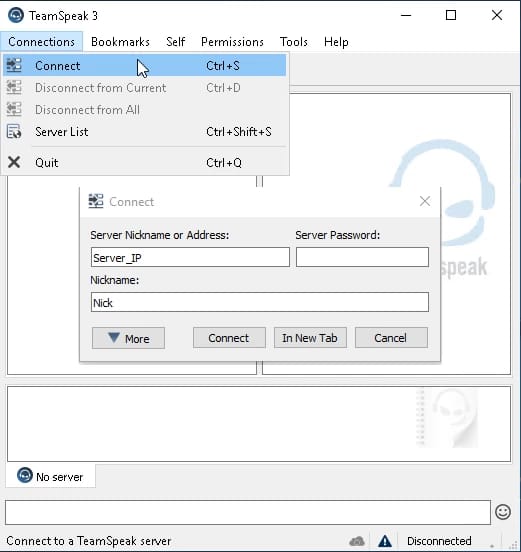
After that, use the Connections tab and click on connect. Enter your VPS IP in Server Nickname or Address field and press Connect.
Here comes the last step. After successfully connecting with the TeamSpeak server as an admin, you have to insert the privilege key which you’ve noted earlier on a text file. This will change your user rank as admin.
That’s all! You’ve successfully set up the TeamSpeak 3 Server on Windows. You’re all set to go now!
How to Make a TeamSpeak 3 Server on Linux
To make a TeamSpeak 3 server on Linux, you can follow these steps.
Prior to proceeding, verify the currency of your system by executing the subsequent command in the terminal:
sudo apt-get update && apt-get upgrade
1- Create a New System User
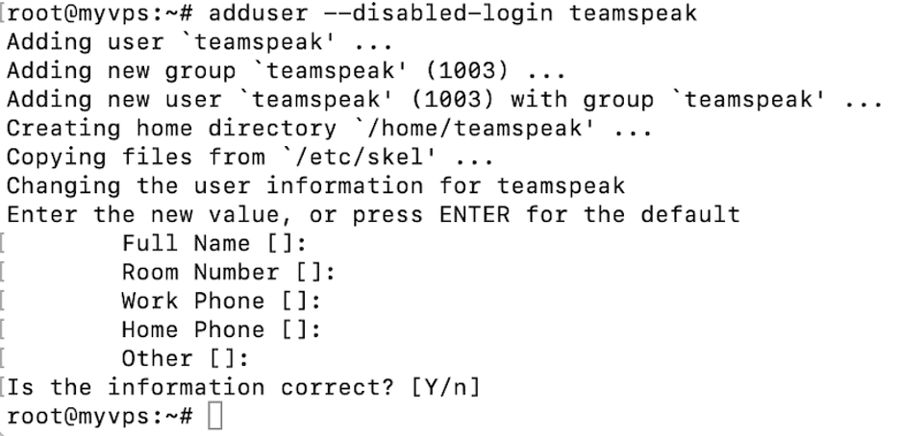
To begin, incorporate a fresh user by running the subsequent command:
adduser --disabled-login teamspeak
Go to the newly established user:
sudo su teamspeak
You'll be prompted to input individual user particulars and validate the accuracy of the provided information. Remember, all fields can remain empty if desired.
Helpful Hint: In case you find yourself in the root directory following the execution of the `sudo su teamspeak` command, utilize `cd ..` before rerunning the command.
Finally, direct yourself to the home directory:
cd /home/teamspeak
2- Download and Extract TeamSpeak 3 Server
Download the TeamSpeak 3 server package. You can check for the latest version on the TeamSpeak website:
https://www.teamspeak.com/en/downloads/#server
We recommend utilizing the `wget` command to directly download the TeamSpeak software to the VPS:
Upon completion, extract the file:
tar xvf teamspeak3-server_linux_amd64-3.13.7.tar.bz2
All contents will manifest within the `teamspeak3-server_linux_amd64` directory. Consequently, safely remove the redundant archive:
rm teamspeak3-server_linux_amd64-3.13.7.tar.bz2
Verify your TeamSpeak software version and input commands accordingly. Should an incorrect version be specified, TeamSpeak will fail to execute.
Execute the `ls` command; the output should resemble the example below:

3- Accept the TeamSpeak 3 License Agreement
Change to the extracted directory:
cd teamspeak3-server_linux_amd64
View and accept the TeamSpeak 3 license agreement:
touch .ts3server_license_accepted
4- Start the TeamSpeak Server on Startup
Let's proceed with configuring the TeamSpeak server to initiate upon server boot. Begin by crafting a file named `teamspeak.service` within the `/lib/systemd/system` directory. Employ the following command to switch to the root user:
su -
Subsequently, generate a new empty file using the text editor of choice. For this demonstration, we'll utilize `nano`:
sudo nano /lib/systemd/system/teamspeak.service
Below is an illustration of the expected content for the file:
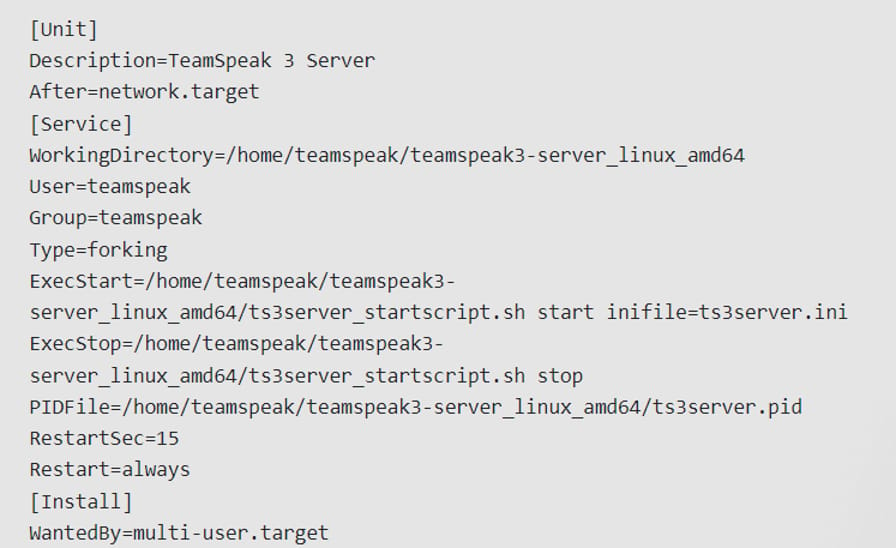
Copy the provided content into the freshly generated file and save it. Subsequently, activate the script to ensure the TeamSpeak Server initiates upon server startup:
systemctl enable teamspeak.service
systemctl start teamspeak.service
To verify the successful addition of the script, execute the following command:
systemctl | grep teamspeak.service
If the TS3 server is operational as intended, you should observe the following outcome:

5- Retrieve the Privilege Key
Although the TeamSpeak server is currently operational, acquiring the privilege key remains imperative. This key must be pasted during your initial connection to the server. Initially, transition to the teamspeak user:
sudo su teamspeak
Subsequently, access the privilege key via the subsequent command:
cat /home/teamspeak/teamspeak3-server_linux_amd64/logs/ts3server_*
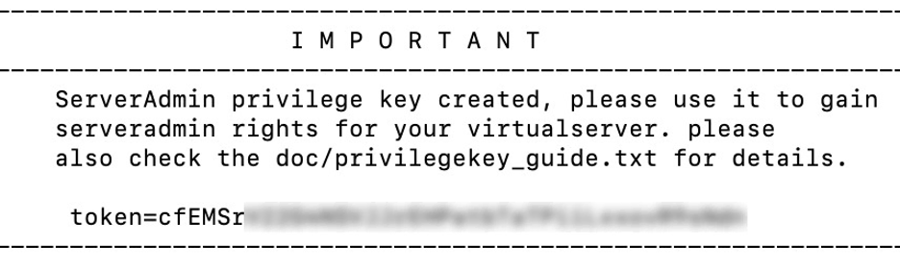
Locate the ServerAdmin line and extract the token. It will resemble the following example:
ServerAdmin privilege key created, please use the line below
token=ZyQqAIGrZyQqAIGrZyQqAIGrZyQqAIGrZyQqAIGr
6- Connect via the TeamSpeak Client
- Install the TeamSpeak client on your local machine from the TeamSpeak website:
(https://teamspeak.com/en/downloads/)
- Open the TeamSpeak client and click on "Connections" in the top menu, then select "Connect" from the drop-down menu.
- In the "Server Address" field, enter the IP address or hostname of your Linux server.
- Enter a nickname for yourself.
- In the "Server Password" field, leave it empty.
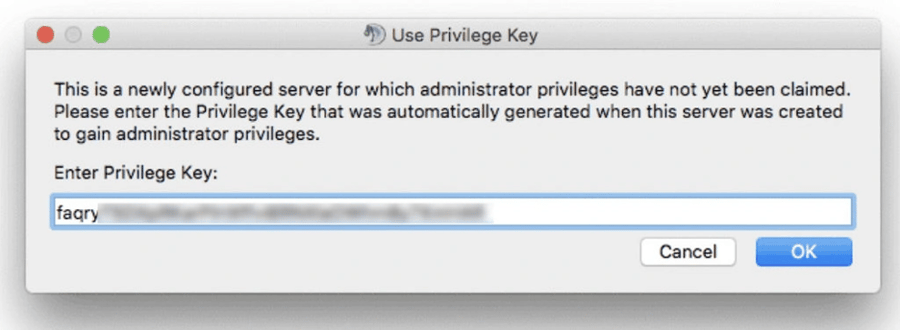
- In the "Privilege Key" field, enter the privilege key you obtained in step 5.
- Click "Connect," and you should now be connected to your TeamSpeak 3 server.
As simple as that! You've just created a TeamSpeak 3 server on Linux and have connected to it with the TeamSpeak client. You can now personalize your server parameters and create channels that your users can join.
How to Make a TeamSpeak Server on macOS
Creating a TeamSpeak server on macOS is straightforward and can be accomplished in just four simple steps. Here's a detailed guide to help you set up your own TeamSpeak Server on macOS:
1- Download and Extract the TeamSpeak Server
Visit the official TeamSpeak website and download the macOS version of the TeamSpeak Server software:
https://www.teamspeak.com/en/downloads/#server
Once downloaded, extract the contents of the downloaded file to a location of your choice on your Mac.
2- Accept the TeamSpeak 3 License Agreement
- Go to the location from where you extracted the TeamSpeak Server files.
- Open the 'ts3server_startscript.sh' file in a text editor.
- Scroll down the file until you reach the section with the license agreement.
- To accept the license agreement, simply follow the on-screen instructions.
3- Start the TeamSpeak Server and Retrieve Your Privilege Key
Commence the server by executing the following command:
./ts3server
Should you encounter a warning regarding TeamSpeak not being recognized as an identified developer, temporarily override the security settings in System Preferences.
Allow a brief interval for the process to conclude. Subsequently, you'll be furnished with your privilege key.
4- Connect via the TeamSpeak Client
You're all set to utilize the TeamSpeak server. When connecting, utilize the IP displayed in the System Preferences -> Network section. You may need to override your security settings again to launch the TeamSpeak application.

Ensure to paste the privilege key for server admin rights.
Congratulations on successfully creating and connecting to a TeamSpeak server on macOS!
How to Point a Domain to a TeamSpeak Server
In this segment, you'll learn how to seamlessly direct your current domain to the TeamSpeak server you've set up. This simple adjustment will streamline the server access process, eliminating the need to recall the IP address and port combination – all you'll need is the domain name.
Prior to advancing to the subsequent step, access the DNS Zone Editor within your domain registrar account. In our demonstration, we'll utilize a domain name registered via Host1. However, the steps should align closely with those of other registrars.
1- Create a Subdomain Using A Records
Access your hPanel account and navigate to the Domains section. Select the desired domain name and then click on DNS / Nameservers.
In the Manage DNS records section, proceed to create a subdomain and direct it to your TeamSpeak server.
Specify the following details:
- Type: Choose A.
- Name: Enter the desired subdomain name.
- Points to: Input the IP address of your TeamSpeak 3 server, replacing any placeholder IP addresses such as the sample 185.185.185.185.
- TTL (Time-to-Live): This setting determines the lifetime of the record. You can leave it at the default value.

Lastly, select "Add Record."
Before moving on to the next step, make sure that the A record is properly pointed and propagated.
2- Create an SRV record
In the same Manage DNS records section, add a new SRV record.
Here's how:
- Type: Choose SRV.
- Name: Specify the service name as "_ts3" and the protocol as "_udp", separated by a full stop. It should look like "_ts3._udp.teamspeak.domain.tld".
- Weight: If there are multiple records with the same priority, set this to 5.
- Port: Enter your server's port. The default port for a TeamSpeak 3 server is usually 9987.
- Target: Instead of "teamspeak.yourdomain.com", put in the subdomain you created in Step 1.
- Priority: Set this to 0.
- TTL: Just leave this as the default value.
- Once you've filled in all the details, save your changes.
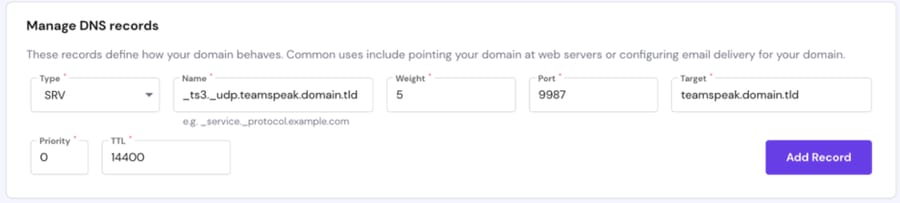
Lastly, click on "Add Record".
Note: It might take up to 24 hours for the new DNS records to spread worldwide. You can also attempt clearing your DNS cache.
And that's it! You've successfully directed a domain to your TeamSpeak 3 server using the DNS SRV record. Now, you can effortlessly connect to your server using a straightforward subdomain.
How to make a TeamSpeak server for free?
Now you may ask How to make a TeamSpeak server for free. So, you should know that creating a free TeamSpeak server is often not viable owing to server infrastructure and maintenance costs. However, you can consider options such as using a limited trial period provided by some hosting services or self-hosting on your gear, albeit this will still incur fees such as internet and electricity.
Host your own TeamSpeak server
To host your own TeamSpeak server, follow these steps:
- Download the Server Software: Go to the TeamSpeak website and download the server software compatible with your operating system.
- Install the Server: Follow the installation instructions provided by TeamSpeak to install the server software on your computer or server.
- Configure the Server: After installation, configure the server settings according to your preferences. This includes setting up permissions, channels, and server passwords.
- Open Ports on Your Router/Firewall: Ensure that the necessary ports are open on your router or firewall to allow incoming connections to your TeamSpeak server. By default, TeamSpeak uses UDP ports 9987 for voice communication and 30033 for file transfers.
- Start the Server: Launch the TeamSpeak server software and ensure it's running properly.
- Connect to Your Server: Use the TeamSpeak client to connect to your server using the IP address or domain name of the computer/server where the TeamSpeak server is hosted.
- Administrate Your Server: As the server admin, you can manage users, channels, permissions, and other settings through the TeamSpeak client.
Conclusion
Congratulations! You've now successfully set up your own TeamSpeak server, empowering yourself and your community with seamless voice communication. By following the steps outlined in this guide, you've gained valuable insights into server hosting, configuration, and administration. Whether you're using your server for gaming, business, or personal use, you're now equipped with the knowledge and tools to customize and optimize your communication platform according to your needs. Remember, the journey doesn't end here. Keep exploring the vast possibilities of TeamSpeak, experiment with different features, and continue refining your server to enhance the communication experience for yourself and your users. With your newfound expertise, you're ready to embark on a journey of connectivity and collaboration. So, go ahead and enjoy your TeamSpeak server adventure!
