In today's digital age, maintaining online privacy and security has become paramount. One powerful tool for achieving this is a Virtual Private Network (VPN). OpenVPN is an open-source VPN solution known for its robust security and flexibility. In this comprehensive guide, we'll walk you through the process of installing OpenVPN on a Virtual Private Server (VPS). Whether you're an IT enthusiast, a system administrator, a small business owner, or simply someone interested in setting up your own VPN, this step-by-step guide will help you establish a secure VPN connection on your VPS.
Prerequisites in order to install OpenVPN on VPS
Before diving into the installation process, it's essential to ensure you have all the necessary prerequisites in place to successfully set up OpenVPN on your VPS. Here's a closer look at each requirement:
- VPS with SSH Access: Your Virtual Private Server (VPS) serves as the foundation for OpenVPN. Select a VPS with care:
- Location: Opt for a server location that suits your needs, whether it's bypassing geo-restrictions or enhancing privacy.
- Resources: Ensure the VPS offers sufficient CPU, RAM, and storage, especially for high-traffic scenarios.
- Pricing: Choose a plan that aligns with your budget while maintaining performance and security.
- Administrative Access Credentials: Have your administrative access credentials at the ready. These typically include a username and password or an SSH key pair. SSH access is vital for remote management and configuration.
- CLI Proficiency: While this guide offers step-by-step instructions, basic command-line interface (CLI) knowledge is valuable. Familiarity with the CLI enables you to execute commands, configure settings, and troubleshoot effectively. Consider brushing up on CLI basics through online resources and tutorials if needed. Master the Command Line Interface Now!
Choosing the Right VPS Provider for Installing OpenVPN
Selecting the right Virtual Private Server (VPS) provider is a critical step in ensuring the success and performance of your OpenVPN setup. There are several factors to consider when making this decision, as your choice of provider will significantly impact the reliability and functionality of your VPN. Here are some essential factors to keep in mind when choosing a VPS provider:
Location
Choose a data center location that suits your needs. If your primary use case is privacy, select a provider with servers in a privacy-friendly jurisdiction. For bypassing geo-restrictions, choose a location close to the content you want to access.
Resources
Ensure your VPS has sufficient resources (CPU, RAM, and storage) to handle the VPN traffic and potential users. Your VPS provider should offer scalability options if you plan to expand.
Pricing
Review the pricing plans to ensure they fit your budget. Some providers offer affordable plans for small-scale deployments, while others cater to enterprise needs.
Setting Up the VPS to install OpenVPN
Now that you have your VPS ready, follow these steps to set it up:
- Log in to your VPS: Use SSH to access your VPS with the provided credentials.
ssh username@your-vps-ip
- Update and upgrade packages: Ensure your system is up to date by running the following commands:
sudo apt update sudo apt upgrade
- Create a non-root user (optional): For added security, create a non-root user and grant them administrative privileges. You can do this by running:
sudo adduser yourusername sudo usermod -aG sudo yourusername
- Configure SSH: To enhance security, modify the SSH configuration to disable root login and password authentication. Edit the SSH configuration file:
sudo nano /etc/ssh/sshd_config
Find and update the following lines:
PermitRootLogin no PasswordAuthentication no
Restart SSH for changes to take effect:
sudo systemctl restart sshd
Now, log out and log back in using your new non-root user account.
Installing OpenVPN on VPS
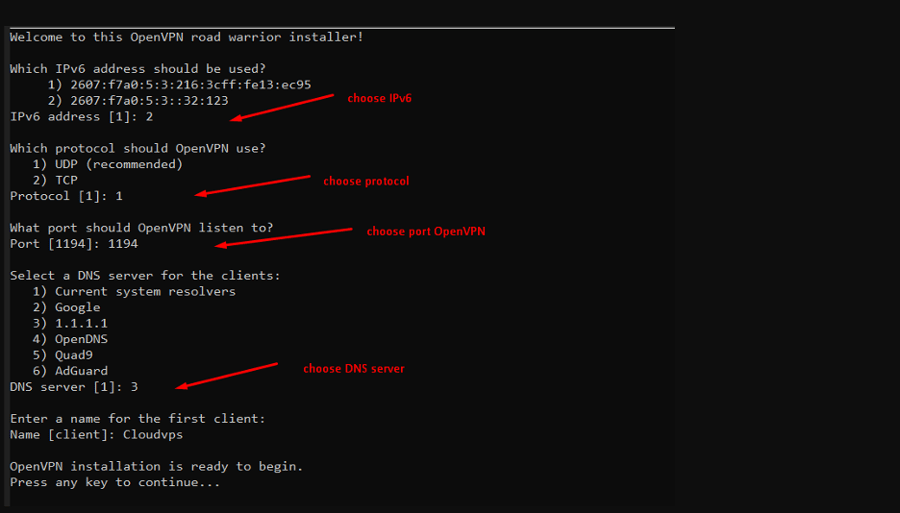
Now that your Virtual Private Server (VPS) is standing by, it's time to embark on the thrilling journey of installing OpenVPN. Picture yourself as a digital explorer, venturing into the realm of online security and privacy. Equipped with your VPS and a sense of curiosity, let's dive into the exciting world of OpenVPN installation.
- Update package information:
Every explorer starts their journey by gathering essential information. In our digital adventure, this involves updating package information on your VPS. Think of it as ensuring your maps and compasses are up to date before setting out on your quest. Execute the following command:
sudo apt update
- Install OpenVPN:
In this next step, you're gearing up for the heart of your adventure – installing OpenVPN itself. Execute:
sudo apt install openvpn
- Copy OpenVPN configuration files to the appropriate directory:
sudo cp -r /usr/share/doc/openvpn/examples/easy-rsa/ /etc/openvpn/
- Navigate to the EasyRSA directory:
cd /etc/openvpn/easy-rsa
This is where you'll lay the groundwork for your Public Key Infrastructure (PKI), setting the stage for your security certificates.
- Initialize the PKI (Public Key Infrastructure):
sudo ./easyrsa init-pki
With this command, you're staking your claim in the digital realm, preparing to issue certificates like a digital monarch.
- Build the CA (Certificate Authority):
sudo ./easyrsa build-ca
Follow the prompts to set up your CA, and remember to enter a strong passphrase.
- Generate server and client certificates:
sudo ./easyrsa gen-req server nopass sudo ./easyrsa sign server server sudo ./easyrsa gen-req client nopass sudo ./easyrsa sign client client
With these commands, you're creating the digital shields and armor that will secure your OpenVPN connections.
Configuring OpenVPN on VPS
Now that OpenVPN is installed and certificates have been generated, it's time to configure it. Follow these steps to establish the core settings:
Step 1: Create the OpenVPN Server Configuration File
Open the server configuration file using a text editor:
sudo nano /etc/openvpn/server.conf
Add the following content to the file, adjusting as needed:
port 1194 proto udp dev tun ca /etc/openvpn/easy-rsa/pki/ca.crt cert /etc/openvpn/easy-rsa/pki/issued/server.crt key /etc/openvpn/easy-rsa/pki/private/server.key dh none topology subnet server 10.8.0.0 255.255.255.0 push "redirect-gateway def1 bypass-dhcp" push "dhcp-option DNS 8.8.8.8" push "dhcp-option DNS 8.8.4.4" cipher AES-256-CBC user nobody group nogroup
In this configuration, you define essential parameters such as the listening port, protocol, encryption settings, and network topology.
Step 2: Enable IP Forwarding
Uncomment or add the following line in the /etc/sysctl.conf file:
net.ipv4.ip_forward=1
Apply the changes:
sudo sysctl -p
By enabling IP forwarding, your server can route data between the VPN network and external networks effectively.
Setting Up Firewall Rules
To facilitate the passage of OpenVPN traffic through your VPS's firewall, you'll need to configure iptables. Here's how:
- Enable NAT (Network Address Translation):
Execute the following command to enable Network Address Translation (NAT), allowing traffic from the VPN network (10.8.0.0/24) to exit via your VPS's external interface (eth0):
sudo iptables -t nat -A POSTROUTING -s 10.8.0.0/24 -o eth0 -j MASQUERADE
This command sets up the necessary translation rules to ensure proper routing of VPN traffic.
- Save the iptables rules:
To preserve these iptables rules for future use and reboots, save them to a configuration file with the following command:
sudo iptables-save > /etc/iptables/rules.v4
This action ensures that your firewall rules persist across system restarts and remain consistent.
Starting and Managing the OpenVPN Service on VPS
With OpenVPN all configured and ready, it's time to put it into action:
- Start the OpenVPN Service:
Initiate the OpenVPN service by executing the following command:
sudo systemctl start openvpn@server
This command launches the OpenVPN service, making it operational for your VPN connections.
- Enable Automatic Start at Boot:
To ensure that OpenVPN starts automatically every time your system boots up, run the following command:
sudo systemctl enable openvpn@server
This action guarantees that your VPN service remains consistently available.
- Check the Service Status:
To verify the current status of your OpenVPN service and ensure it's running as expected, use the following command:
sudo systemctl status openvpn@server
This command provides real-time information about the service's state, enabling you to confirm that it's operational and serving your VPN connections.
Connecting to the VPN on VPS
To connect to your OpenVPN server, you'll need the client configuration files and certificates. Here's how to set up a client on various platforms:
Windows:
- Download the OpenVPN Windows client from the official website.
- Install the client and import the client.ovpn file provided by your server administrator.
- Connect to the VPN.
macOS:
- Install the Tunnelblick OpenVPN client from the official website.
- Import the client.ovpn file.
- Connect to the VPN through the Tunnelblick menu.
Linux:
- Install the OpenVPN client:
sudo apt install openvpn
- Place the client.ovpn file in the /etc/openvpn/ directory.
- Connect to the VPN:
sudo openvpn --config /etc/openvpn/client.ovpn
Mobile Devices:
For mobile devices, you can typically find OpenVPN client apps in your app store. Install the app, import the client configuration, and connect as instructed by the app.
Troubleshooting Common Issues
Setting up OpenVPN can present challenges, and it's not uncommon to encounter various hurdles along the way. Here are some troubleshooting tips to help you overcome common issues that may arise during your OpenVPN journey:
1. Firewall Rules
Firewall configurations can sometimes hinder your OpenVPN traffic. To ensure a smooth connection:
Check Firewall Rules - Verify that your VPS firewall rules are accurately configured to permit OpenVPN traffic. Incorrect settings can block the necessary communication between your VPN clients and the server.
2. Log Files
OpenVPN maintains detailed log files that can provide valuable insights into potential issues:
Review Log Files - Explore the OpenVPN log files located in /var/log/openvpn/. These logs often contain error messages and diagnostic information that can help pinpoint problems in your setup.
3. Certificate Issues
Certificates are the backbone of OpenVPN's security. Misconfigurations can lead to authentication and connectivity problems:
Double-Check Certificates - Thoroughly review your certificates and paths specified in your server and client configuration files. Mismatched or incorrectly referenced certificates can disrupt the handshake process.
4. Port and Protocol
The choice of port and protocol (UDP or TCP) is crucial for proper communication between the server and clients:
Verify Port and Protocol - Ensure that you are using the correct port and protocol (UDP or TCP) in your client configuration. A mismatch can prevent successful connections, as both the server and clients must use the same settings.
5. Network Conflicts
Network conflicts can arise if your VPN's IP address range interferes with your local network:
Address Conflicts - Be certain that the IP address range allocated for your VPN network (e.g., 10.8.0.0/24) does not overlap or conflict with any IP addresses already in use on your local network. Address conflicts can result in routing issues and connectivity problems.
Securing and Maintaining the VPN on VPS
Securing your OpenVPN installation is a continuous commitment. To fortify your VPN and ensure its integrity, adopt the following best practices:
- Keep Software Updated: Regularly update both OpenVPN and your server's operating system to address emerging security vulnerabilities. Timely patches are the armor that shields your VPN from potential threats.
- Rotate Certificates and Keys: Strengthen your VPN's security by periodically rotating certificates and encryption keys. This practice limits exposure to compromised credentials and adds an extra layer of protection.
- Implement Two-Factor Authentication (2FA): Elevate your VPN's security posture by implementing Two-Factor Authentication (2FA) for access. This additional layer of verification ensures that only authorized users can connect, even if their credentials are compromised.
- Monitor VPS Logs: Vigilance is paramount. Continuously monitor your VPS logs for any unusual or suspicious activities. Promptly addressing anomalies can thwart potential security breaches and maintain the integrity of your VPN.
Conclusion
In this guide, we've provided you with a detailed, step-by-step tutorial on how to install OpenVPN on a Virtual Private Server (VPS). By following these instructions, you can create a secure VPN connection that enables you to protect your online privacy, access geo-restricted content, or establish a secure remote access solution. Remember that while the basic setup covered here is secure, you can further enhance your VPN's security by exploring advanced configurations and additional security measures. Stay safe and enjoy the benefits of your self-hosted OpenVPN server.

Hello, everyone, my name is Lisa. I'm a passionate electrical engineering student with a keen interest in technology. I'm fascinated by the intersection of engineering principles and technological advancements, and I'm eager to contribute to the field by applying my knowledge and skills to solve real-world problems.