
Config Server Firewall (CSF) is a free, open-source firewall and intrusion prevention system (IPS) for Linux systems. It is a powerful tool that can help protect your server from various threats, including port scans, brute force attacks, and DDoS attacks. In this blog post, we will guide you through the process of installing and configuring CSF on Ubuntu. We will also provide some tips on how to use CSF to improve the security of your server and how to monitor threats using CFS.
What is CSF?
CSF is a powerful firewall and IPS that can help protect your server from various threats. It offers a wide range of features which we will discuss later.
Why use CSF?
There are many reasons why you should use CSF to protect your server. CSF is a free, open-source firewall and IPS. This means that you can download and use it without any cost. It’s easy to install and configure: CSF is easy to install and configure. You can follow the instructions in this blog post to install and configure CSF on your Ubuntu server.
How CSF Protects the Server?
CSF protects your server in several ways. Here are some of the ways that CSF can protect your server:
- Port blocking: CSF can block access to specific ports on your server. This can help to prevent attackers from exploiting known vulnerabilities. For example, you can block port 22, which is the port used for SSH, to prevent attackers from logging into your server.
- IP blocking: CSF can block access from specific IP addresses or ranges. This can help to prevent attackers from accessing your server. For example, you can block IP addresses from known bad botnets to prevent them from scanning your server.
- Brute force protection: CSF can be used to protect against brute force attacks. These are attacks where an attacker tries to guess your username and password by repeatedly trying different combinations. CSF can help to protect against brute force attacks by blocking IP addresses that make too many failed login attempts.
- DDoS protection: CSF can be used to protect against DDoS attacks. These are attacks where an attacker tries to overwhelm your server with traffic. CSF can help protect against DDoS attacks by limiting the amount of traffic your server can handle.
Additional features for protection
In addition to these features, CSF also includes some other security features, such as:
- Log monitoring: CSF can be used to monitor your server’s logs for suspicious activity. This can help you to identify and respond to attacks quickly.
- TCP Wrappers: CSF can be used to configure TCP Wrappers, which is a Linux security tool that can help to block access to services from unauthorized hosts.
- ModSecurity: CSF can be used to configure ModSecurity, which is a web application firewall (WAF) that can help to protect your web applications from attacks.
By using these features, CSF can help to protect your server from a variety of threats.
How to Install ConfigServer Firewall on Linux?
In this article, we will go through the steps on installing and configuring CSF. Today we will show you:
- How to install CSF
- How to configure it
- How to use CSF as a firewall and intrusion detection system
In order to start with this tutorial, you’re going to need a reliable Linux VPS provider. With our SSD-based Linux VPS, you have all the hardware ready, so let’s get started!
The Prerequisites:
Perl and libwww are prerequisites to install CSF.
# yum install perl-libwww-perl
# apt install libwww-perl
Step 1: Download CSF
# cd /usr/src
# wget https://download.configserver.com/csf.tgz
Step 2: Extract the CSF tarball
# tar xzf csf.tgz
# cd csf
Step 3: Run the CSF Installation Script
- Check all dependencies are installed
- Create the necessary directory structures
- Detect currently open ports
- restart the csf and lfd daemons after initial configuration
# sh install.sh
# perl /usr/local/csf/bin/csftest.pl
The output of the above command will look like this:
Testing ip_tables/iptable_filter...OK
Testing ipt_LOG...OK
Testing ipt_multiport/xt_multiport...OK
Testing ipt_REJECT...OK
Testing ipt_state/xt_state...OK
Testing ipt_limit/xt_limit...OK
Testing ipt_recent...OK
Testing xt_connlimit...OK
Testing ipt_owner/xt_owner...OK
Testing iptable_nat/ipt_REDIRECT...OK
Testing iptable_nat/ipt_DNAT...OK
RESULT: csf should function on this server
Step 4: Disable Firewall and Configure CSF
Disable firewalld (if running) and configure CSF
# systemctl stop firewalld
# systemctl disable firewalld
Change TESTING = "1" to TESTING = "0" and list allowed incoming and outgoing ports as a comma-separated list in /etc/csf/csf.conf as shown in output:
# Testing flag - enables a CRON job that clears iptables incase of
# configuration problems when you start csf. This should be enabled until you
# are sure that the firewall works - i.e. incase you get locked out of your
# server! Then do remember to set it to 0 and restart csf when you're sure
# everything is OK. Stopping csf will remove the line from /etc/crontab
#
# lfd will not start while this is enabled
TESTING = "0"
# Allow incoming TCP ports
TCP_IN = "20,21,22,25,53,80,110,143,443,465,587,993,995"
# Allow outgoing TCP ports
TCP_OUT = "20,21,22,25,53,80,110,113,443,587,993,995"
Save the changes and return to the command line.
Step 5: Restart and Test CSF
# systemctl restart {csf,lfd}
# systemctl enable {csf,lfd}
# systemctl is-active {csf,lfd}
# csf -v
Step 6: Setting up CSF and Intrusion Detection Rules
Inspect the current firewall rules as follows:
# csf -l
You can also stop them or reload them with:
# csf -f
# csf -r
Check after making changes and restarting csf and lfd.
How to Install CSF on Ubuntu
To install CSF on Ubuntu, you will need to open a terminal window and run the following commands:
sudo apt update sudo apt install csf
Once CSF is installed, you will need to configure it. To do this, you will need to create a configuration file. The configuration file is located at /etc/csf/csf.conf. You can edit this file using any text editor.
The configuration file is divided into two sections:
- The global section contains settings that apply to all services.
- The service section contains settings that apply to specific services.
To configure CSF, you will need to edit the global section and the service section of the configuration file.
For more information on configuring CSF, please refer to the CSF documentation.
How to Configure CSF
Here are some examples of how you can use the CSF firewall to whitelist and blacklist IPs, limit incoming connections, and send alerts via email. Of course, there is still much more you can do with CSF.
Example 1 – Allowing and Forbidding IP Addresses
To allow incoming connections from 192.168.0.10.
# csf -a 192.168.0.10
You can deny connections originating from 192.168.0.11.
# csf -d 192.168.0.11
Remove each of the above rules.
# csf -ar 192.168.0.10
# csf -dr 192.168.0.11
The output will be as follows:
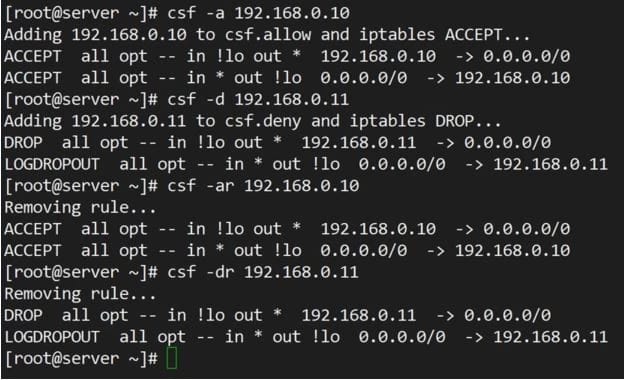
Use of -ar or -dr above removes existing allow and deny rules:
Example 2 – Limiting Incoming Connections by Source
- Open /etc/csf/csf.conf
- Search for CONNLIMIT
- Specify multiple ports
- connections pairs separated by commas
CONNLIMIT = "22;2,80;10"
Example 3 – Sending Alerts via Email
- Look for EMAIL_ALERT
- Search in /etc/csf/csf.conf
- Set to "1" to receive
LF_SSH_EMAIL_ALERT = "1"
LF_SU_EMAIL_ALERT = "1"
CSF Configuration Options and Usage
- Modify and control csf configuration
- Configuration files of csf are located under /etc/csf directory
- Restart the csf daemon to make changes
csf.conf : The main configuration file for controlling CSF
csf.allow : The list of allowed IP’s and CIDR addresses on the firewall
csf.deny : The list of denied IP’s and CIDR addresses on the firewall
csf.ignore : The list of ignored IP’s and CIDR addresses on the firewall
csf.*ignore : The list of various ignore files of users, IP’s
How to Remove CSF Firewall?
Run the following script located under /etc/csf/uninstall.sh directory.
# /etc/csf/uninstall.sh
It will erase the CSF firewall completely with all the files and folders.
How to Use CSF ?
Once CSF is configured, you can use it to protect your server from various threats. To do this, you will need to use the CSF commands. The CSF commands are located in the /usr/local/csf/bin directory.
The most commonly used CSF commands are:
- csf status: This command displays the status of
- csf deny: This command denies access to a specific IP address or range.
- csf allow: This command allows access to a specific IP address or range.
- csf reload: This command reloads the CSF configuration.
How to Monitor Threats with CSF?
CSF can be used to monitor your server for suspicious activity. CSF includes many features that can help you to identify and respond to attacks quickly.
- Log monitoring: CSF can be used to monitor your server’s logs for suspicious activity. This can help you to identify and respond to attacks quickly. For example, you can use the csf logstats command to view a summary of your server’s logs.
- TCP Wrappers: CSF can be used to configure TCP Wrappers, which is a Linux security tool that can help to block access to services from unauthorized hosts. For example, you can use the csf -a command to add a new host to the TCP Wrappers blacklist.
- ModSecurity: CSF can be used to configure ModSecurity, which is a web application firewall (WAF) that can help to protect your web applications from attacks. For example, you can use the csf modsecurity command to enable ModSecurity on your server.
CSF can be used to monitor your server’s logs for suspicious activity. This can help you to identify and respond to attacks quickly. For example, you can use the csf logstats command to view a summary of your server’s logs.
CSF can also block IP addresses that are making too many failed login attempts. This can help to prevent brute force attacks. For example, you can use the csf deny command to block an IP address with 10 failed login attempts in a row.
Tips for Monitoring Threats with CFS
- Keep an eye on your logs: CSF will generate log files that record your server’s activity. These logs can be a valuable resource for identifying and responding to attacks. Make sure to check your logs regularly for any suspicious activity.
- Use a security scanner: A security scanner can help you to identify security vulnerabilities on your server. There are many different security scanners available, so you can choose one that is right for your needs.
- Keep your software up-to-date: Software vulnerabilities are a common way for attackers to gain access to your server. To help protect your server, make sure to keep your software up-to-date with the latest security patches.
- Use strong passwords: Strong passwords are essential for protecting your server. Make sure to use a different strong password for each of your accounts.
- Be careful what you click: Phishing emails and malicious websites are a common way for attackers to gain access to your server. Be careful what you click on, and don’t open attachments from unknown senders.
- Back up your data regularly: Even if you do everything right, there is always the possibility that your server will be compromised. To protect your data, make sure to back it up regularly.
Final Thoughts
Congratulations on making it to the end of this tutorial! We hope you are now more acquainted with firewalls, their importance, and what they do. Let us know in the comments below if this installation tutorial worked, and if you liked it then you can share it with your friends.

I'm fascinated by the IT world and how the 1's and 0's work. While I venture into the world of Technology, I try to share what I know in the simplest way with you. Not a fan of coffee, a travel addict, and a self-accredited 'master chef'.