![How to Change Linux Password? [CentOS, Debian, Ubuntu]](/wp-content/uploads/2020/08/114882-main.webp)
Ever wondered about the nuances of updating your password on a Linux Operating System? Whether you're a seasoned Linux enthusiast or just beginning to explore the open-source realm, understanding the ins and outs of password management is essential. In this blog post, we'll tell you how to change Linux password command line, including CentOS, Debian, and Ubuntu.
Unlock the Power of Linux! 🌟 Explore Our Comprehensive Linux Commands Cheat Sheet! 🌟
➤ Easy to Understand – Perfect for beginners and experts alike!
➤ Quick Reference – Save time with a handy guide at your fingertips!
➤ Enhance Your Skills – Master the command line with ease!
Linux Set User Password Command
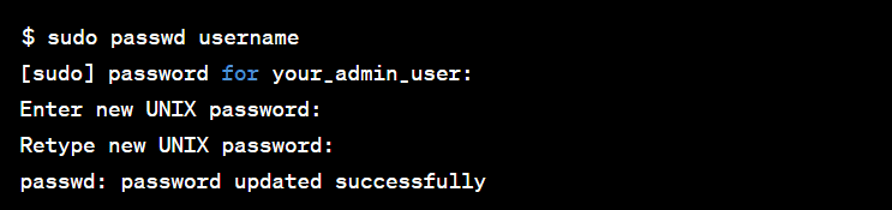
The 'passwd' command can be used to set password for user Linux via the command line. Do you want to know how to change Linux password command line? Here's a step-by-step procedure:
- Open the terminal on your Linux system.
- Type this command and press Enter:
sudo passwd username - Replace "username" with the actual username whose password you want to set or update.
- You will be required to enter the user's new password. Enter the new password and press the Enter key.
- When prompted for confirmation, retype the new password and hit Enter.
The system will confirm that the password has been updated successfully. The user can now use the new password to log in.
Note 1: For security reasons, you will not see any characters on the screen when typing the password.
Note 2: You may need administrative privileges, hence the use of sudo in the command, to Linux change password for another user's password.
Change a Linux password for one user
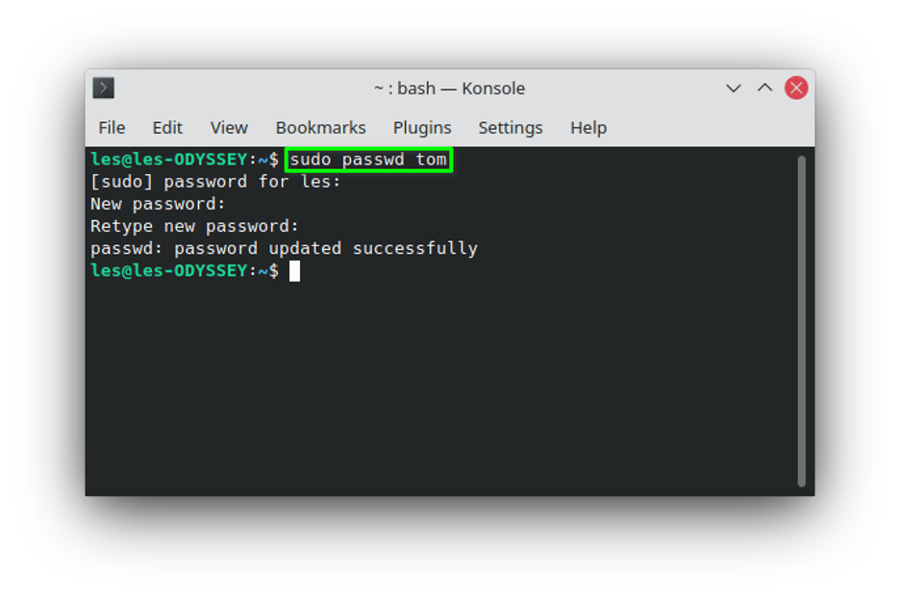
If you aim to Linux change password for a different user, it requires Change root password Linux. Change root password Linux grant exclusive access to all system files and resources, and only the computer's primary user possesses these unlimited rights. Ensure you have your password readily available for authentication purposes. Here we tell you how is Linux change password for different user:
- To alter a user's password, navigate to the terminal and input the command: sudo passwd <username>
- Proceed by following the steps outlined in the previous example: input the new password and confirm it by retyping.
Once the password is successfully updated, the designated user must use the newly set password during the subsequent login.
Linux change password for other user account
To modify the password for a different user in Linux, it's essential to be logged in as the root user. Here's a step-by-step guide:
- Launch the Terminal window.
- Enter the su - or sudo -i command and press Enter.
- As the root user, input the 'passwd' command, followed by the username for which you intend to change password Linux: passwd username
- Provide the new password for the user and confirm it by entering it again.
- Press Enter, and you've successfully updated the password!
Linux Change Group Password
Group passwords are not widely used in Linux, and permissions and access control are typically managed through user accounts and group memberships. Each user has a password connected to their account.
However, If you want to manage the membership or properties of a group, use the 'gpasswd' command with the '-p' option. Here's an example:
sudo gpasswd -p newPassword groupName
Replace "newPassword" with the desired new password and "groupName" with the name of the group. For example:
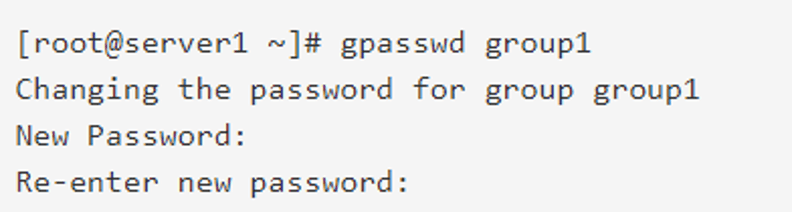
Note: Modifying group properties requires administrative privileges, hence the use of `sudo`.
Note 2: Group passwords are not commonly used in Linux. If you have specific needs or work in a specific setting, please offer more information for accurate support.
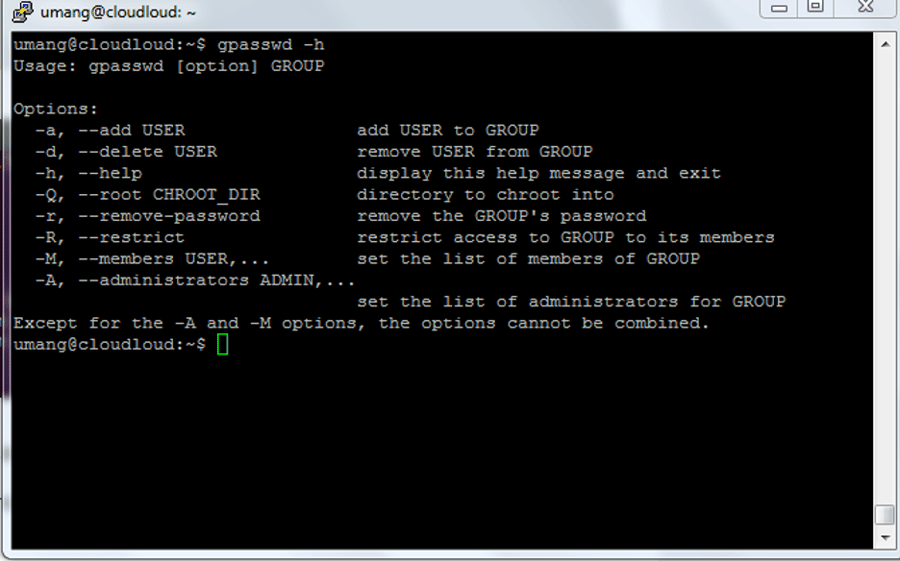
Options for Linux Change Group Password
In this context, only the -A and -M options are combinable. Here are the options that you can use for this command:
- -a, --add: This choice is utilized for adding a user to the specified group.
- -d, --delete: It is employed to remove a user from the designated group.
- -r, --remove-password: This option removes the password from the specified group.
- -R, --restrict: Employing this option will restrict access to the designated group.
- -A, --administrators: This choice sets the list of administrative users.
- -M, --members: It establishes the list of group members.
- -h, --help: Display the help message and exit.
Changing user passwords on Linux
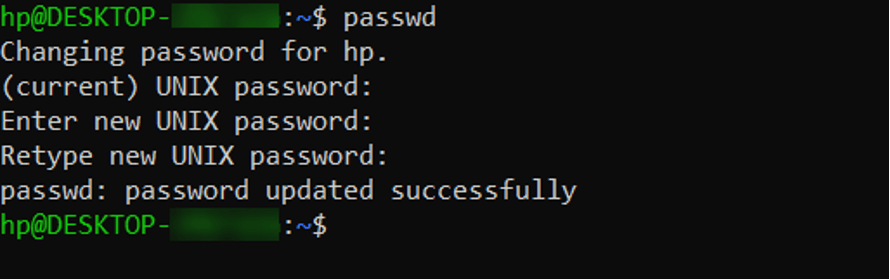
Changing user passwords on Linux is a routine administrative task, and it can be done using the passwd command. Here's a simple guide:
- Open the Terminal: You can open the terminal from your desktop environment or use the keyboard shortcut Ctrl + Alt + T on most distributions.
- Type this command: passwd
- Press Enter.
- Enter the current password: You will be prompted to enter the current password for the user account.
- Type the new password: You'll be prompted to enter the new password. As you type, no characters will be shown on the screen for security reasons.
- Retype the new password: Confirm the new password by retyping it when prompted.
- Password Changed: You should receive a message indicating that the password has been updated successfully.
Forcing Linux user to change passwords at their next login
By default, Linux user passwords do not have expiration. Nonetheless, we can mandate users to change their password to Linux during their next login, employing either the GUI or CLI methods. The syntax is uncomplicated:
sudo passwd -e {username}
or
sudo passwd --expire {username}
Let's promptly expire the password for an account, for instance, 'marlena':
sudo passwd -e marlena
The system will affirm the change:
passwd: password expiry information changed.
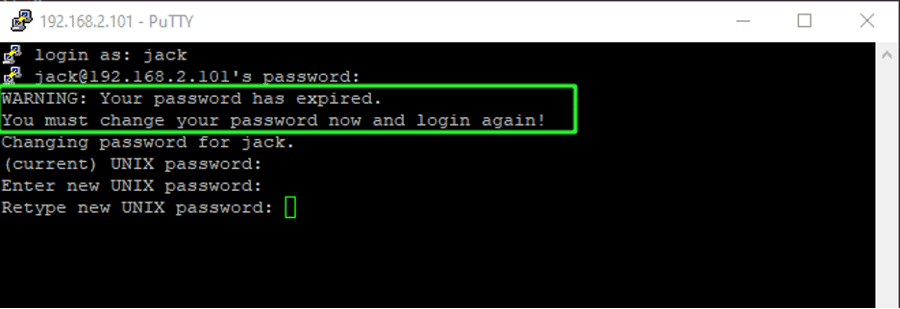
Upon attempting to log in via an SSH command, users will encounter the following message on the screen:
Locking and Unlocking user password of the named account
Please be aware that the provided local command does not fully disable the user account. The user may still have the ability to log in using an alternative authentication method, such as an SSH key. To effectively disable the account, administrators should utilize either the `usermod --expiredate 1 {username}` or `sudo passwd --expire {username}` command. Additionally, users with a locked password are restricted from changing their password, ensuring compliance with the security policies set by the system administrator. Here, we tell you how to lock and unlock a user account in Linux.
Locking a User Account:
sudo passwd -l username
Replace "username" with the actual username of the account you want to lock.
This command will lock the user account, preventing the user from logging in.
Unlocking a User Account:
sudo passwd -u username
Replace "username" with the locked account's actual username.
This command will unlock the user account and allow them to log in again.
Following the execution of these commands, you may receive a confirmation message stating that the password was successfully changed or the account status was updated.
Note: Administrative privileges (`sudo`) are required to lock or unlock user accounts.
How to change passwords in Linux and view the status
You're familiar with using the `passwd` command to manage user passwords on Linux. Now, let's explore how to check the password status for a Linux user, say 'john', using the `-S` option:
passwd -S john
Upon execution, you'll receive output similar to the following:
john P 03/21/2022 0 99999 7 -1
Let's break down the information in this line:
- `john`: Represents the login or account name.
- `P`: Denotes the password status. For instance, 'P' indicates that the user has a usable password. 'L' means the user account has a locked password, and 'NP' means no password.
- `03/21/2022`: Signifies the date of the last password change.
- `0`: Reflects the minimum age for the user's password.
- `99999`: Indicates the maximum age for the user's password.
- `7`: Specifies the warning period for the password, i.e., the number of days given to the user to change their password before it expires and their account gets locked, as detailed in the next field.
- `-1`: Represents the number of days after a password expires before it is locked.
Note: Replace 'john' with the actual username as needed. This information provides valuable insights into the password-related settings for the specified user.
A note about setting up a secure Linux password
Creating a secure Linux password is crucial for protecting your system from unauthorized access. Follow these guidelines to ensure your password is strong and secure:
- Length: Choose a password that is at least 12 characters long. Longer passwords are more difficult to crack.
- Complexity: Include a mix of uppercase and lowercase letters, numbers, and special characters. This increases password complexity and makes it harder to guess or crack using brute-force methods.
- Avoid common words: Stay away from dictionary words or easily guessable sequences of characters. Password-cracking tools often use dictionaries and common password lists.
- Use unique passwords: Assign a different password to each Linux account or service you use. Reusing passwords across multiple accounts increases the risk of compromise if one account is breached.
- Avoid personal information: Do not include personal details like your name, username, birthdate, or other easily discoverable information in your password.
- Consider passphrases: Instead of a single word, use a passphrase composed of multiple words or a sentence. Passphrases are easier to remember while being harder to crack.
- Regularly update your password: Set a reminder to change your password at regular intervals, such as every 90 days. Regular updates reduce the risk of long-term compromise.
- Enable two-factor authentication (2FA): It adds an extra layer of security by requiring a second form of authentication, such as a temporary code generated by a mobile app or sent via SMS.
- Password managers: Consider using a password manager to generate, store, and manage your passwords. Password managers help create strong and unique passwords for each account without the need to remember them all.
- Keep your system updated: Regularly install the latest security patches and updates for your Linux system. This minimizes vulnerabilities that attackers could exploit.
Note: Implement other best practices like configuring proper user permissions, using firewalls, and regularly backing up your data to maintain a secure Linux environment.
Linux change user password without current is also possible with booting to recovery mode. If you want to know how to change password in Linux Ubuntu, continue reading.
The passwd command in Ubuntu
Ubuntu change password is easy using the 'passwd' command to maintain user account passwords. It allows users to update their passwords as well as the passwords of other users if they have the appropriate credentials. Now we should tell you how to change password in Linux Ubuntu.
Here are some examples of Ubuntu change password:
Change Your Own Password
To change the password for the currently logged-in user, simply type:
passwd
You will be prompted to enter your current password and then your new password twice.
Change Another User's Password
If you have administrative privileges (usually obtained with `sudo`), you can change the password for another user. Replace "username" with the actual username:
sudo passwd username
Force a User to Change Password Linux on Next Login
To expire the password for a user and force them to change it on their next login, use:
sudo passwd -e username
View Password Status
To view the password status for a user, use:
passwd -S username
This will display information about the password status, such as the last password change date, minimum and maximum age for the password, and more.
Conclusion
Changing your Linux password is an essential step in keeping your system secure. You can quickly update your password to ensure it fulfills the criteria for strength and complexity by following the easy procedures explained in this blog post. Remember to use a long, unique password that avoids common words or personal information. You can also improve security by regularly upgrading your password, using two-factor authentication, and using password managers.

I'm fascinated by the IT world and how the 1's and 0's work. While I venture into the world of Technology, I try to share what I know in the simplest way with you. Not a fan of coffee, a travel addict, and a self-accredited 'master chef'.