
Rocky Linux is one of the most trusted enterprise Linux distributions available today. Designed as a 100% bug-for-bug compatible alternative to Red Hat Enterprise Linux (RHEL), it delivers long-term stability, predictable updates, and production-ready performance without licensing costs.
This guide explains how to install Rocky Linux step by step across all major environments and use cases. Whether you’re deploying a physical server, creating a virtual machine, or setting up a development environment on Windows, this tutorial walks you through the process clearly and professionally.
You’ll learn:
- How to download and install Rocky Linux
- How to install Rocky Linux from USB (bare metal)
- How to install Rocky Linux on VMware
- How to install Rocky Linux on VirtualBox
- How to install Rocky Linux on WSL
- Differences between Rocky Linux 10, 9.6, and 8.10
- Common installation issues and how to fix them
This article is written for system administrators, DevOps engineers, developers, and hosting users who want reliability—not guesswork.
Quick Answer: How to Install Rocky Linux?
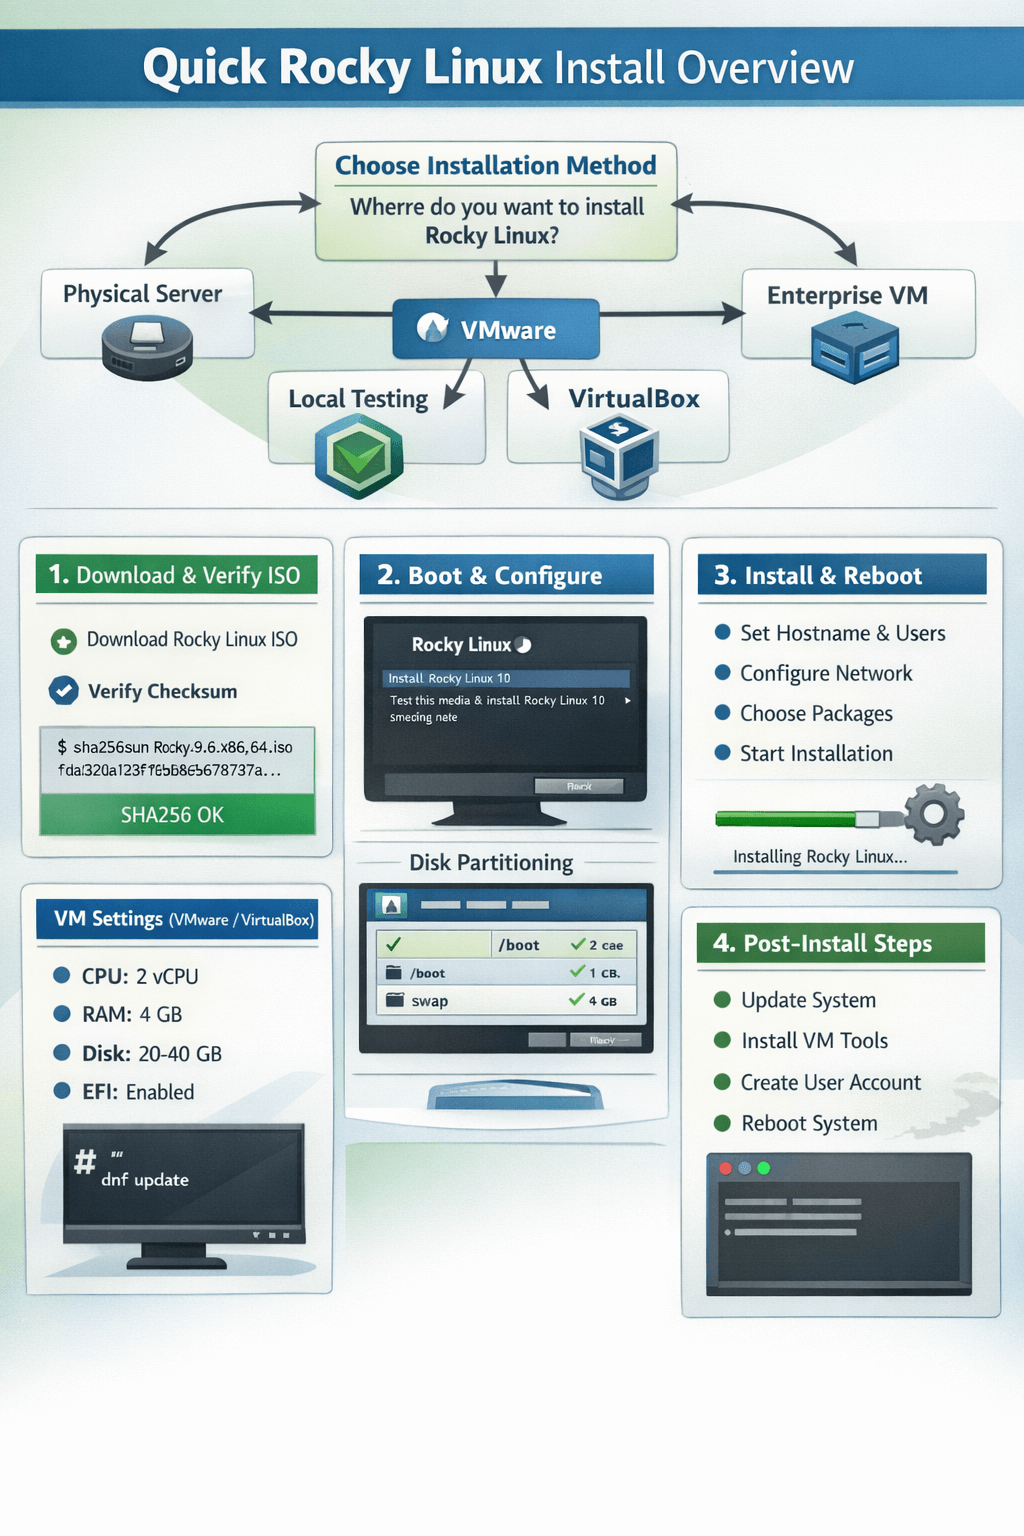
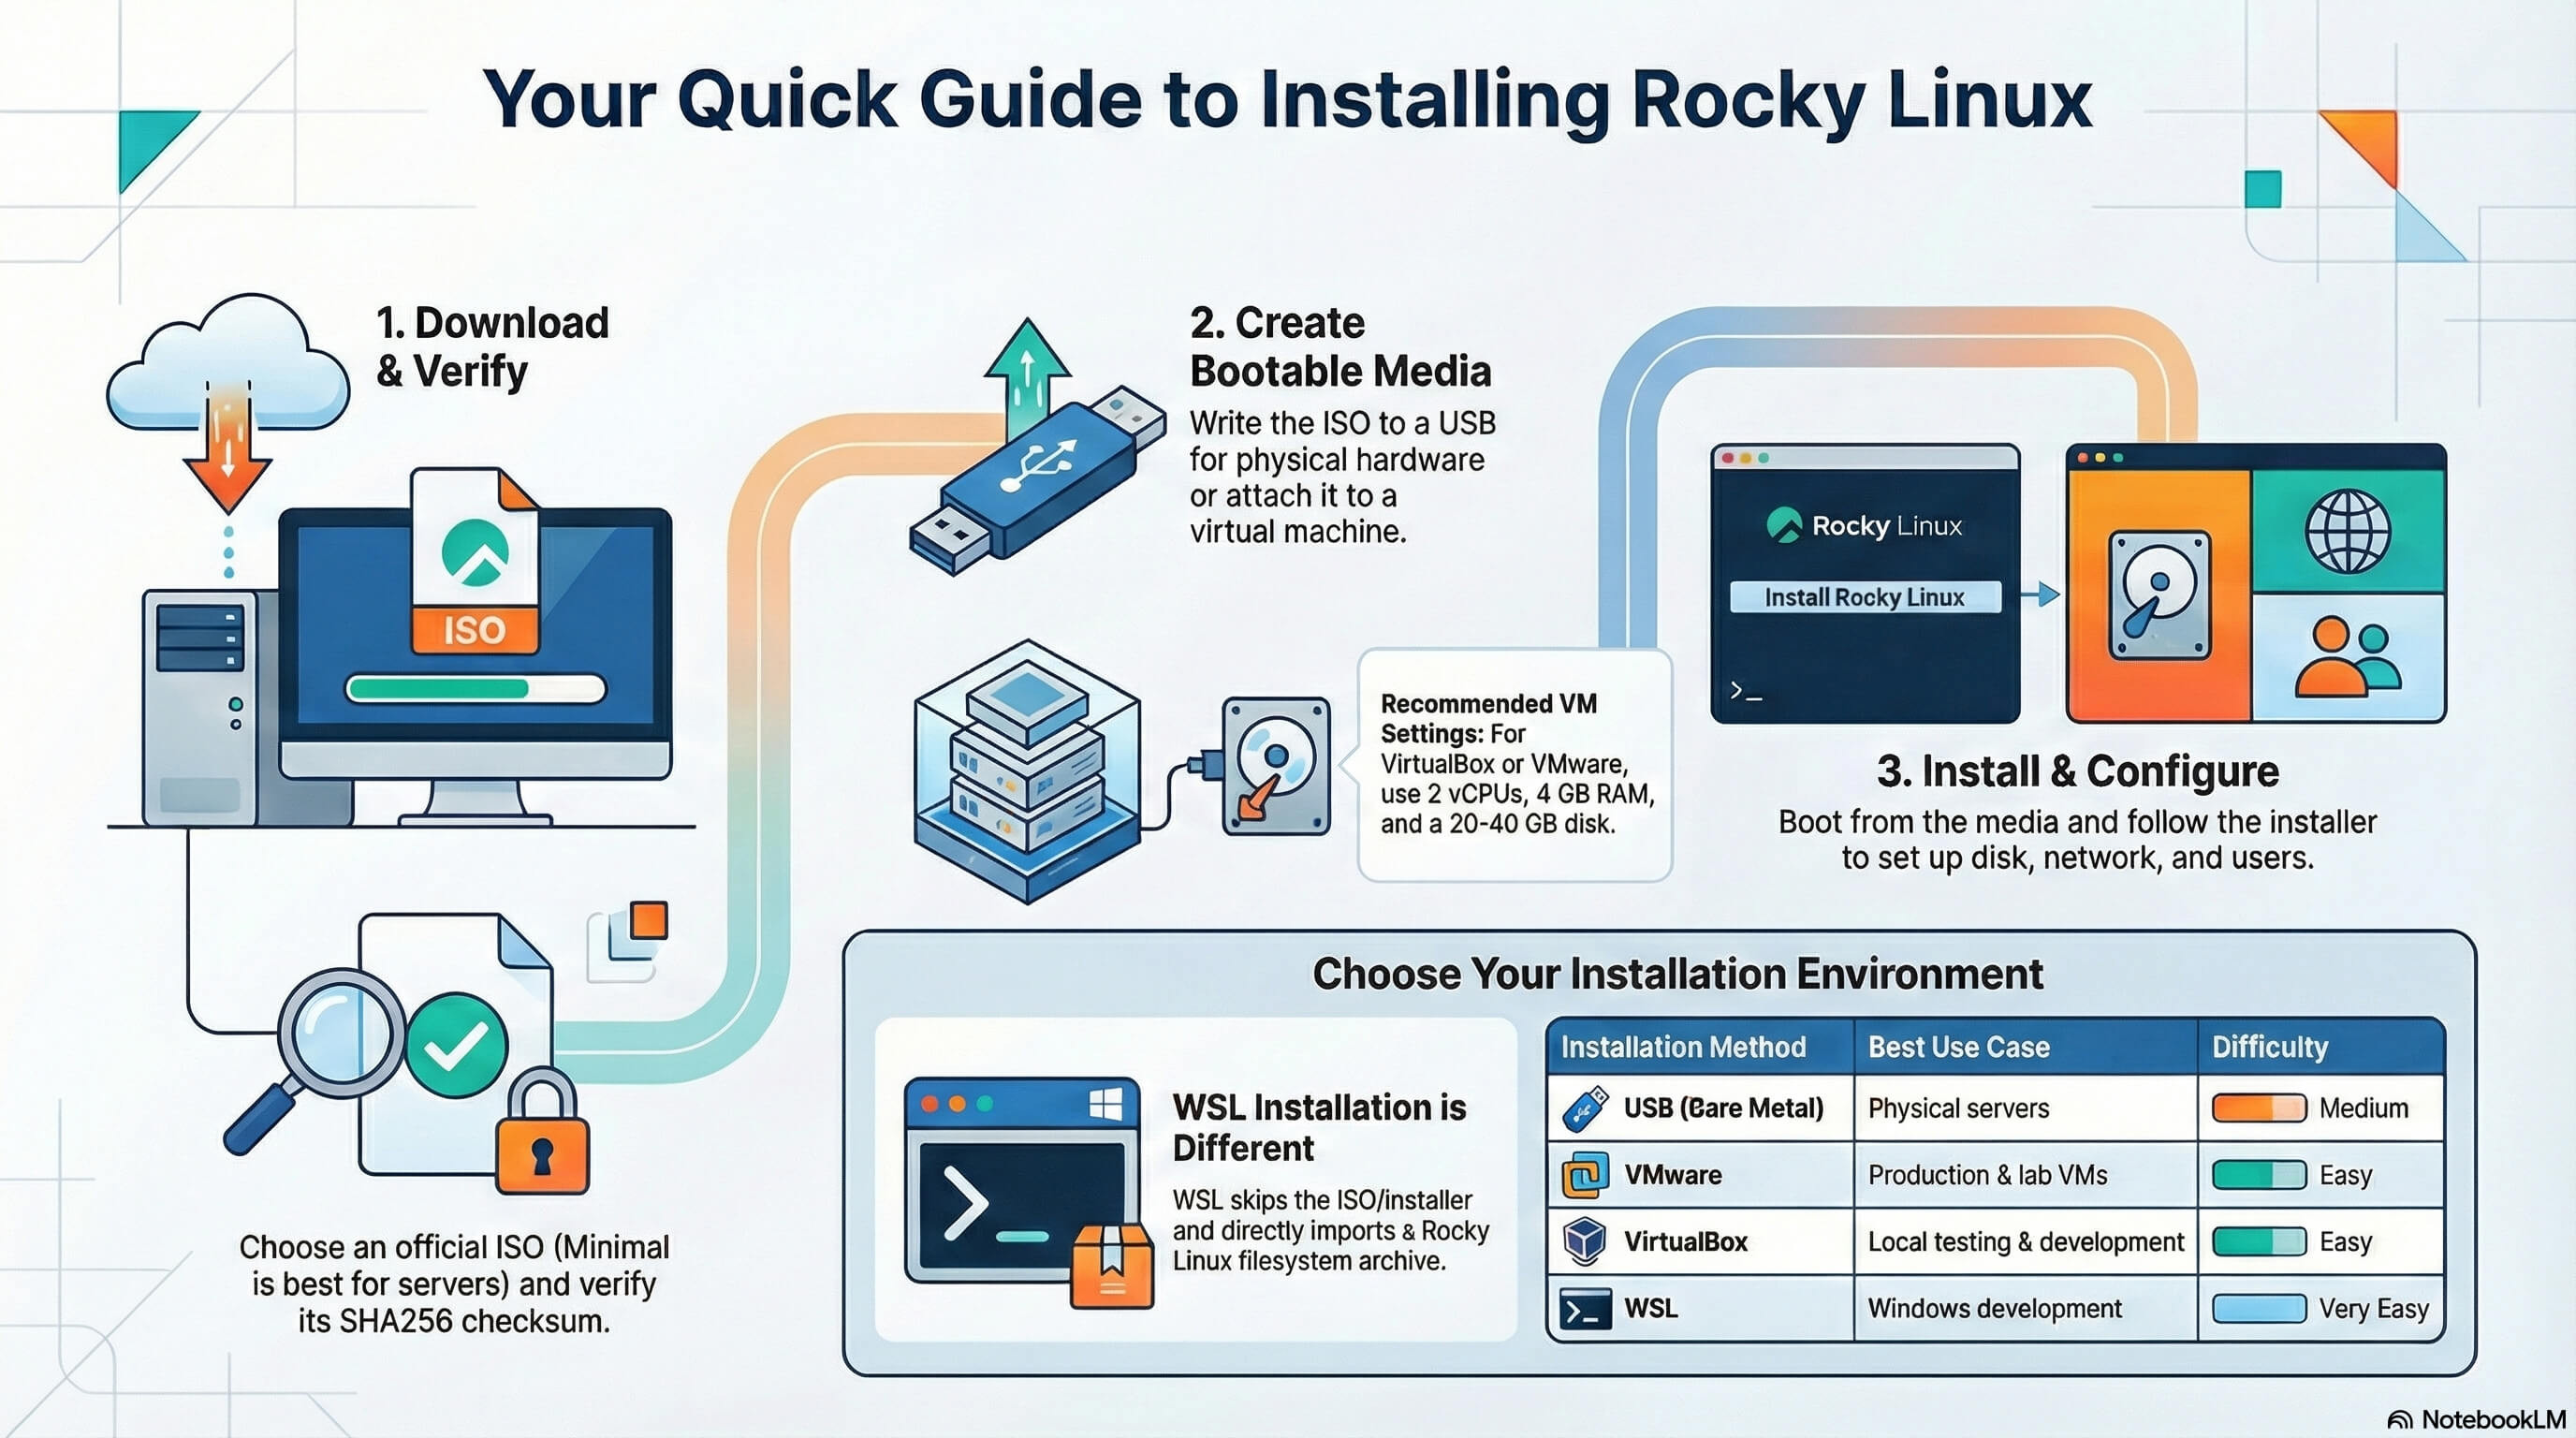
The Rocky Linux installation process generally follows a clear, predictable workflow. First, download the official Rocky Linux ISO from the project’s website, making sure to choose the correct architecture and version for your system. Next, verify the ISO’s SHA256 checksum to ensure the file is intact and hasn’t been tampered with. Once verified, create a bootable USB drive for physical hardware or attach the ISO to a virtual machine if you’re installing in a hypervisor such as VirtualBox, VMware, or KVM. Boot the system from the installer media, then walk through the graphical or text-based installer to configure storage layout, networking, system language, timezone, and user accounts (including setting the root password). After confirming your settings, start the installation, wait for the packages to be deployed, and reboot into your newly installed Rocky Linux system.
For WSL (Windows Subsystem for Linux), the process is simpler: instead of using an ISO, you import a Rocky Linux root filesystem tarball directly into WSL, create a distribution instance, and begin using Rocky Linux immediately without a traditional installer or reboot.
What Is Rocky Linux and Why Install It?
Rocky Linux is a free, open-source, enterprise-grade Linux operating system designed to be a community-driven replacement for CentOS after CentOS transitioned from a downstream rebuild to the rolling-release CentOS Stream model. The project was founded by Gregory Kurtzer, one of the original creators of CentOS, and is maintained by the Rocky Enterprise Software Foundation (RESF), a nonprofit organization dedicated to keeping the distribution stable, transparent, and vendor-neutral.
Rocky Linux is built to be 100% bug-for-bug binary compatible with Red Hat Enterprise Linux (RHEL). This means applications, workloads, and configurations designed for RHEL run identically on Rocky Linux—without licensing costs. For organizations and professionals who rely on predictable system behavior and long lifecycle stability, Rocky Linux provides a trusted platform suitable for production environments.
If you’re new to the distribution, start here: What is Rocky Linux.
Why Professionals Choose Rocky Linux?
Rocky Linux is widely adopted by system administrators, DevOps engineers, and infrastructure teams for several key reasons:
- RHEL Compatibility: Full binary compatibility ensures seamless migration from CentOS or RHEL and guarantees consistency across enterprise environments.
- Long-Term Support: Each major Rocky Linux release is supported for up to 10 years, making it ideal for servers and mission-critical workloads that require minimal change over time.
- Strong Security Defaults: Built-in security features include SELinux enforcement, firewalld for network protection, signed packages, and timely security updates aligned with RHEL advisories.
- Production-Ready Stability: Rocky Linux prioritizes stability over bleeding-edge features, reducing the risk of unexpected changes or regressions.
- Broad Use Cases
Commonly used for: - VPS and dedicated servers
- Cloud infrastructure (AWS, Azure, GCP, OpenStack)
- Container platforms (Docker, Podman, Kubernetes nodes)
- Databases and enterprise applications
- CI/CD pipelines and backend services
Thanks to its reliability, governance model, and active community support, Rocky Linux is consistently listed among the top Linux distributions for enterprise and server workloads, making it a strong choice for both individual professionals and large organizations seeking a stable, future-proof Linux platform.
System Requirements and Preparation
Minimum Hardware Requirements
|
Component |
Minimum |
Recommended |
|
CPU |
1 vCPU |
2 vCPU |
|
RAM |
2 GB |
4 GB or more |
|
Storage |
10 GB |
20–40 GB |
|
Network |
Optional |
Required |
Recommended Virtual Machine Settings
When installing Rocky Linux in a virtual machine, using appropriate resource allocations ensures smooth installation and stable performance. The following settings are considered a reliable baseline for most use cases:
- CPU: 2 vCPU: Two virtual CPUs provide enough processing power for the installer and for typical server workloads such as web services, small databases, and development environments. For heavier workloads, you can scale this up later.
- Memory: 4 GB RAM: While Rocky Linux can run with less memory, 4 GB is recommended for comfortable operation, especially if you plan to run multiple services, use SELinux in enforcing mode, or manage containers.
- Disk: 20–40 GB (LVM): A minimum of 20 GB is suitable for minimal server installations, but allocating 40 GB offers more flexibility for logs, packages, and future growth. Using LVM (Logical Volume Manager) is strongly recommended, as it allows you to resize volumes and manage storage more easily over time.
- Firmware: BIOS or UEFI: Rocky Linux supports both legacy BIOS and modern UEFI firmware. UEFI is recommended for newer systems and closer alignment with enterprise hardware, but BIOS works perfectly for most virtualized environments.
These settings work well in common hypervisors such as VirtualBox, VMware, Proxmox, KVM, and Hyper-V.
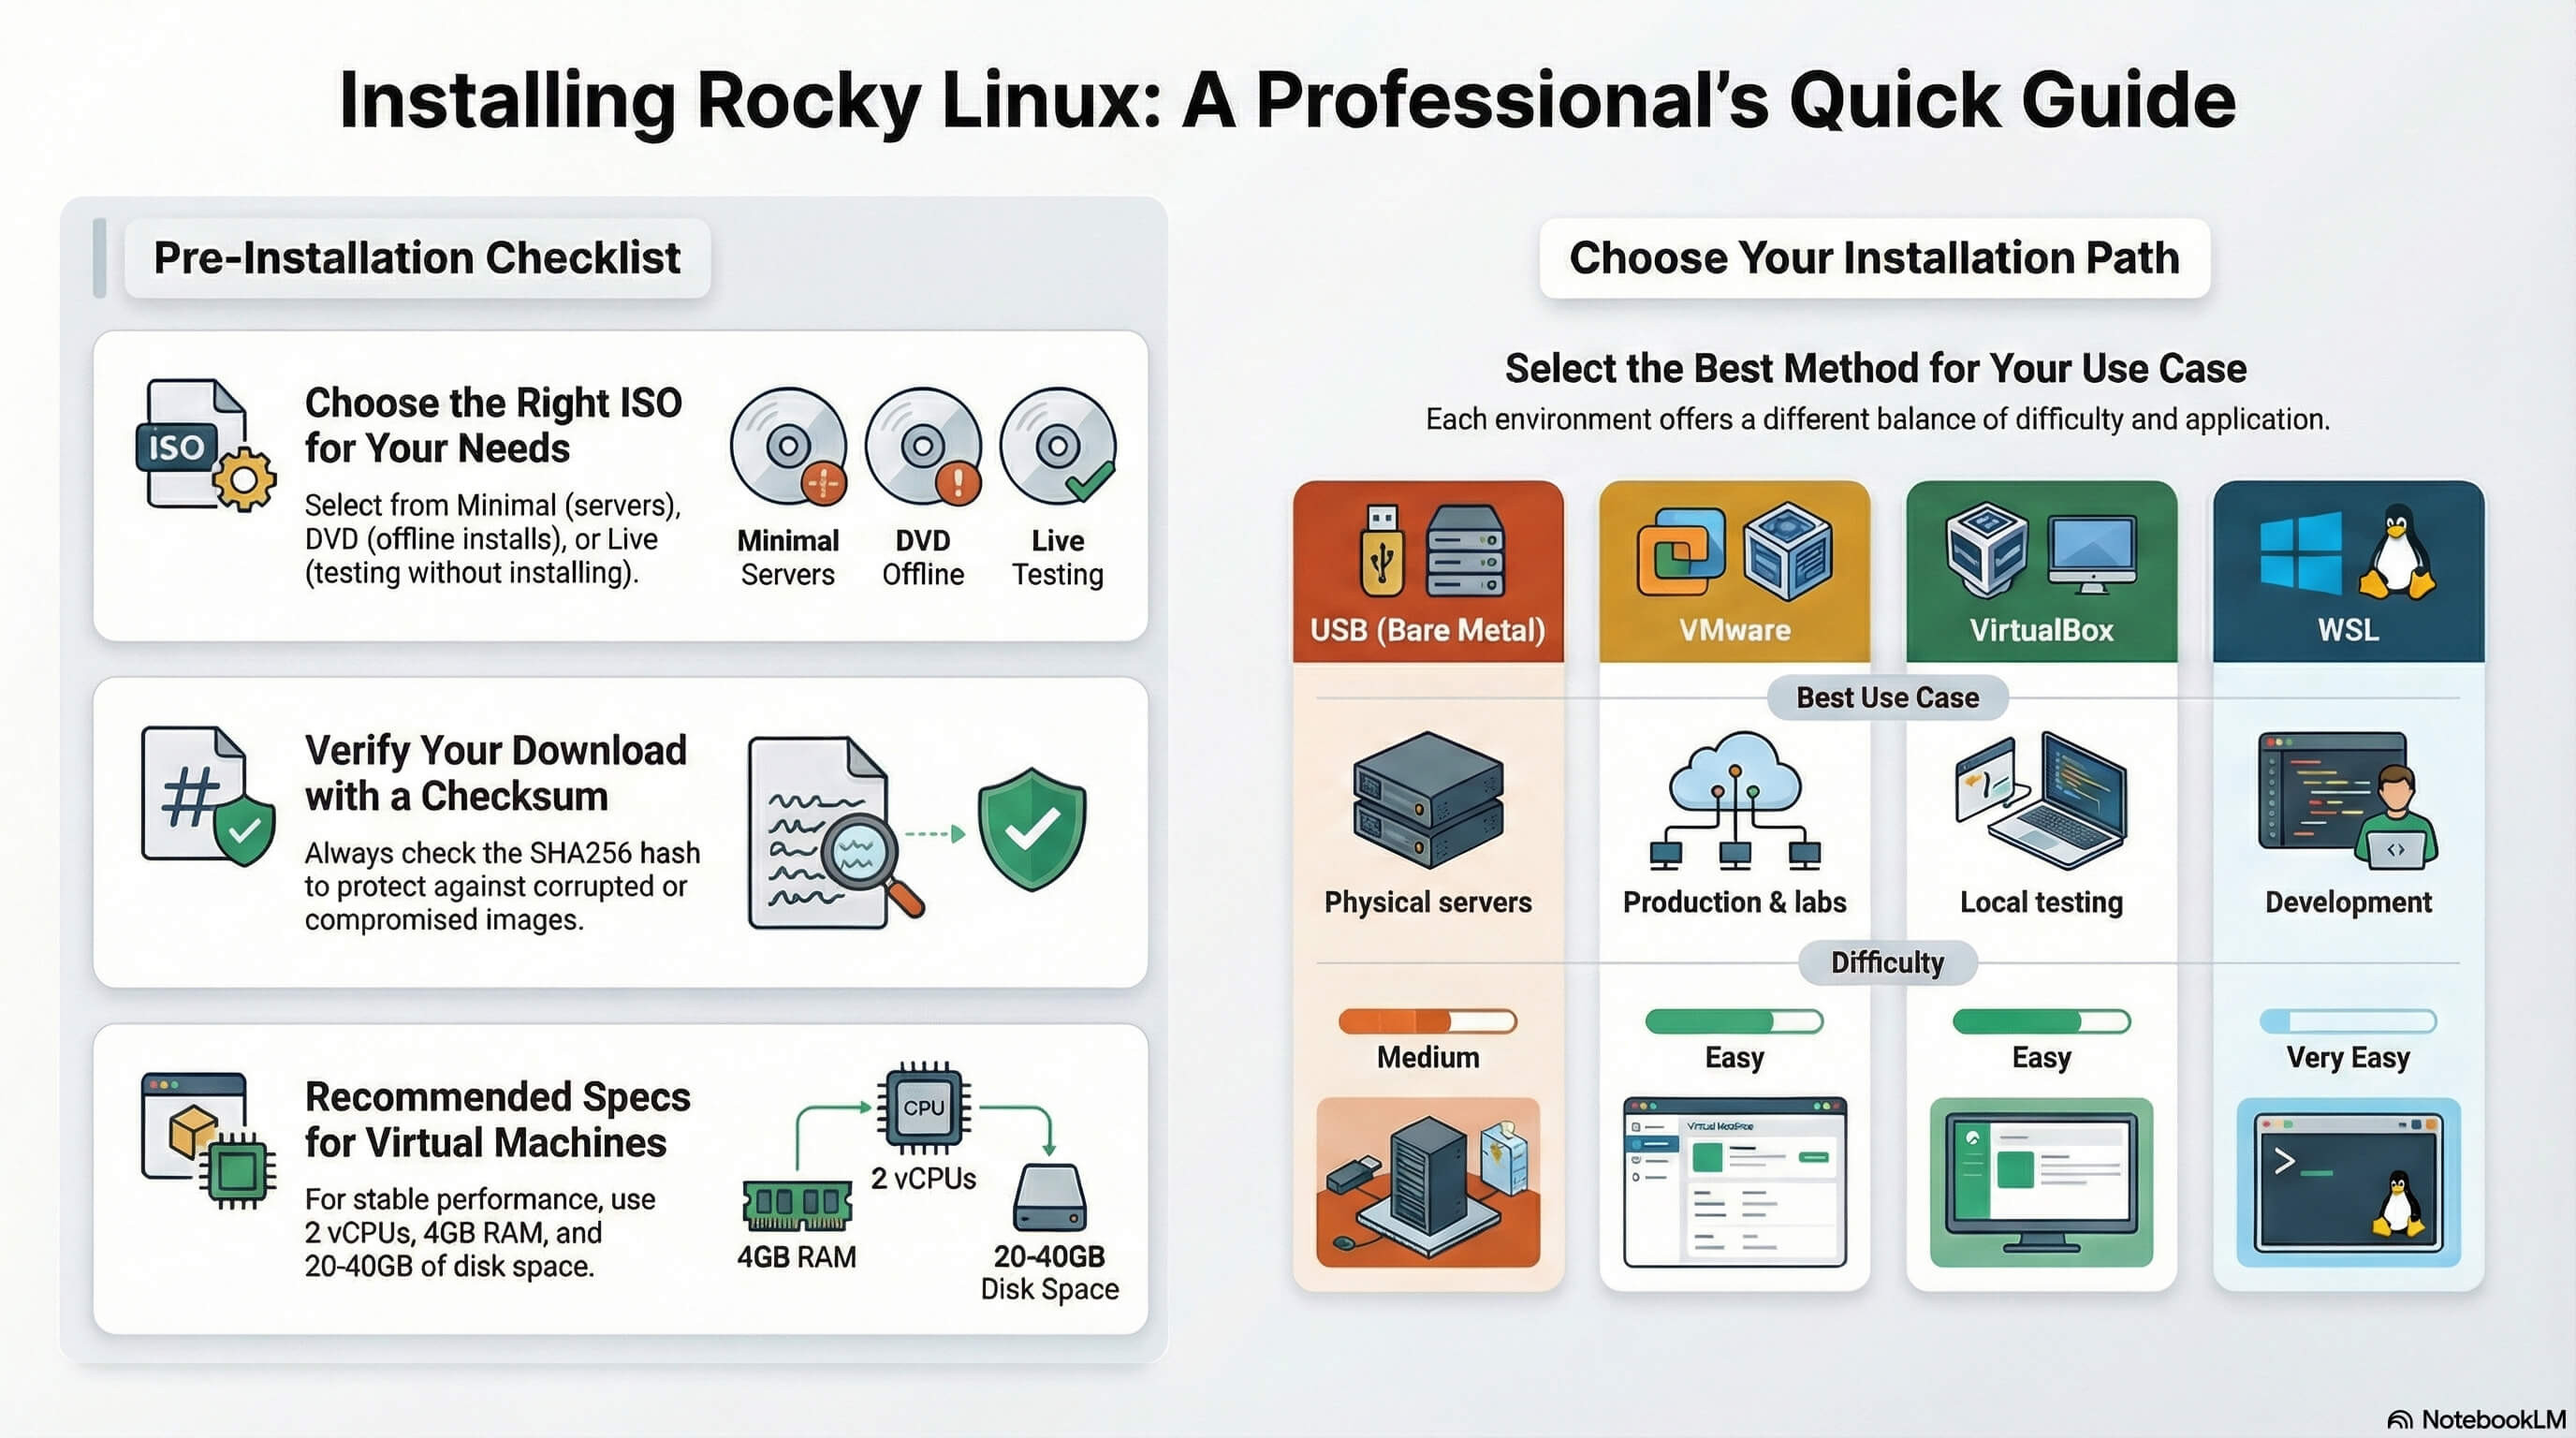
Rocky Linux ISO Types Explained
Rocky Linux provides several ISO images tailored to different installation scenarios. Choosing the right ISO can save time and reduce unnecessary components:
1. Minimal ISO (Recommended)
This is the best choice for servers, VPS deployments, and production environments. It installs a small, clean base system with only essential packages, allowing you to add exactly what you need later. This approach improves security, reduces attack surface, and keeps the system lightweight.
2. DVD ISO
The DVD ISO contains a complete set of packages and supports full offline installation. It is ideal for environments with limited or no internet access, or for users who want a wide selection of software available during installation without downloading additional packages.
3. Live / Workstation ISO
This ISO boots into a live desktop environment, allowing you to test Rocky Linux without installing it. It is primarily intended for desktop evaluation, demos, and testing, and includes a graphical interface suitable for workstation use rather than servers.
Selecting the appropriate ISO ensures your Rocky Linux installation matches your intended workload and deployment environment from the start.
Step 1: How to Download and Verify the Rocky Linux ISO
To ensure system security and reliability, always download Rocky Linux installation media only from official Rocky Linux mirrors. Using trusted sources guarantees that the ISO image has not been altered and matches the version officially released by the Rocky Linux project.
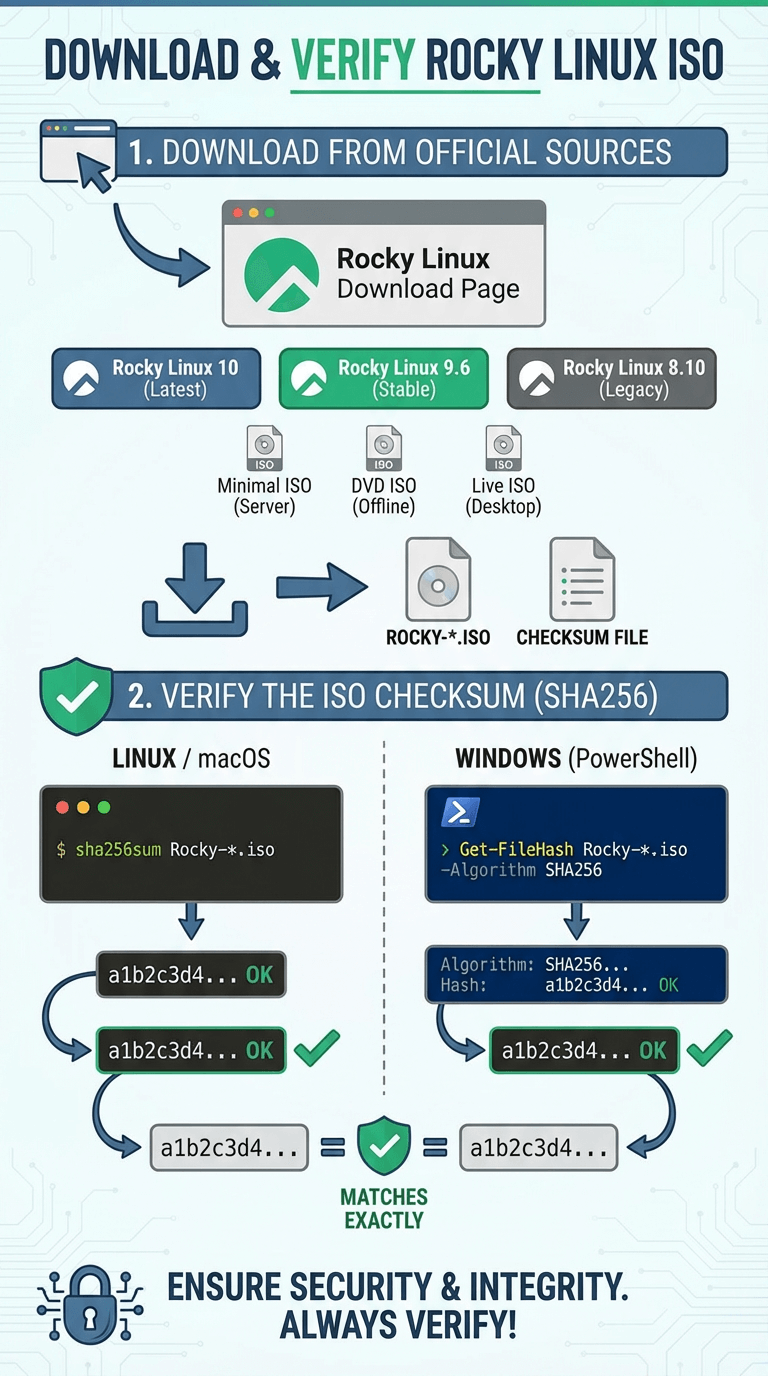
This guide applies to the following supported releases:
- Rocky Linux 10 – Latest major release for new deployments
- Rocky Linux 9.6 – Current stable release for enterprise systems
- Rocky Linux 8.10 – Legacy-compatible release for older environments
Each version is available in multiple ISO types (Minimal, DVD, Live/Workstation), depending on your installation needs.
Download the ISO
1. Visit the official Rocky Linux download page.
2. Select your desired Rocky Linux version and architecture (usually x86_64).
3. Choose the appropriate ISO:
- Minimal ISO (recommended for servers and VPS)
- DVD ISO (offline or full-package installs)
- Live / Workstation ISO (desktop evaluation)
4. Download the ISO file and the corresponding CHECKSUM file provided alongside it.
Verify the ISO Checksum (SHA256)
Verifying the checksum ensures that the downloaded ISO file is complete and has not been corrupted or tampered with during download.
On Linux or macOS
Navigate to the directory containing the ISO file and run:
sha256sum Rocky-*.iso
Compare the output hash with the value listed in the official CHECKSUM file. The two values must match exactly.
You can also verify automatically using:
sha256sum -c CHECKSUM
A successful verification will return OK.
On Windows (PowerShell)
Run the following command in the folder containing the ISO:
Get-FileHash Rocky-*.iso -Algorithm SHA256
Compare the displayed hash with the official checksum provided by Rocky Linux.
Why Checksum Verification Matters
- Confirms the ISO was downloaded correctly
- Protects against corrupted or incomplete files
- Prevents installation from a potentially compromised image
- Ensures compatibility with official Rocky Linux updates
Once the ISO is verified, you’re ready to proceed with creating a bootable USB drive or attaching the ISO to a virtual machine.
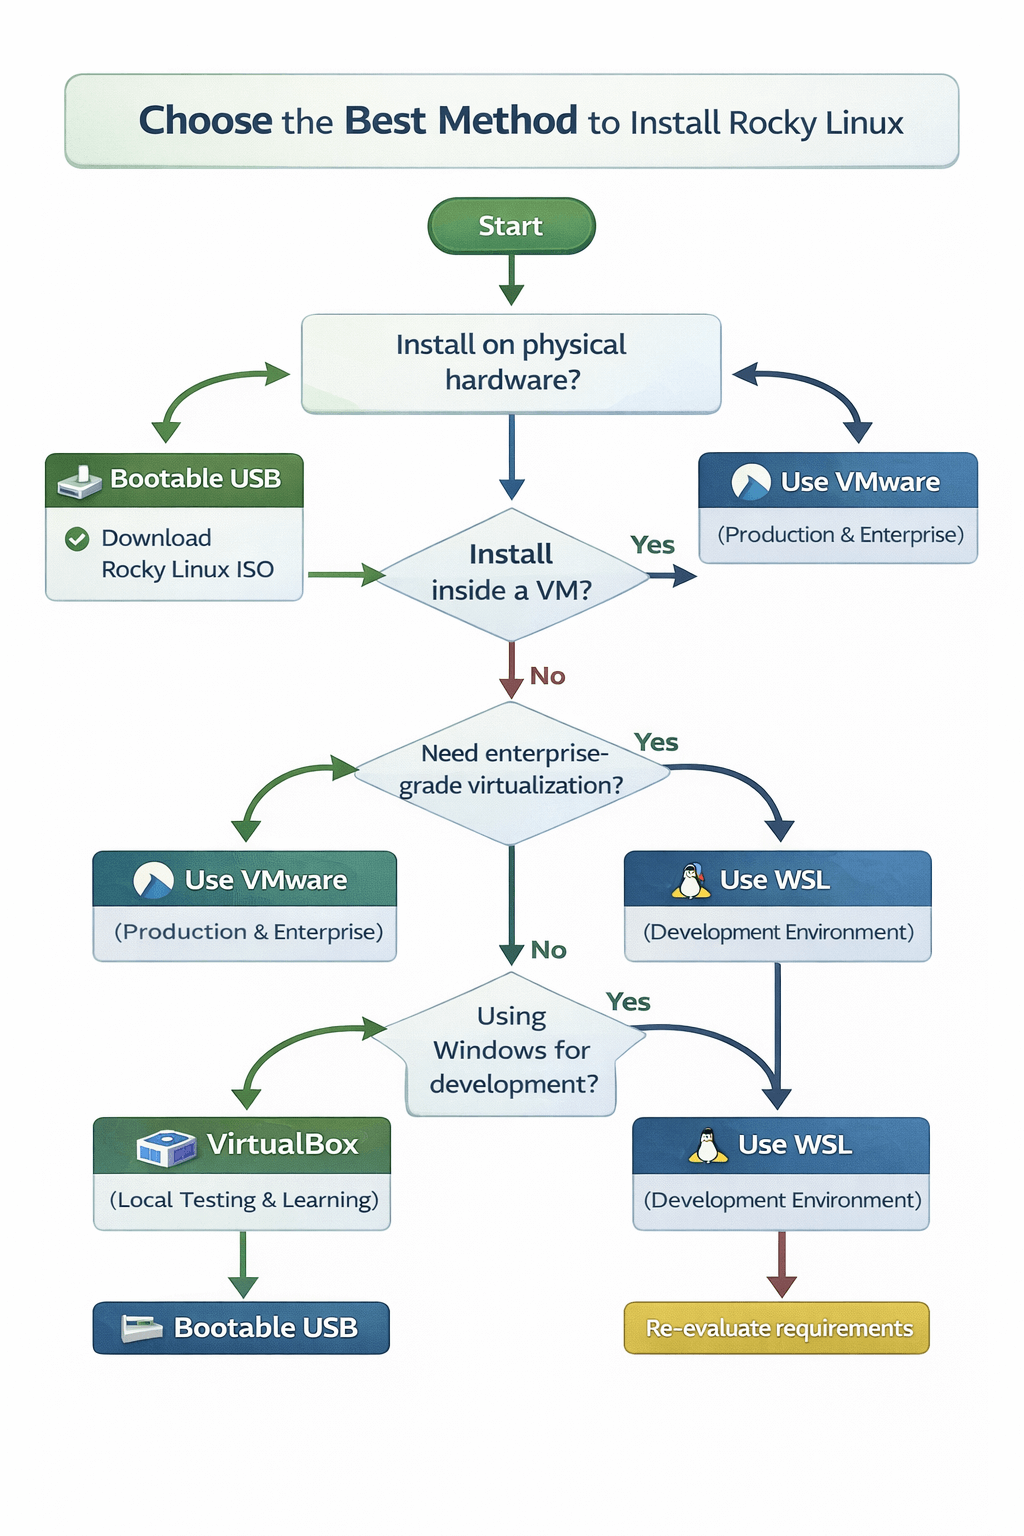
Step 2: How to Install Rocky Linux from USB (Bare Metal)
To install Rocky Linux on physical hardware, you must first create a bootable USB drive using the verified ISO image. This USB installer can then be used to boot the target system and start the installation process.
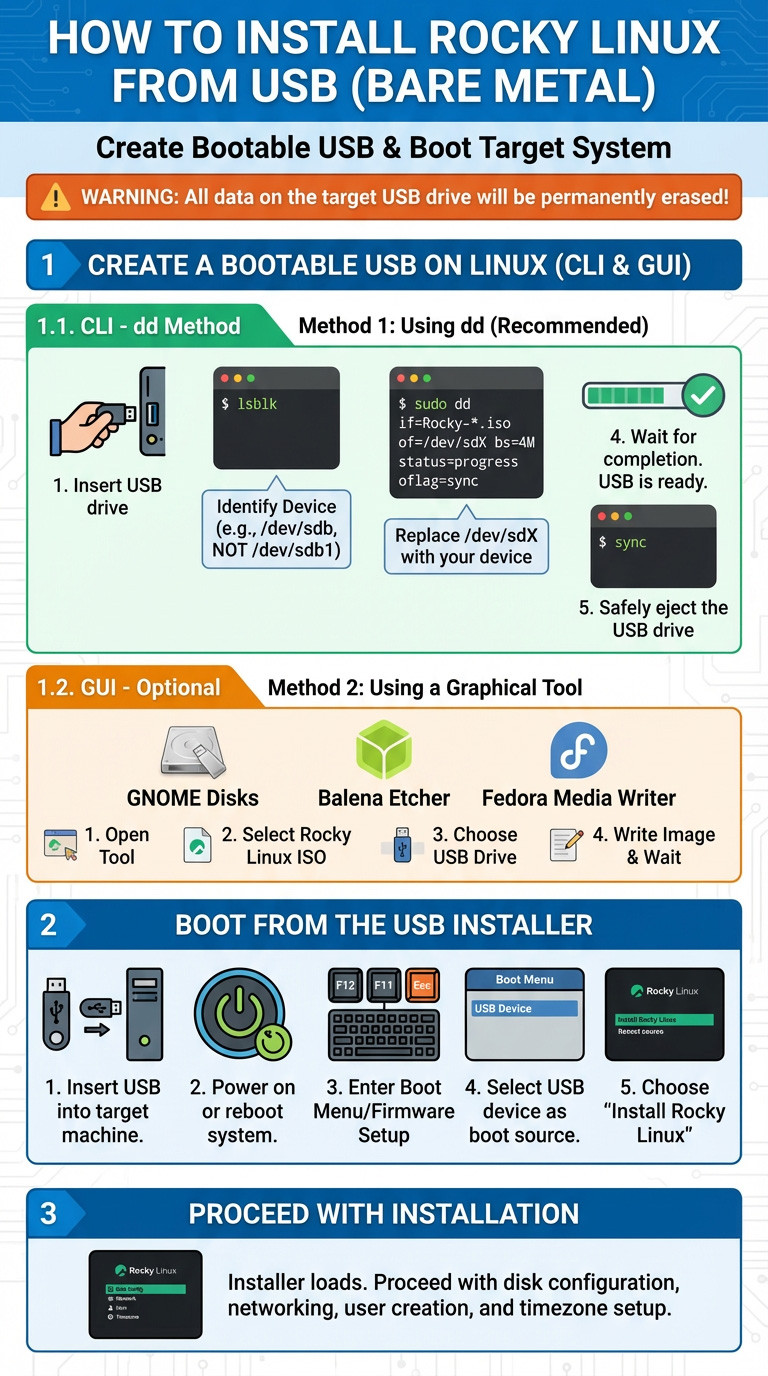
Warning: All data on the target USB drive will be permanently erased.
Create a Bootable USB on Linux
There are two common and reliable methods on Linux: using the command line (dd) or a graphical tool. The dd method is universal and does not require additional software.
Method 1: Using dd(Recommended)
1. Insert the USB drive into your system.
2. Identify the USB device name:Lsblk
Look for a device such as /dev/sdb or /dev/sdc that matches your USB size.
Do not use a partition like /dev/sdb1.
3. Write the ISO to the USB drive:
sudo dd if=Rocky-*.iso of=/dev/sdX bs=4M status=progress oflag=sync
Replace /dev/sdX with your actual USB device (for example /dev/sdb).
4. Wait for completion. When the command finishes and returns to the prompt, the USB is ready.
5. Safely eject the USB drive:
sync
Method 2: Using a Graphical Tool (Optional)
If you prefer a GUI, you can use:
- GNOME Disks (gnome-disk-utility)
- Balena Etcher
- Fedora Media Writer
Steps are generally:
- Open the tool
- Select the Rocky Linux ISO
- Choose the USB drive
- Write the image and wait for completion
Boot from the USB Installer
- Insert the bootable USB into the target machine.
- Power on or reboot the system.
- Enter the boot menu or firmware setup (commonly F12, F11, Esc, or Del).
- Select the USB device as the boot source.
- When the Rocky Linux boot menu appears, choose Install Rocky Linux.
The installer will now load, and you can proceed with disk configuration, networking, user creation, and timezone setup in the next step.
Step 3: Install Rocky Linux on Bare Metal
Once the system boots from the USB installer, the Anaconda installer starts automatically. Anaconda is Red Hat–based distributions’ standard installer and provides a structured, guided process that works for both beginners and advanced users.
The installation is completed by configuring each required section and then launching the installer.
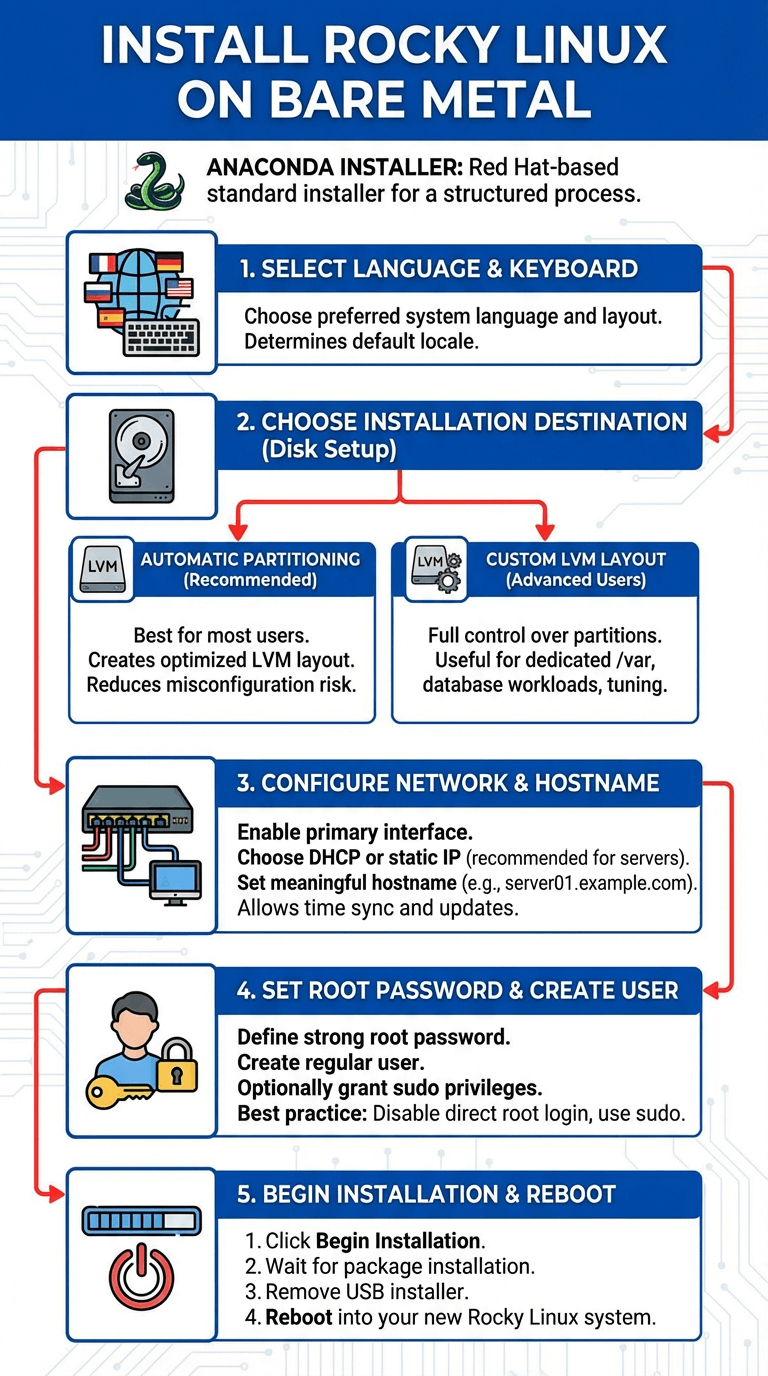
1. Select Language and Keyboard
Choose your preferred system language and keyboard layout.
This setting determines the default locale for the operating system, installer, and system messages. You can add additional keyboard layouts later if needed.
2. Choose Installation Destination (Disk Setup)
Select the target disk where Rocky Linux will be installed.
You have two primary options:
Automatic Partitioning (Recommended)
- Best choice for most users and production servers
- Automatically creates a secure and optimized layout
- Uses LVM by default
- Reduces the risk of misconfiguration
This option is ideal unless you have specific storage requirements.
Custom LVM Layout (Advanced Users)
- Full control over partitions and logical volumes
- Useful for:
- Dedicated /var or /home partitions
- Database or container-heavy workloads
- Compliance or performance tuning
Only choose this if you understand Linux storage and LVM concepts.
3. Configure Network and Hostname
- Enable the primary network interface
- Choose DHCP or configure a static IP address (recommended for servers)
- Set a meaningful hostname (e.g., server01.example.com)
A working network connection allows the installer to:
- Sync time correctly
- Download updates (if using Minimal ISO)
- Register additional repositories
4. Set Root Password and Create a User
- Define a strong root password
- Create a regular user account
- Optionally grant the user administrator (sudo) privileges
Best practice:
- Disable direct root login later
- Use sudo for administrative tasks
5. Begin Installation and Reboot
Once all required sections are complete:
- Click Begin Installation
- Wait for package installation to finish
- Remove the USB installer when prompted
- Reboot into your new Rocky Linux system
Example LVM Layout (Recommended for Servers)
A typical and balanced LVM layout looks like this:
- /boot – 1 GB
Stores bootloader and kernel files - / (root) – 20–30 GB
Main operating system and installed software - swap – 2–4 GB
Used for memory overflow and system stability
(Increase for systems with low RAM)
Additional volumes like /var or /home can be added later if required.
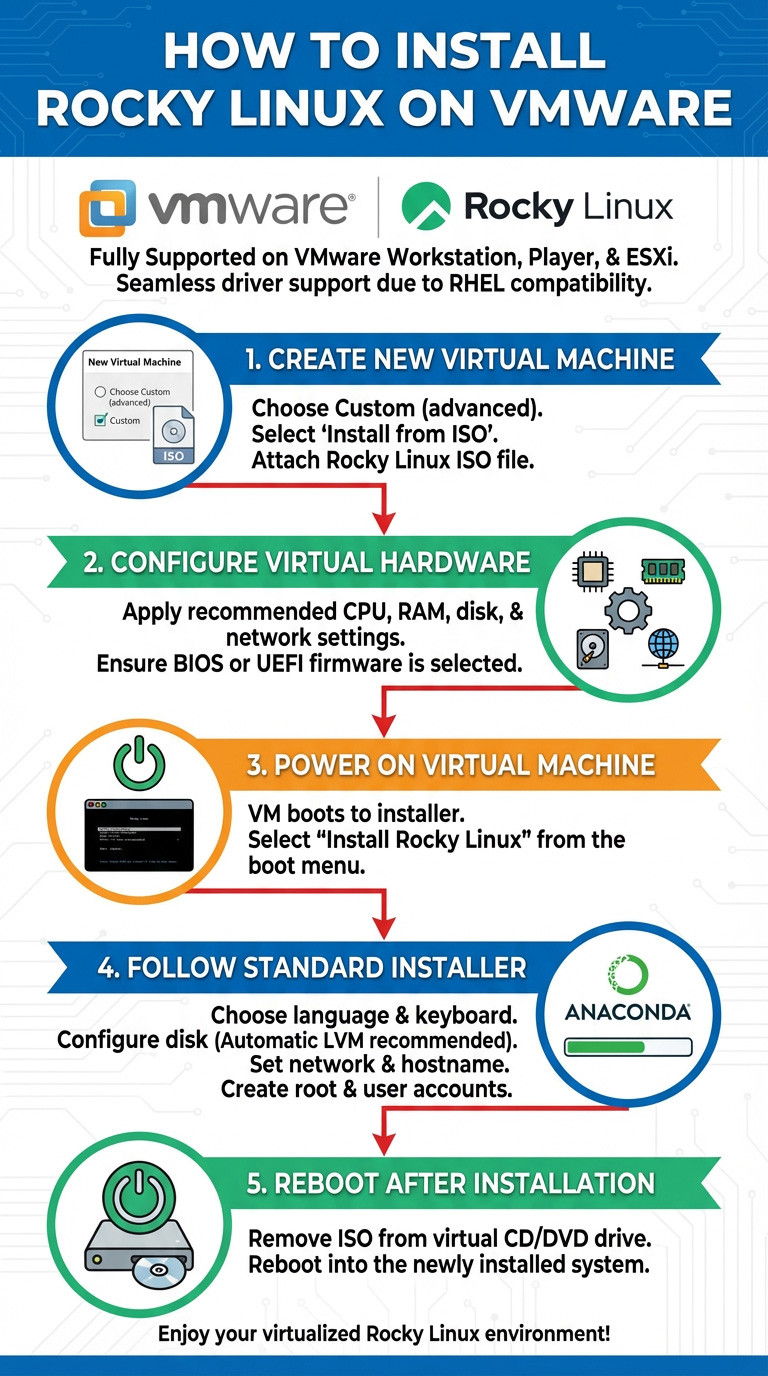
Step 4: How to Install Rocky Linux on VMware
Rocky Linux is fully supported on VMware platforms, including VMware Workstation, VMware Player, and VMware ESXi. Because Rocky Linux is binary-compatible with RHEL, VMware’s built-in Red Hat templates and drivers work seamlessly.
Recommended VMware Settings
When creating a new virtual machine, use the following baseline configuration for stable performance:
- Guest OS: Red Hat Enterprise Linux 9 (64-bit)
This ensures VMware applies the correct virtual hardware profile and drivers. - CPU: 2 vCPU
Suitable for most server workloads, testing, and development environments. - RAM: 4 GB
Provides enough memory for smooth installation and service operation. Increase for databases or container workloads. - Disk: 20+ GB (SCSI)
Use a SCSI virtual disk for best performance and compatibility. Thin provisioning is acceptable for labs; thick provisioning is recommended for production. - Network: NAT or Bridged
- NAT: Easy internet access, ideal for desktops and labs
- Bridged: Assigns the VM an IP on your local network, preferred for servers
Installation Steps
1. Create a New Virtual Machine
- Choose Custom (advanced) if available
- Select Install from ISO
- Attach the Rocky Linux ISO file
2. Configure Virtual Hardware
- Apply the recommended CPU, RAM, disk, and network settings
- Ensure firmware is set to BIOS or UEFI (either is supported)
3. Power On the Virtual Machine
- The VM will boot directly into the Rocky Linux installer
- Select Install Rocky Linux from the boot menu
4. Follow the Standard Installer
- Choose language and keyboard
- Configure disk layout (automatic LVM recommended)
- Set network and hostname
- Create root and user accounts
5. Reboot After Installation
- Remove the ISO from the virtual CD/DVD drive
- Reboot into the newly installed system
Post-Installation Optimization (Recommended)
After the first login, perform these steps to improve performance and usability:
1. Install VMware Tools / Open VM Tools
sudo dnf install -y open-vm-tools
sudo systemctl enable --now vmtoolsd
2. Update the System
sudo dnf update -y
3. Verify Network and Time Sync
Confirm IP address and DNS resolution
Ensure chronyd is running for accurate timekeeping
4. Enable SSH (if needed)
sudo systemctl enable --now sshd
Installing VMware tools improves:
- Network performance
- Disk I/O
- Time synchronization
- Graceful shutdown and reboot handling
Step 5: How to Install Rocky Linux on VirtualBox
Oracle VirtualBox is a popular choice for local testing, learning, and development. Rocky Linux runs very well on VirtualBox and closely mirrors enterprise RHEL-based environments.
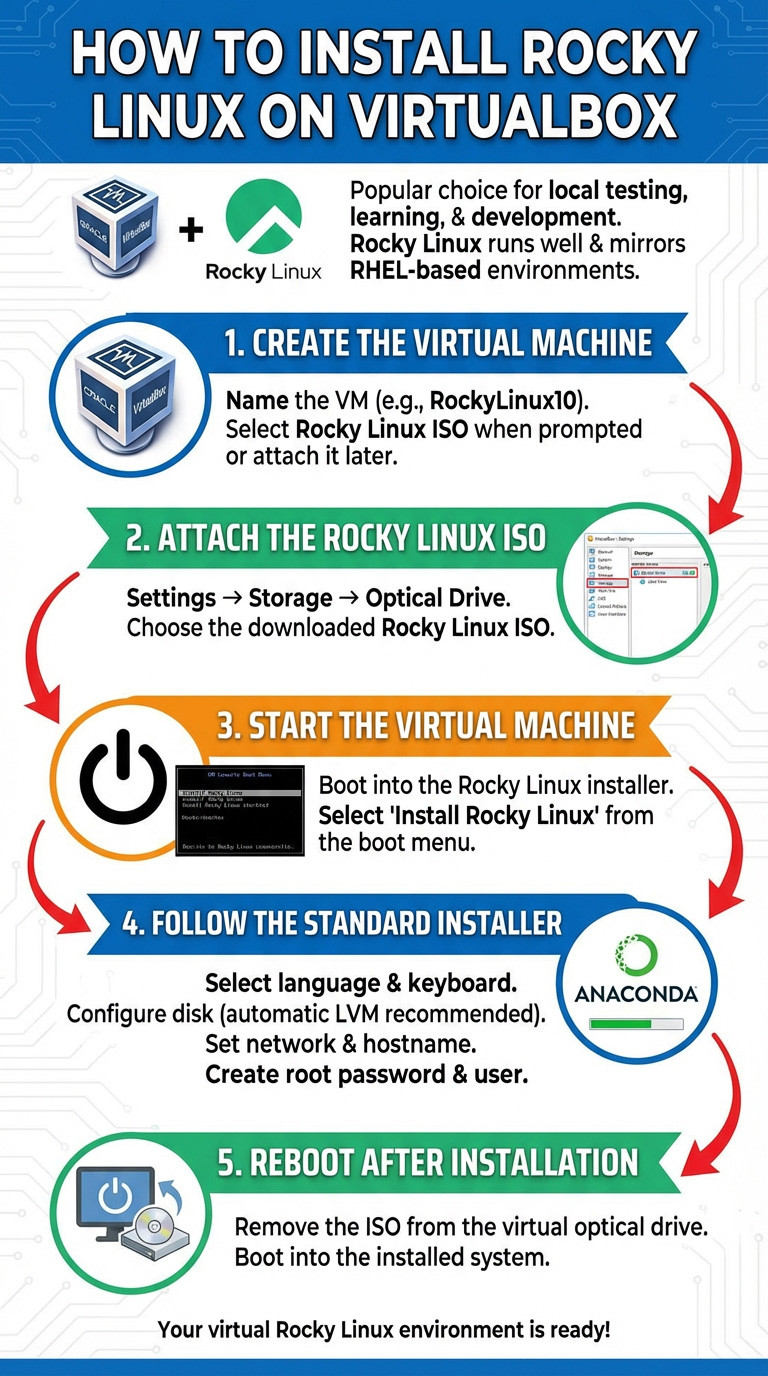
VirtualBox Configuration
When creating a new virtual machine, use the following recommended settings:
- Type: Linux
- Version: Red Hat (64-bit)
This ensures proper kernel and hardware compatibility. - RAM: 4 GB
Provides a smooth installer experience and supports typical development or server workloads. - CPU: 2 cores
Adequate for most use cases. Increase if running containers or databases. - Enable EFI: Recommended for Rocky Linux 10
UEFI better matches modern enterprise systems.
(Settings → System → Motherboard → Enable EFI) - Disk: 20–40 GB (VDI, dynamically allocated)
Use dynamically allocated disks for local labs, or fixed-size disks for better performance. - Display (Optional):
- Video Memory: 128 MB
- Graphics Controller: VMSVGA (recommended)
Installation Steps
1. Create the Virtual Machine
- Name the VM (e.g., RockyLinux10)
- Select the Rocky Linux ISO when prompted or attach it later
2. Attach the Rocky Linux ISO
- Settings → Storage → Optical Drive
- Choose the downloaded Rocky Linux ISO
3. Start the Virtual Machine
- Boot into the Rocky Linux installer
- Select Install Rocky Linux from the boot menu
4. Follow the Standard Installer
- Select language and keyboard
- Configure disk (automatic LVM recommended)
- Set network and hostname
- Create root password and user
5. Reboot After Installation
- Remove the ISO from the virtual optical drive
- Boot into the installed system
Install VirtualBox Guest Additions (Highly Recommended)
Guest Additions improve display resolution, mouse integration, clipboard sharing, and overall VM performance.
1. Insert Guest Additions ISO
In the VirtualBox menu:
- Devices → Insert Guest Additions CD Image
2. Install Required Packages
sudo dnf install -y gcc make perl kernel-devel kernel-headers
Reboot if the kernel was updated.
3. Run the Installer
sudo mkdir -p /mnt/cdrom
sudo mount /dev/cdrom /mnt/cdrom
sudo /mnt/cdrom/VBoxLinuxAdditions.run
4. Reboot the System
sudo reboot
After reboot, you should have:
- Automatic screen resizing
- Better graphics performance
- Improved mouse and keyboard integration
Optional Post-Install Tweaks
1. Enable SSH:
sudo systemctl enable --now sshd
2. Update the system:
sudo dnf update -y
Disable unnecessary services for minimal installs
Step 6: How to Install Rocky Linux on WSL
Unlike traditional installations or virtual machines, Windows Subsystem for Linux (WSL) does not use ISOs, bootloaders, or installers like Anaconda. Instead, Rocky Linux is installed by importing a root filesystem (rootfs) tarball directly into WSL.
This method is fast, lightweight, and ideal for development, scripting, CI/CD pipelines, and command-line workflows.

Import Rocky Linux into WSL
Prerequisites
-
Windows 10 (version 2004+) or Windows 11
WSL 2 installed and set as default -
Administrator access
Verify WSL is installed and using version 2:
wsl --status
If needed, enable WSL:
wsl --install
Step 1: Download the Rocky Linux Root Filesystem
- Download the official Rocky Linux container/rootfs image (tar.xz) from an official Rocky Linux or OCI source.
- Extract the archive if required:
tar -xf rocky-*.tar.xz
Always use official images to ensure security and compatibility.
Step 2: Create a Directory for the WSL Distribution
mkdir C:\WSL\RockyLinux
This directory will store the WSL filesystem.
Step 3: Import Rocky Linux into WSL
Run the following command in PowerShell (as Administrator):
wsl --import RockyLinux C:\WSL\RockyLinux rocky-*.tar
- RockyLinux → WSL distribution name
- C:\WSL\RockyLinux → installation directory
- rocky-*.tar → Rocky Linux root filesystem archive
Step 4: Start Rocky Linux
wsl -d RockyLinux
You will be logged in as the root user by default.
Post-Installation Setup (Recommended)
1. Create a Regular User
useradd -m -G wheel User
passwd passwd
2. Set the user as default:
wsl --set-default-user User
3. Update the System
dnf update -y
4. Enable Systemd (WSL 2)
Rocky Linux supports systemd under WSL 2.
Edit /etc/wsl.conf:
cat <
[boot]
systemd=true
EOF
Then restart WSL:
wsl --shutdown
Notes and Limitations
- No graphical desktop by default (use WSLg on Windows 11 if needed)
- No direct access to hardware boot features
- Ideal for:
- Development
- Automation
- Package testing
- CLI-based workloads
Troubleshooting Common Installation Issues
Even with a straightforward installer like Anaconda, installation issues can occur due to firmware settings, virtualization configuration, or network defaults. The following are the most common problems encountered when installing Rocky Linux and how to resolve them.
Frequent Problems and Solutions
1. USB Does Not Boot
Possible causes:
- Mismatch between UEFI and BIOS boot modes
- Secure Boot blocking unsigned media
- Improperly written USB image
Solutions:
- Verify whether the system is using UEFI or Legacy BIOS, and boot the USB in the same mode
- Disable Secure Boot temporarily in firmware settings
- Recreate the USB using a reliable method (dd, Fedora Media Writer, or Balena Etcher)
- Try a different USB port or drive (preferably USB 2.0 for older systems)
2. Virtual Machine Cannot Detect the ISO
Possible causes:
- ISO not attached to the virtual optical drive
- Incorrect guest OS type selected
- Corrupted or incomplete ISO download
Solutions:
- Power off the VM and re-attach the ISO to the virtual CD/DVD device
- Ensure the guest OS is set to Red Hat (64-bit) or RHEL 9
- Re-verify the ISO checksum (SHA256) to confirm integrity
- Confirm the VM firmware (BIOS vs UEFI) matches the ISO boot mode
3. No Network After Installation
Possible causes:
- Network interface disabled by default
- Missing or inactive NetworkManager configuration
- Incorrect network mode in VM (NAT / Bridged)
Solutions:
- Enable the network interface:
nmcli device status
nmcli device connect eth0 - Ensure NetworkManager is running
systemctl status NetworkManager - For VMs:
- Verify the adapter is set to NAT or Bridged
- Reboot the VM after changing network settings
- For bare metal:
Check cable or NIC detection with:ip a
Additional Tips
- Always use official Rocky Linux images
- Keep firmware and hypervisor versions up to date
- Review installer logs (/tmp/anaconda.log) if installation fails
- Use the Minimal ISO for servers to reduce complexity
Installation Method Comparison Table
|
Method |
Versions Supported |
Best Use Case |
Difficulty |
|
USB |
8.10 / 9.6 / 10 |
Physical servers |
Medium |
|
VMware |
8.10 / 9.6 / 10 |
Production & labs |
Easy |
|
VirtualBox |
8.10 / 9.6 / 10 |
Local testing |
Easy |
|
WSL |
9 / 10 |
Development |
Very Easy |
Final Thoughts & Recommendation
You now have a complete, professional understanding of how to install Rocky Linux 10, 9.6, and 8.10 across multiple environments, including bootable USB (bare metal), VMware, VirtualBox, and WSL. This flexibility makes Rocky Linux a powerful choice for both learning and production use. With its long-term support, strong security defaults, and full RHEL compatibility, Rocky Linux delivers true enterprise reliability without enterprise licensing costs.
For users who want to skip manual installation and infrastructure management, deploying a Rocky Linux VPS from MonoVm is an excellent alternative. With instant provisioning, global data centers, 24/7 expert support, and cost-effective pricing, MonoVm allows you to run Rocky Linux in production within minutes—no setup complexity, no maintenance overhead.
Whether you’re building a development lab, running mission-critical workloads, or scaling cloud infrastructure, Rocky Linux provides the stability and performance you can rely on.
Build faster. Deploy smarter. Run Rocky Linux the right way.

An experienced tech and developer blog writer, specializing in VPS hosting and server technologies. Fueled by a passion for innovation, I break down complex technical concepts into digestible content, simplifying tech for everyone.