List of content you will read in this article:
If the operating system on your Virtual Private Server (VPS) doesn’t meet your requirements, changing it is an easy and straightforward process. You don’t need to be an IT expert to change the operating system in VPS; with the right guidance, you can do it in just a few steps. Whether you want to switch from Linux to Windows 10, install Windows on your Linux VPS, or change the OS on a macOS VPS, this guide will walk you through the entire process.
Why Change the Operating System in VPS?
There are several reasons you may want to change the operating system in VPS:
- Compatibility Issues: Some software applications are better supported on specific operating systems.
- Improved Performance: A different OS might provide better performance for your specific use case.
- Security Concerns: Updating or switching to a more secure OS version can help protect your data and applications.
- Personal Preference: You may simply prefer the interface and tools available on another operating system.
Step-by-Step Guide to Change the Operating System in VPS
Step 1: Create a Backup of Your Data
Before making any changes to your VPS, it is crucial to back up your important files and data. The OS change process might lead to data loss, so it's better to be safe. Most VPS providers offer backup tools in their control panel, so make sure you create a full backup of your server data before proceeding.
Step 2: Log In to the VPS Control Panel
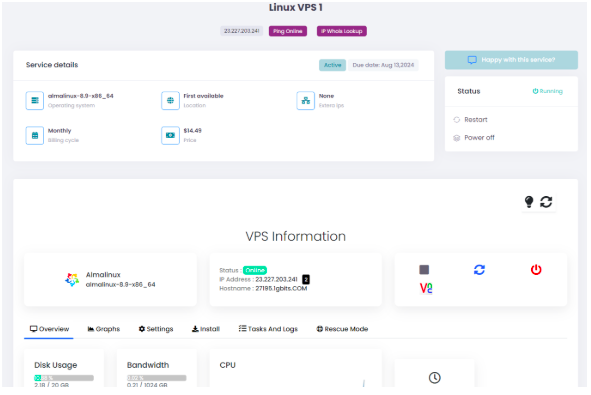
Once you’ve backed up your data, log in to your VPS control panel. This is where you’ll manage your server and initiate the operating system change process. Most VPS providers offer an easy-to-use interface for managing various server settings.

Step 3: Initiate the OS Change Process
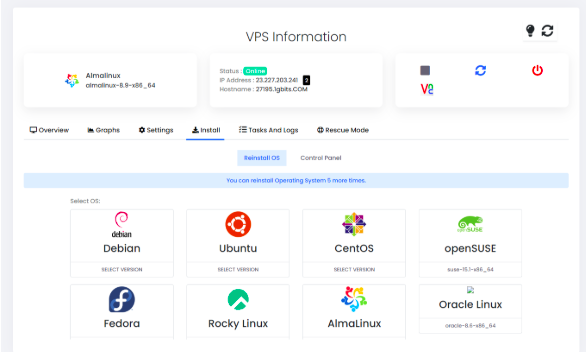
In the VPS control panel, look for the "Reinstall" or "Change OS" option. This is where you can begin the process of changing the operating system. Depending on your VPS provider, this option may be under the "Server Management" or "Operating System" section.

Step 4: Choose Your Preferred Operating System
You will now be presented with a variety of operating systems to choose from. Popular options include:
- Linux Distributions: Ubuntu, CentOS, Debian, Fedora, and more.
- Windows Versions: Windows 10, Windows Server 2019, etc.
- Others: Some providers may offer additional options, such as FreeBSD or macOS.
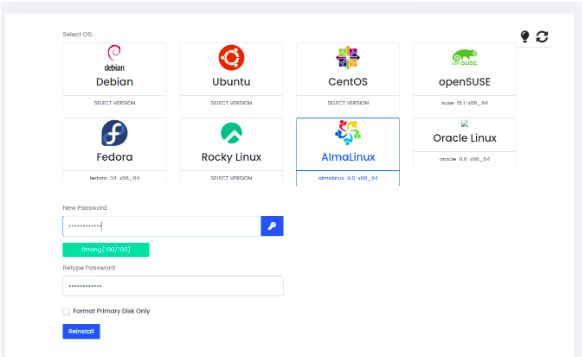
Choose the operating system that best suits your needs. Make sure to select the version that aligns with the applications and features you need.

Step 5: Confirm the Changes
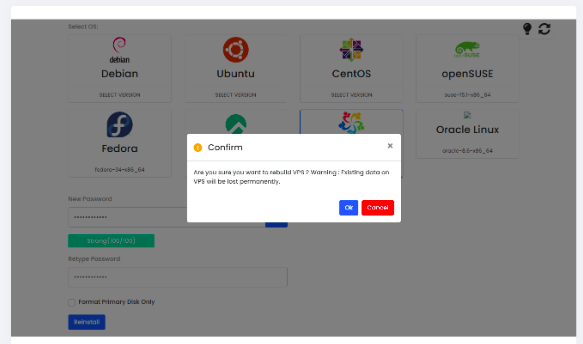
Before the system is reinstalled, you’ll need to confirm the changes. Double-check your selection to ensure that you’ve chosen the correct operating system and that everything is backed up. Once you’re sure, confirm the process to begin the installation.

Step 6: Set Up the New OS
The new operating system will begin installing on your VPS. The process may take some time, depending on the OS and your VPS provider. Once the installation is complete, you will be provided with the necessary instructions to access your VPS control panel on the new OS.
Tips for a Smooth VPS OS Change
- Check Compatibility: Ensure that your software or applications are compatible with the new OS version.
- Research Your VPS Provider’s Support Options: Some providers offer dedicated support during the OS change process, which can be helpful if you encounter any issues.
- Consider Server Resources: Different operating systems have varying resource requirements. Make sure your VPS has the necessary CPU, RAM, and disk space to run the new OS smoothly.
- Keep Your Backup Safe: After the installation, keep your backup files secure until you’re confident that your new operating system is set up correctly.
Troubleshooting Common Issues During OS Change
- Server Not Booting After OS Change: This could be due to an incomplete installation. Ensure that you follow the VPS provider’s reboot instructions carefully.
- Software Compatibility Issues: If certain software doesn’t work on the new OS, check for alternative software or compatibility layers.
- Missing Drivers or Tools: Some operating systems, particularly Windows, may require additional drivers or tools to function correctly on your VPS. Consult your VPS provider for guidance.
Conclusion
Changing the operating system in VPS is a simple process that can be done without advanced technical knowledge. By following these easy steps and considering the additional tips provided, you can ensure a smooth transition to your preferred operating system. Whether you're switching from Linux to Windows or installing a completely different OS, always remember to back up your data and choose the operating system that best fits your needs.
