List of content you will read in this article:
Secure Shel is built into Linux OS as the default method of carrying out remote server management, however, until recently, Microsoft’s proprietary Remote Desktop software was the only option for Windows (i.e., without installing third-party software). Luckily, with the release of Windows 10 and Windows Server 2019, the developers have mercifully added one more first-party choice.
OpenSSH is the recent addition that allows you to remotely control your server without installing any third-party applications on either of the devices. As you might have guessed from the name, it uses Secure Shell in order to establish the connection, and today we will show you how to install OpenSSH Client on Windows 10 systems and OpenSSH Server on Windows Server 2019. But first, let us delve into what OpenSSH is.
What is OpenSSH?
OpenSSH is the open-source version of the Secure Shell (SSH) tools used by administrators of Linux and other non-Windows for cross-platform management of remote systems. OpenSSH has been added to Windows as of autumn 2018 and is included in Windows 10 and Windows Server 2019.
OpenSSH in Windows 10 comes with two different versions, called OpenSSH Client and OpenSSH Server. OpenSSH Client only has the ability to communicate with Windows SSH and is available to users through the CMD and PowerShell environment.
How to Install OpenSSH Client
To install OpenSSH Client, follow these very simple steps:
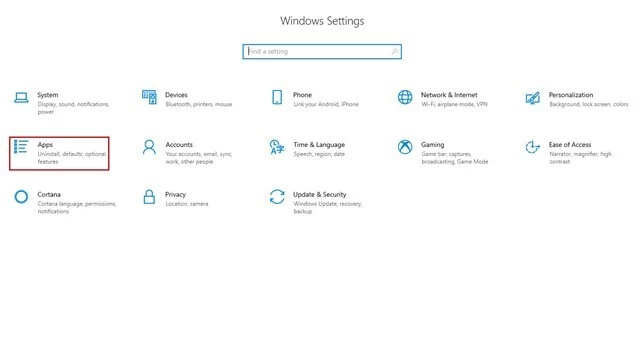
Step 1: Open Windows 10 settings and click on Apps.
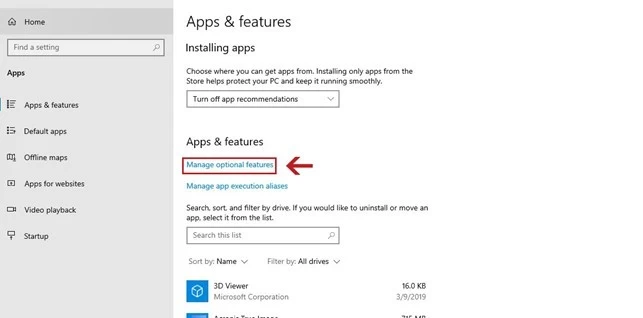
Step 2: On the newly-opened page, you will see all of the installed applications on Windows. Click on Manage optional features.

Step 3: Then, click on Add a feature to viewing all of the features which you can install on your Windows.

Step 4: In the feature list, find OpenSSH Client and click on it, then click on Install.

Step 5: Wait for the installation step to be completed. After finishing the OpenSSH Client installation, restart your PC to finish up.

How to Install OpenSSH Server
The steps for OpenSSH Server installation are very similar to OpenSSH Client. Here’s what you should do:
Step 1: Open Windows settings and click on Apps.

Step 2: On the newly-opened page, you will see all of the installed applications on Windows. Click on Manage optional features.
Step 3: Then, click on Add a feature to viewing all of the features which you can install on your Windows.

Step 4: In the feature list, find OpenSSH Server and click on it, then click on Install.
Step 5: After the OpenSSH Server installation is complete, restart your server to finalize the process.
Conclusion
There are many trustworthy third-party clients out there, however, thanks to OpenSSH it is now possible to do so without the hassle of installing them. While RDP is still the most convenient option for establishing Windows-to-Windows connections, Secure Shell is the best tool for cross-platform remote server management.
We hope that with the help of the detailed tutorials outlined within this blog, you were able to successfully install OpenSSH Client and Server versions on your respective systems. If you have any questions or suggestions, please leave them in the comment section below.